Potentially you are already used to Ansible, if so, just skip the introduction in this article.
Installing Ansible
Ansible is a huge and powerful tool set to automate activities – there a so many options. Ansible follows an approach they call „batteries included“ – means – all the modules and tools are always part of the distribution. And this includes as well the Cisco ACI automation capabilities.
If you look around – tutorials are available – from both the ansible team as well from other contributors.
This tutorial gives a nice start into your ansible journey. https://linuxhint.com/ansible-tutorial-beginners/
Installation on a linux box is quite simple (a „no-brainer“ as it has been called from a colleague many years ago). For CentOS/RedHat it is just a
# yum install ansible
# ansible --version
ansible 2.9.10
  config file = /etc/ansible/ansible.cfg
  configured module search path = [u'/root/.ansible/plugins/modules', u'/usr/share/ansible/plugins/modules']
  ansible python module location = /usr/lib/python2.7/site-packages/ansible
  executable location = /usr/bin/ansible
  python version = 2.7.5 (default, Apr  2 2020, 13:16:51) [GCC 4.8.5 20150623 (Red Hat 4.8.5-39)]
As you can see, config file location (for CentOS) is /etc/ansible.cfg.
Please install as well two tools:
- yamllint
- ansible-lint
as the yaml syntax is quite picky especially regarding indentitation.
Ansible hosts
Another important file is stored in /etc/ansible as well, the hosts file.
Let us create a simple entry there:
# This is the default ansible 'hosts' file.
#
# It should live in /etc/ansible/hosts
#
#   - Comments begin with the '#' character
#   - Blank lines are ignored
#   - Groups of hosts are delimited by [header] elements
#   - You can enter hostnames or ip addresses
#   - A hostname/ip can be a member of multiple groups

# APIC host

[APIC]
192.168.140.40 ansible_user=ansible ansible_connection=local
Next step is to create a user ansible within the fabric.
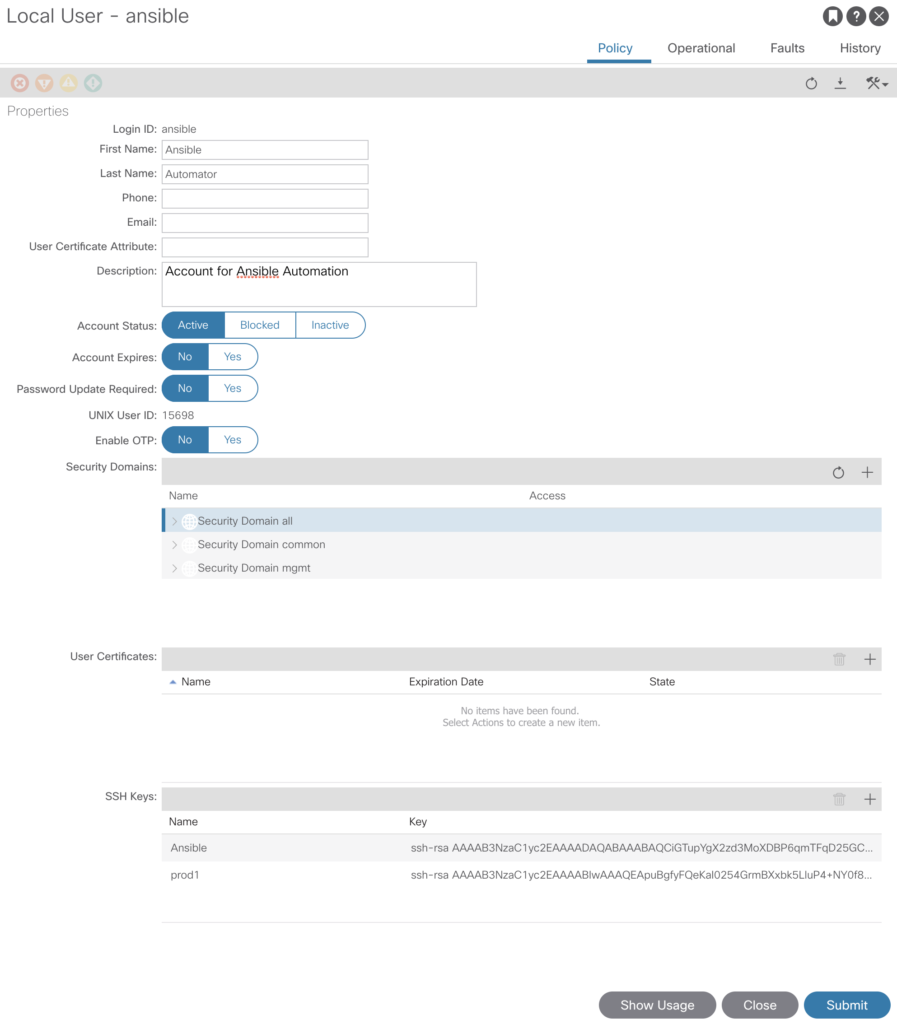
Create Ansible User
As we’ve already done – go to -> Admin -> AAA -> Users and create a new local user. Add your public key from the box you are running ansible from and store it in the SSH Keys section.
Quick check, if we are now able to connect to the box.
# ansible APIC -m ping
192.168.140.40 | SUCCESS => {
    "ansible_facts": {
        "discovered_interpreter_python": "/usr/bin/python"
    },
    "changed": false,
    "ping": "pong"
}
This shows – access via ssh is possible for ansible.
Ansible .yml File
But we want to use the API – and this is really simple.
Just create a file named tenant.yml with this content:
---
- name: ACI Tenant Management
  hosts: APIC
  connection: local
  gather_facts: no
  tasks:
  - name: CONFIGURE TENANT
    aci_tenant:
      host: '{{ inventory_hostname }}'
      user: ansible
      password: SecretSecretOhSoSecret
      validate_certs: false
      tenant: "Beaker"
      description: "Beaker created Using Ansible"
      state: present
...
and run this via the command line:
# ansible-playbook tenant.yml

PLAY [ACI Tenant Management] *********************************************************************************************************************************************************************************************

TASK [CONFIGURE TENANT] **************************************************************************************************************************************************************************************************
changed: [192.168.140.40]

PLAY RECAP ***************************************************************************************************************************************************************************************************************
192.168.140.40             : ok=1    changed=1    unreachable=0    failed=0    skipped=0    rescued=0    ignored=0
Have a look on your APIC console:

Using private keys
One last step – I’m not a big fan of storing plain passwords – starting with Ansible 2.5 it is possible to use private keys to authenticate. This requires some additional steps.
First you have to create a private key and a .crt file (to be used on APIC AAA).
# openssl req -new -newkey rsa:1024 -days 36500 -nodes -x509 -keyout ansible.key -out ansible.crt -subj '/CN=ansible/O=proGIS/C=DE'
Generating a 1024 bit RSA private key
...................................................................++++++
....++++++
writing new private key to 'ansible.key'
After running this command you’ll find two new files in the directory where you’ve executed the command.
- ansible.key (your private key)
- ansible.crt (the file required in APIC)
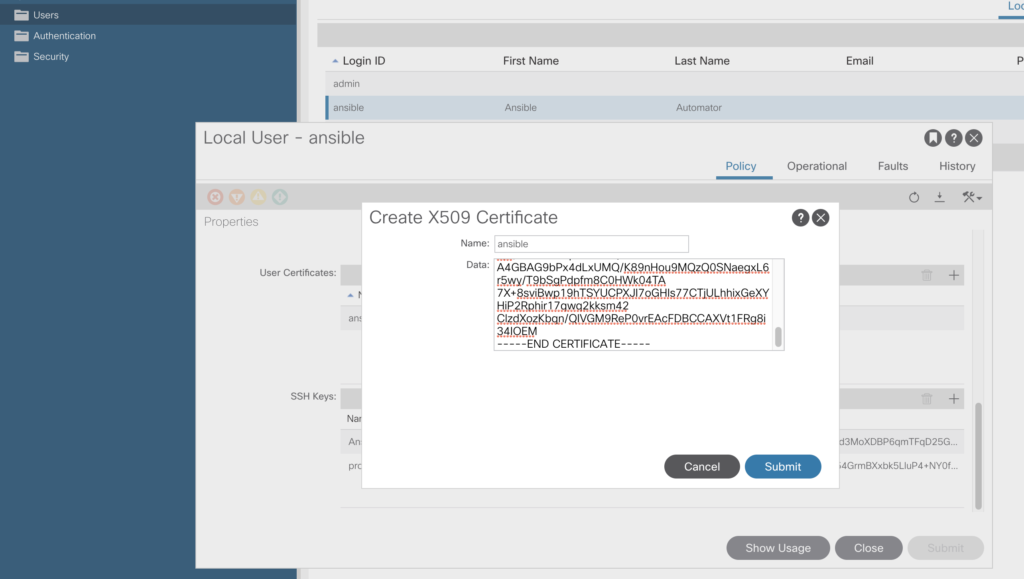
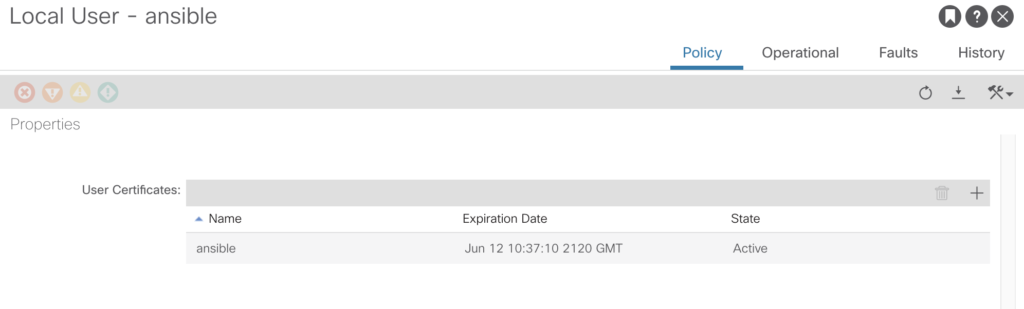
Go now to –> Admin -> AAA -> Users
and add the .crt file content in the user certificates section.
Just replace now the password entry with private_key details, the file looks like this:
---
- name: ACI Tenant Management
  hosts: APIC
  connection: local
  gather_facts: no
  tasks:
  - name: CONFIGURE TENANT
    aci_tenant:
      host: '{{ inventory_hostname }}'
      user: ansible
      private_key: /root/.pki/ansible.key
      validate_certs: false
      tenant: "Beaker"
      description: "Beaker created Using Ansible"
      state: present
...
This works! If you want to see more details about the activities behind the scene – please add -vvvv to you playbook command line.
# ansible-playbook tenant.yml -vvvv
ansible-playbook 2.9.10
  config file = /etc/ansible/ansible.cfg
  configured module search path = [u'/root/.ansible/plugins/modules', u'/usr/share/ansible/plugins/modules']
  ansible python module location = /usr/lib/python2.7/site-packages/ansible
  executable location = /usr/bin/ansible-playbook
  python version = 2.7.5 (default, Apr  2 2020, 13:16:51) [GCC 4.8.5 20150623 (Red Hat 4.8.5-39)]
Using /etc/ansible/ansible.cfg as config file
setting up inventory plugins
host_list declined parsing /etc/ansible/hosts as it did not pass its verify_file() method
script declined parsing /etc/ansible/hosts as it did not pass its verify_file() method
auto declined parsing /etc/ansible/hosts as it did not pass its verify_file() method
Parsed /etc/ansible/hosts inventory source with ini plugin
Loading callback plugin default of type stdout, v2.0 from /usr/lib/python2.7/site-packages/ansible/plugins/callback/default.pyc

PLAYBOOK: tenant.yml *****************************************************************************************************************************************************************************************************
Positional arguments: tenant.yml
become_method: sudo
inventory: (u'/etc/ansible/hosts',)
forks: 5
tags: (u'all',)
verbosity: 4
connection: smart
timeout: 10
1 plays in tenant.yml

PLAY [ACI Tenant Management] *********************************************************************************************************************************************************************************************
META: ran handlers

TASK [CONFIGURE TENANT] **************************************************************************************************************************************************************************************************
task path: /root/nxos/tenant.yml:7
<192.168.140.40> ESTABLISH LOCAL CONNECTION FOR USER: root
<192.168.140.40> EXEC /bin/sh -c 'echo ~root && sleep 0'
<192.168.140.40> EXEC /bin/sh -c '( umask 77 && mkdir -p "` echo /root/.ansible/tmp `"&& mkdir /root/.ansible/tmp/ansible-tmp-1594034388.72-15831-57970545921562 && echo ansible-tmp-1594034388.72-15831-57970545921562="` echo /root/.ansible/tmp/ansible-tmp-1594034388.72-15831-57970545921562 `" ) && sleep 0'
<192.168.140.40> Attempting python interpreter discovery
<192.168.140.40> EXEC /bin/sh -c 'echo PLATFORM; uname; echo FOUND; command -v '"'"'/usr/bin/python'"'"'; command -v '"'"'python3.7'"'"'; command -v '"'"'python3.6'"'"'; command -v '"'"'python3.5'"'"'; command -v '"'"'python2.7'"'"'; command -v '"'"'python2.6'"'"'; command -v '"'"'/usr/libexec/platform-python'"'"'; command -v '"'"'/usr/bin/python3'"'"'; command -v '"'"'python'"'"'; echo ENDFOUND && sleep 0'
<192.168.140.40> EXEC /bin/sh -c '/usr/bin/python && sleep 0'
Using module file /usr/lib/python2.7/site-packages/ansible/modules/network/aci/aci_tenant.py
<192.168.140.40> PUT /root/.ansible/tmp/ansible-local-15822LIJPe1/tmpfW12QD TO /root/.ansible/tmp/ansible-tmp-1594034388.72-15831-57970545921562/AnsiballZ_aci_tenant.py
<192.168.140.40> EXEC /bin/sh -c 'chmod u+x /root/.ansible/tmp/ansible-tmp-1594034388.72-15831-57970545921562/ /root/.ansible/tmp/ansible-tmp-1594034388.72-15831-57970545921562/AnsiballZ_aci_tenant.py && sleep 0'
<192.168.140.40> EXEC /bin/sh -c '/usr/bin/python /root/.ansible/tmp/ansible-tmp-1594034388.72-15831-57970545921562/AnsiballZ_aci_tenant.py && sleep 0'
<192.168.140.40> EXEC /bin/sh -c 'rm -f -r /root/.ansible/tmp/ansible-tmp-1594034388.72-15831-57970545921562/ > /dev/null 2>&1 && sleep 0'
changed: [192.168.140.40] => {
    "ansible_facts": {
        "discovered_interpreter_python": "/usr/bin/python"
    },
    "changed": true,
    "current": [
        {
            "fvTenant": {
                "attributes": {
                    "annotation": "",
                    "descr": "Beaker created Using Ansible",
                    "dn": "uni/tn-Beaker",
                    "name": "Beaker",
                    "nameAlias": "",
                    "ownerKey": "",
                    "ownerTag": "",
                    "userdom": ":all:mgmt:common:"
                }
            }
        }
    ],
    "invocation": {
        "module_args": {
            "certificate_name": "ansible",
            "description": "Beaker created Using Ansible",
            "host": "192.168.140.40",
            "output_level": "normal",
            "password": null,
            "port": null,
            "private_key": "VALUE_SPECIFIED_IN_NO_LOG_PARAMETER",
            "protocol": "https",
            "state": "present",
            "tenant": "Beaker",
            "timeout": 30,
            "use_proxy": true,
            "use_ssl": true,
            "user": "ansible",
            "username": "ansible",
            "validate_certs": false
        }
    }
}
META: ran handlers
META: ran handlers

PLAY RECAP ***************************************************************************************************************************************************************************************************************
192.168.140.40             : ok=1    changed=1    unreachable=0    failed=0    skipped=0    rescued=0    ignored=0
Starting with rel. 2.8 ansible offers encryption of the private key as well. Please find more details at the bottom of this article.
https://docs.ansible.com/ansible/latest/scenario_guides/guide_aci.html#aci-guide
A one hour webinar offered by RedHat – please watch it as well:
Query the fabric
Quite simple to query the fabric.
---
- name: ACI Get Bridge Domains
  hosts: APIC
  connection: local
  gather_facts: no
  tasks:
  - name: Get Bridge Domains
    aci_rest:
      host: '{{ inventory_hostname }}'
      username: ansible
      private_key: /root/.pki/ansible.key
      validate_certs: false
      path: /api/node/class/fvBD.json
      method: get

...
Will give you
# ansible-playbook getbridge.yml -vvvv | grep dn
                    "dn": "uni/tn-common/BD-default",
                    "dn": "uni/tn-infra/BD-ave-ctrl",
                    "dn": "uni/tn-infra/BD-default",
                    "dn": "uni/tn-mgmt/BD-inb",
We’ve got now full control in both directions (read and write).