Data mining – with GNU R and a bunch of other tools

A while ago I’ve been asked to analyse a given piece of software and to bring it to life on a new platform. It was the typical sad story, no documentation, no scripts, all hard coded, no central data store (all based on excel sheets) and in the end – being fit for this single purpose – and thus I’ve recommended the customer to think of a rewrite of the entire code and to look into other options (the code was based on Python with lots of nice (but undocumented) libraries

As he asked me, if I’m able to do this, I’ve did some research on options. As I’ve used so many programming languages in the past (just make a list, and I’ll add checkmarks to the languages 🙂 ) I had a look around, which would fit best.

Some of my criterias:

  • Open Source
  • Web Based
  • Widely in use
  • Capable of database interface
  • Interpreter or compiler capable
  • OS – preferable Linux (as this is our preferred OS)
  • Web-Based IDE (Integrated Development Environment)
  • Integration into GIT possible
  • Possible to integrate into automated deployment software
  • Modular concept, especially for graphic libraries
  • list not complete – we’ll see later

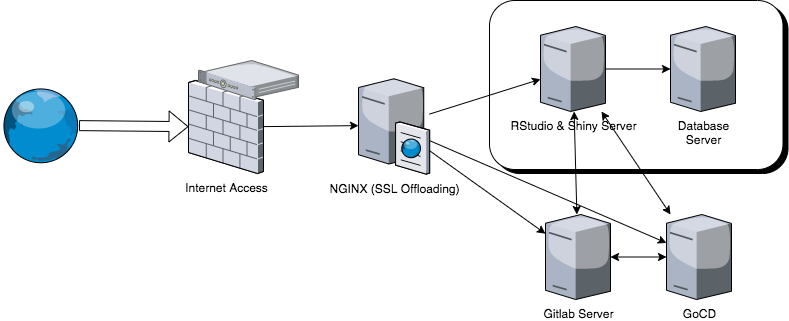
As Open Source heavily depends on sharing back, I’ve decided to show the interested crowd how I’ve build up my entire development stack, some examples to get this all running. And I’m happy, if that way others will get into this fantastic solution without the additional efforts to find out, how to build up. So – this series of articles will show you:

  • Required infrastructure
  • Configuration of all components
  • some examples

Feedback and comments are greatly appreciated!

When searching the net (by using my preferred search engine provider https://swisscows.ch) I’ve found various solutions, including the very impressive Tableau or similar solutions offered by e.g. Microsoft. But those got out of the game, no open source and quite expensive depending on your requirements.

That way I’ve found

GNU R

To get a first impression of the language capabilities – have a look here:

https://cran.r-project.org/doc/manuals/r-release/R-intro.html

available as PDF as well:

https://cran.r-project.org/doc/manuals/R-intro.pdf

By the way – GNU R is being integrated into Oracle’s data mining suite as well – interesting to read this PDF with a comprehensive overview

https://www.oracle.com/assets/media/oraclertechnologies-2188877.pdf

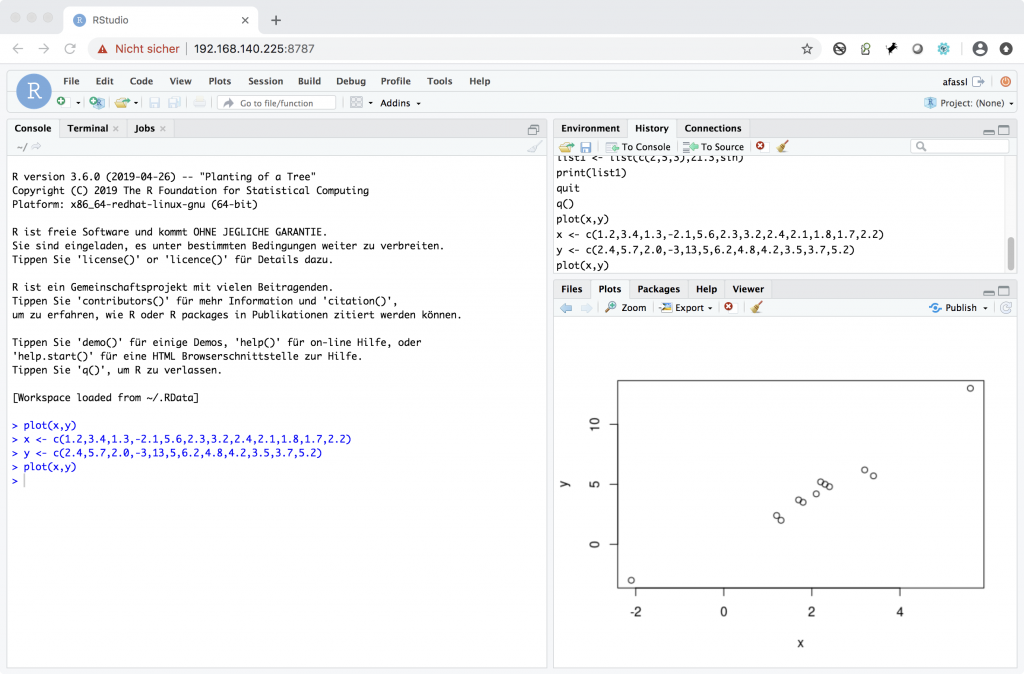
First attempts to use this for my project have been quite promising, but I’d like to have an environment, which is running via a web based interface.
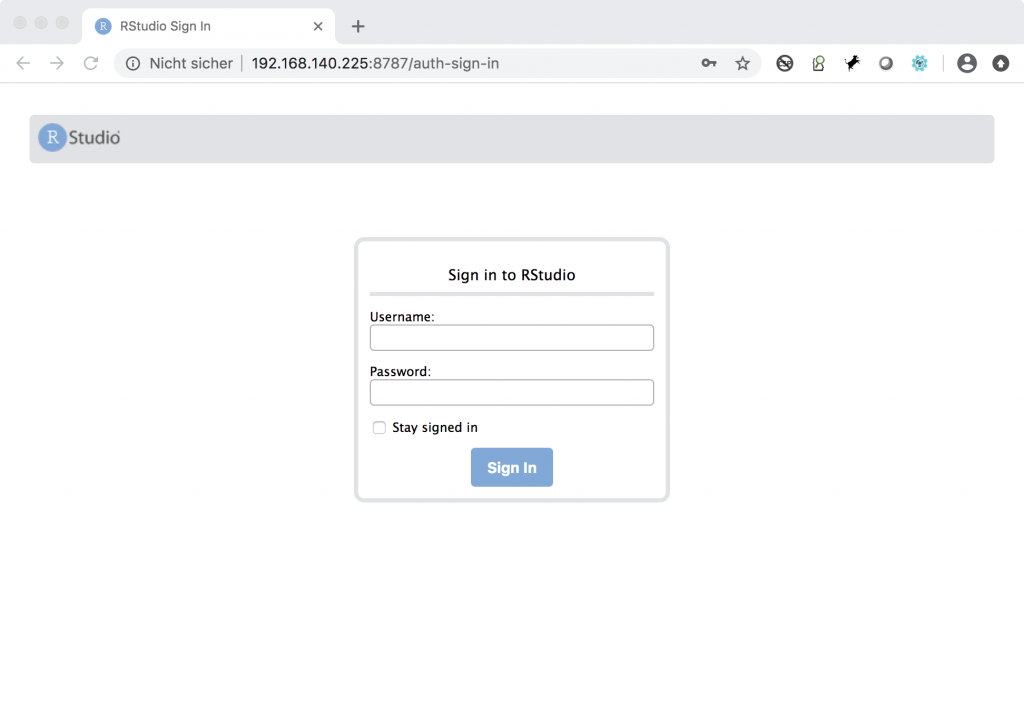
RStudio

(being available in both OpenSource as well as subscription model) is another important piece.

https://rstudio.com/products/rstudio/#rstudio-server

But now – let’s start with the first part – installation of GNU R.

GNU R – Installation and First Steps

You will notice during all my installations, I’m preferring a Linux distribution – CentOS. All the configuration can be done on all those other ones, it is just historical, that I’m quite used CentOS. I’m aware of all the Pros and Cons – it depends on your personal preference, shouldn’t be a big deal to configure this on Debian, Ubuntu, SuSe, and all those others. in most cases it is just done by replacing yum by the package manager commands of the distribution of your choice.

In ancient times software installation was time consuming, maybe some of you are recalling those „configure; make; make install“ sequences – finding out – some library is missing, some include file as well. Took eventually days to get a simple piece of software up and running – gave you a very detailed insight how all of this is working – but the price – your time. With the actual package based distributions those installations can be done in minutes – literally.

Some words on the general design. We’ll build during this series of articles:

  • The nginx layer to take care of SSL offloading, and the forwarding to involved systems
  • RStudio and Shiny (we’ll come later to this one)
  • Database setup (based on MariaDB)
  • gitlab server
  • GoCD

I’ve got a quite large ESXi server, where I’m running all those instances as dedicated containers. All of this could be done on one single box, but I like to separate those. Especially as I’ve had some experience when e.g. the update requirements for one system conflicts with the another one. As CentOS is free, and you only need round about 8 GB per instance plus some storage – it is not a big deal to separate that.

Ok – on a standard installed CentOS we’ll start with the first step.

Install GNU R

As this is part of the standard CentOS distribution – this is a no-brainer.

By using the magic command

# yum install R

CentOS will start to check for all the required packages – don’t be surprised, it it ends up with over 50 packages consisting of several hundred megabytes – GNU R is huge, and requires a lot of add packages (remember my comment on the „configure; make; make install“ cycles 🙂 )

Depending on internet access and the performance of your system this will take a while.

After completion of the installation cycle, just enter the simple command „R“.

# R

R version 3.6.0 (2019-04-26) -- "Planting of a Tree"
Copyright (C) 2019 The R Foundation for Statistical Computing
Platform: x86_64-redhat-linux-gnu (64-bit)

As always – please create a non-privileged user to develop your code. It is alluring to use the root user – we all know.

At this stage you can do some testing and fiddling around, but a pure text based interface is .. kind of boring with the sixties feeling of a terminal interface.

There are quite a lot of tutorials (should be replace by „huge amount“ or „incredible amount“) available – the R primer is a good example, but if you enter „R tutorial“ or „R examples“ – you’ll get a lot of results.

This site (sponsored by lots of ad links) gives a good introduction (I’m not affiliated with them) – but there are many, many others. And – always a good idea – just buy some books on R coding.

https://www.tutorialspoint.com/r/index.htm

But we shouldn’t spend too much time on the text interface – next step – RStudio – this will make your life as R coder much, much easier.

RStudio – the perfect R IDE

RStudio installation isn’t a big deal as well, some few commands and configuration steps – can be done in couple of minutes.

First login as root user on the box you’ve prepared to run the rstudio server.

Please check, if you’ve enabled as well the epel (extra packages for enterprise linux).

# yum install epel-release

After this step please download via wget the latest rstudio-package from this location.

https://rstudio.com/products/rstudio/download-server/

At time of this writing the latest package will be downloaded by:

# wget https://download2.rstudio.org/server/centos6/x86_64/rstudio-server-rhel-1.2.5042-x86_64.rpm

and after this a

# yum install rstudio-server-rhel-1.2.5042-x86_64.rpm 

will install all required parts on your system.

Please don’t forget to issue a

# systemctl enable rstudio-server

By this command the rstudio-server will come up after a reboot automatically.

And now – the big moment – you are able to access rstudio on port 8787 on your server.

Which user ? Quite simple – the user you’ve just created to run R. If you haven’t done so far:


# adduser myrstudio
# passwd myrstudio

Using your credential you will know be presented the RStudio interface.


I’ve entered some test lines in the text console – they are captured in the session log, and now you are able to see the output as well of the plot command.

On RStudio there are as well so many information resources available.

As I’ve configured my Rstudio system in a private IP network range, I’ve configured on our internet facing nginx instance a https forwarding.

Quite simple as well (nginx is configured in a couple of minutes).

nginx as SSL offloader

If you plan to use Rstudio outside of your internal network (or even from an external hosted server) it is best to use nginx as a proxy, and even better by implementing valid certificates.

To configure nginx there are some good tutorials online available – this one

https://www.digitalocean.com/community/tutorials/how-to-secure-nginx-with-let-s-encrypt-on-centos-7

describes pretty well what has to be done. letsencrypt is delivering trusted certificates – they have to be renewed every three months, but this can be automated (described in the article above as well).

If you follow the steps above, request and implementation of a SSL protected setup for your rstudio setup (and later one shiny) is quite simple.

# certbot certonly --standalone --preferred-challenges http --http-01-port 8080 -d rstudio.7o9.de
Saving debug log to /var/log/letsencrypt/letsencrypt.log

Plugins selected: Authenticator standalone, Installer None

Starting new HTTPS connection (1): acme-v02.api.letsencrypt.org

Obtaining a new certificate

Performing the following challenges:

http-01 challenge for rstudio.7o9.de

Waiting for verification...

Cleaning up challenges

IMPORTANT NOTES:

 - Congratulations! Your certificate and chain have been saved at:
/etc/letsencrypt/live/rstudio.7o9.de/fullchain.pem

As we’ve got now our certificates, we are ready to configure the SSL setup for our rstudio access.

########### SSL config for rstudio.7o9.de                                                                                                                                                                     

server {

# SSL only                                                                                                                                                                                                    

    listen       443 ssl http2;

    server_name  rstudio.7o9.de;

# Location of letsencrypt certificates                                                                                                                                                                        

        ssl_certificate /etc/letsencrypt/live/rstudio.7o9.de/fullchain.pem;

        ssl_certificate_key /etc/letsencrypt/live/rstudio.7o9.de/privkey.pem;

# Optimized SSL session cache                                                                                                                                                                                 

#    ssl_session_cache shared:SSL:40m;                                                                                                                                                                        

#    ssl_session_timeout  4h;                                                                                                                                                                                 

# Enable session tickets (as an alternative to ssl session cache)                                                                                                                                             

  ssl_session_tickets on;

# Only support the latest SSL protocol                                                                                                                                                                        

    ssl_protocols  TLSv1 TLSV1.1 TLSv1.2;

# Strict Transport security                                                                                                                                                                                   

    add_header Strict-Transport-Security "max-age=31536000; preload" always;

# Supported SSL ciphers                                                                                                                                                                                       

    ssl_ciphers ECDH+AESGCM:ECDH+AES256:ECDH+AES128:DH+3DES:!ADH:!AECDH:!MD5;

# OCSP stapling                                                                                                                                                                                               

ssl_stapling on;

ssl_stapling_verify on;

ssl_trusted_certificate /etc/nginx/certs/lets-encrypt-x3-cross-signed.pem;

    ssl_prefer_server_ciphers   on;

# Forward to rstudio host                                                                                                                                                                                     

    location / {

                       proxy_pass http://192.168.140.225:8787;

            proxy_set_header X-Real-IP  $remote_addr;

            proxy_set_header X-Forwarded-For $proxy_add_x_forwarded_for;

            proxy_set_header X-Forwarded-Proto https;

            proxy_set_header X-Forwarded-Port 443;

            proxy_set_header Host $host;

# Required to enable upload of larger files                                                                                                                                                                   

            client_max_body_size 128m;

# for  web socket support                                                                                                                                                                                     

            proxy_redirect http://localhost:8787/ $scheme://$host/;

            proxy_http_version 1.1;

            proxy_set_header Upgrade $http_upgrade;

            proxy_read_timeout 20d;

            proxy_buffering off;

    }

}

########## end of rstudio.7o9.de config  

To check if your setup is fine, just enter your URL here:

https://www.ssllabs.com/ssltest/analyze.html?d=rstudio.7o9.de

Yeah – Grade A+ – that’s nice.

and Chrome and all others are happy as well.

Again – don’t use easy to guess passwords for your rstudio account. Part of the rstudio is a fully web based console – all the ubiquitous password crawlers are more than happy to find another „test/test“ login. And they will crawl your site for sure. 100% guaranteed!