In the previous articles we’ve had a look into various aspects to access the Fabric, to configure based on small examples. In this article we’ll go through a complete build. For a very deep understanding on how ACI is working I highly recommend to watch Dave Lunde’s training videos. After watching his training series you’ll get an idea how powerful the ACI concept is.
His full training series is available here
– consisting of 40 units – hours of most valuable information. If interested in UCS – he is offering a course as well.
Creating a tenant
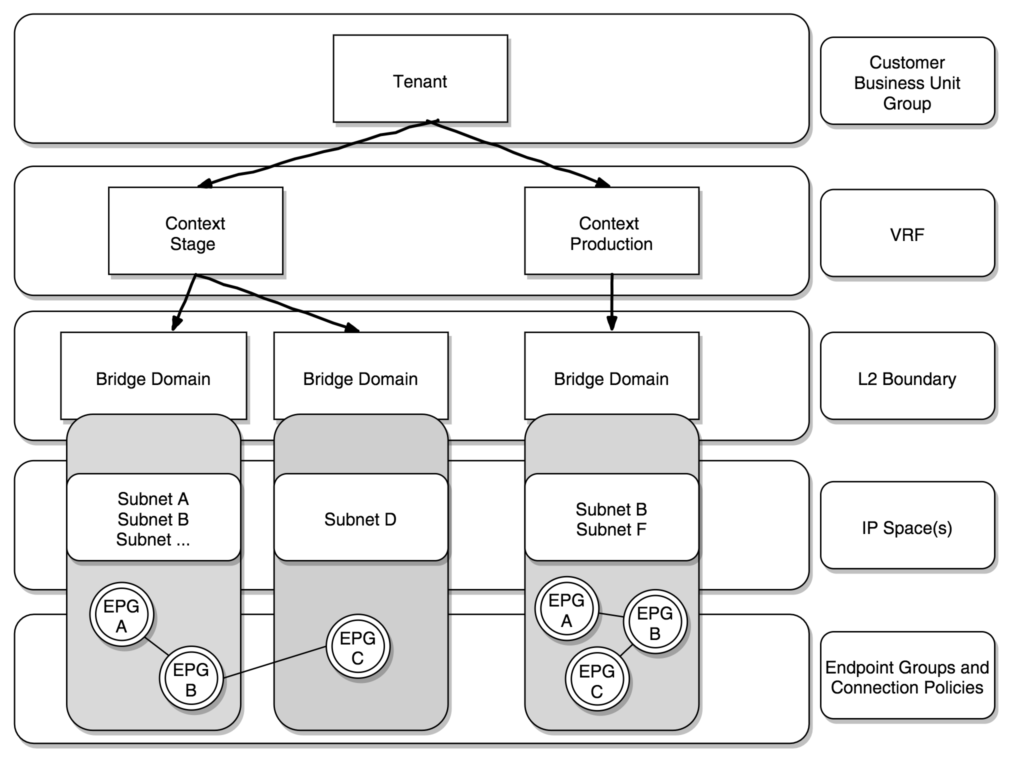
A tenant is more or less representing a logical representation – a company, a branch or whatever you want use to separate your fabric consumers.
The logical binding overview
ACI classifies three types of endpoints:
- Physical endpoints
- Virtual endpoints
- External endpoints
We’ve done this in the previous articles with various approaches, but for our initial build we’ll use the ansible way.
Reference to the ansible module:
https://docs.ansible.com/ansible/latest/modules/aci_tenant_module.html
Ansible Code:
---
- name: ACI Tenant Management
  hosts: APIC
  connection: local
  gather_facts: no
  tasks:
  - name: CONFIGURE TENANT
    aci_tenant:
      host: '{{ inventory_hostname }}'
      user: ansible
      private_key: /root/.pki/ansible.key
      validate_certs: false
      tenant: "MyCompany"
      description: "Tenant created by Ansible"
      state: present
...
By the way – if you want to remove that definition – you can either delete via the GUI or – much easier – just replace the „state: present“ with „state: absent“ and run the playbook again.
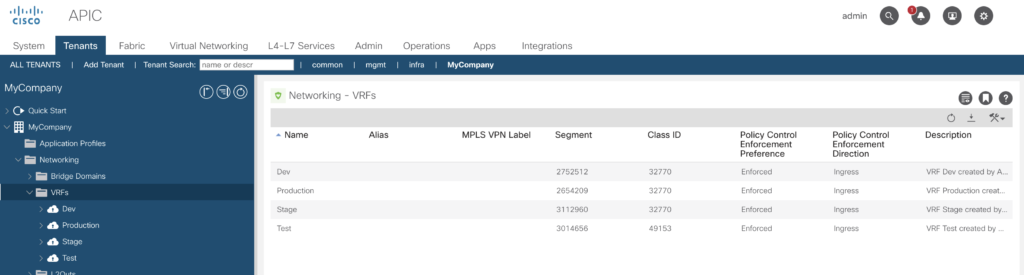
Creating the context (VRF)
Within a tenant you are able to create one or more VRFs (context). Many shops do split dev/test/stage and production. If you want to implement this, the initial ansible script will be:
---
- name: ACI VRF context
  hosts: APIC
  connection: local
  gather_facts: no
  tasks:
  - name: CONFIGURE VRF Prod
    aci_vrf:
      host: '{{ inventory_hostname }}'
      user: ansible
      private_key: /root/.pki/ansible.key
      validate_certs: false
      tenant: "MyCompany"
      vrf: "Production"
      description: "VRF Production created by Ansible"
      state: present

  - name: CONFIGURE VRF Stage
    aci_vrf:
      host: '{{ inventory_hostname }}'
      user: ansible
      private_key: /root/.pki/ansible.key
      validate_certs: false
      tenant: "MyCompany"
      vrf: "Stage"
      description: "VRF Stage created by Ansible"
      state: present

  - name: CONFIGURE VRF Test
    aci_vrf:
      host: '{{ inventory_hostname }}'
      user: ansible
      private_key: /root/.pki/ansible.key
      validate_certs: false
      tenant: "MyCompany"
      vrf: "Test"
      description: "VRF Test created by Ansible"
      state: present

  - name: CONFIGURE VRF Prod
    aci_vrf:
      host: '{{ inventory_hostname }}'
      user: ansible
      private_key: /root/.pki/ansible.key
      validate_certs: false
      tenant: "MyCompany"
      vrf: "Dev"
      description: "VRF Dev created by Ansible"
      state: present

...
Running the playbook:
# ansible-playbook vrf.yml

PLAY [ACI VRF context] ****************************************************************************************

TASK [CONFIGURE VRF Prod] *************************************************************************************
changed: [192.168.140.40]

TASK [CONFIGURE VRF Stage] ************************************************************************************
changed: [192.168.140.40]

TASK [CONFIGURE VRF Test] *************************************************************************************
changed: [192.168.140.40]

TASK [CONFIGURE VRF Prod] *************************************************************************************
changed: [192.168.140.40]

PLAY RECAP ****************************************************************************************************
192.168.140.40             : ok=4    changed=4    unreachable=0    failed=0    skipped=0    rescued=0    ignored=0
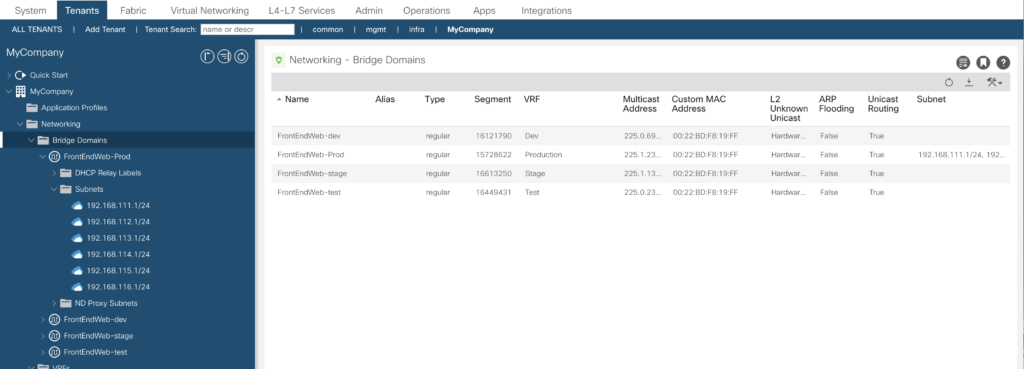
Quick check via the GUI – all there.
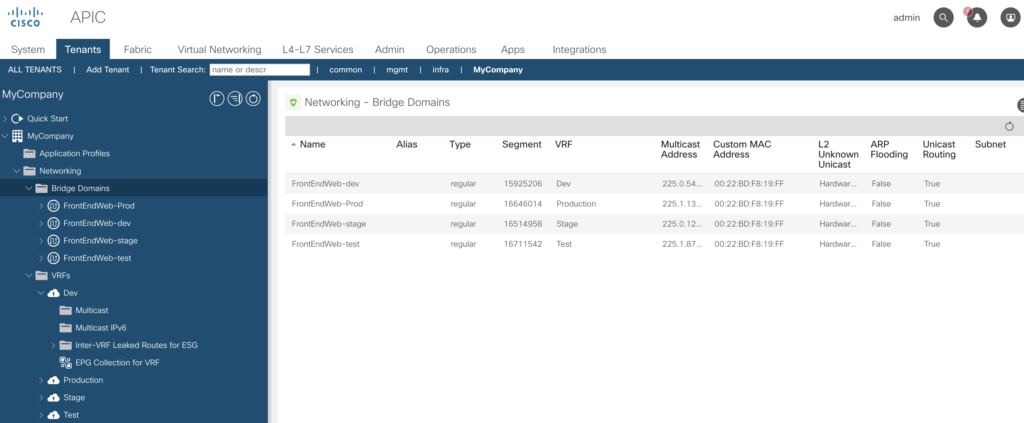
Creating Bridge Domains
Beneath the VRF context the bridge domains (BD) are placed, to simplify – those are containers for subnets.
It is possible to use the same subnets within different bridge domains – e.g. you’ve got a server, which has been tested in your VRF test context, you’ll move it over to the stage context without the requirement to change the network configuration on that server.
To create a bridge domain there is another ansible aci module available.
https://docs.ansible.com/ansible/latest/modules/aci_bd_module.html#aci-bd-module
and to create subnets within the BD this module should be used.
https://docs.ansible.com/ansible/latest/modules/aci_bd_subnet_module.html#aci-bd-subnet-module
Let us now create a series of bridge domain by ansible (please note – I’ve introduced a variable (whattodo) – that way it is much easier to do test runs.
With whattodo set to „present“ – create it, set to „absent“ delete it.
---
- name: ACI Bridge Domain
  hosts: APIC
  connection: local
  gather_facts: no
  vars:
      whattodo:	present
  tasks:
  - name: CONFIGURE BD FE Web
    aci_bd:
      host: '{{ inventory_hostname }}'
      user: ansible
      private_key: /root/.pki/ansible.key
      validate_certs: false
      tenant: "MyCompany"
      bd: FrontEndWeb-dev
      vrf: Dev
      description: "BridgeDomain created by Ansible"
      state: '{{ whattodo }}'
  - name: CONFIGURE BD FE Web
    aci_bd:
      host: '{{ inventory_hostname }}'
      user: ansible
      private_key: /root/.pki/ansible.key
      validate_certs: false
      tenant: "MyCompany"
      bd: FrontEndWeb-test
      vrf: Test
      description: "BridgeDomain created by Ansible"
      state: '{{ whattodo }}'
  - name: CONFIGURE BD FE Web
    aci_bd:
      host: '{{ inventory_hostname }}'
      user: ansible
      private_key: /root/.pki/ansible.key
      validate_certs: false
      tenant: "MyCompany"
      bd: FrontEndWeb-stage
      vrf: Stage
      description: "BridgeDomain created by Ansible"
      state: '{{ whattodo }}'
  - name: CONFIGURE BD FE Web
    aci_bd:
      host: '{{ inventory_hostname }}'
      user: ansible
      private_key: /root/.pki/ansible.key
      validate_certs: false
      tenant: "MyCompany"
      bd: FrontEndWeb-Prod
      vrf: Production
      description: "BridgeDomain created by Ansible"
      state: '{{ whattodo }}'

...
Check in the GUI:
Now we do add the subnet creation to the script (it is getting longer and longer).
---
- name: ACI Bridge Domain
  hosts: APIC
  connection: local
  gather_facts: no
  vars:
      whattodo: present
  tasks:
  - name: CONFIGURE BD FE Web
    aci_bd:
      host: '{{ inventory_hostname }}'
      user: ansible
      private_key: /root/.pki/ansible.key
      validate_certs: false
      tenant: "MyCompany"
      bd: FrontEndWeb-dev
      vrf: Dev
      description: "BridgeDomain created by Ansible"
      state: '{{ whattodo }}'
  - name: CONFIGURE BD FE Web
    aci_bd:
      host: '{{ inventory_hostname }}'
      user: ansible
      private_key: /root/.pki/ansible.key
      validate_certs: false
      tenant: "MyCompany"
      bd: FrontEndWeb-test
      vrf: Test
      description: "BridgeDomain created by Ansible"
      state: '{{ whattodo }}'
  - name: CONFIGURE BD FE Web
    aci_bd:
      host: '{{ inventory_hostname }}'
      user: ansible
      private_key: /root/.pki/ansible.key
      validate_certs: false
      tenant: "MyCompany"
      bd: FrontEndWeb-stage
      vrf: Stage
      description: "BridgeDomain created by Ansible"
      state: '{{ whattodo }}'
  - name: CONFIGURE BD FE Web
    aci_bd:
      host: '{{ inventory_hostname }}'
      user: ansible
      private_key: /root/.pki/ansible.key
      validate_certs: false
      tenant: "MyCompany"
      bd: FrontEndWeb-Prod
      vrf: Production
      description: "BridgeDomain created by Ansible"
      state: '{{ whattodo }}'
  - name: CONFIGURE BD subnet
    aci_bd_subnet:
      host: '{{ inventory_hostname }}'
      user: ansible
      private_key: /root/.pki/ansible.key
      validate_certs: false
      tenant: "MyCompany"
      bd: FrontEndWeb-Prod
      gateway: 192.168.111.1
      mask: 24
      description: "BridgeDomain subnet created by Ansible"
      state: '{{ whattodo }}'
  - name: CONFIGURE BD subnet
    aci_bd_subnet:
      host: '{{ inventory_hostname }}'
      user: ansible
      private_key: /root/.pki/ansible.key
      validate_certs: false
      tenant: "MyCompany"
      bd: FrontEndWeb-Prod
      gateway: 192.168.112.1
      mask: 24
      description: "BridgeDomain subnet created by Ansible"
      state: '{{ whattodo }}'
  - name: CONFIGURE BD subnet
    aci_bd_subnet:
      host: '{{ inventory_hostname }}'
      user: ansible
      private_key: /root/.pki/ansible.key
      validate_certs: false
      tenant: "MyCompany"
      bd: FrontEndWeb-Prod
      gateway: 192.168.113.1
      mask: 24
      description: "BridgeDomain subnet created by Ansible"
      state: '{{ whattodo }}'
  - name: CONFIGURE BD subnet
    aci_bd_subnet:
      host: '{{ inventory_hostname }}'
      user: ansible
      private_key: /root/.pki/ansible.key
      validate_certs: false
      tenant: "MyCompany"
      bd: FrontEndWeb-Prod
      gateway: 192.168.114.1
      mask: 24
      description: "BridgeDomain subnet created by Ansible"
      state: '{{ whattodo }}'
  - name: CONFIGURE BD subnet
    aci_bd_subnet:
      host: '{{ inventory_hostname }}'
      user: ansible
      private_key: /root/.pki/ansible.key
      validate_certs: false
      tenant: "MyCompany"
      bd: FrontEndWeb-Prod
      gateway: 192.168.115.1
      mask: 24
      description: "BridgeDomain subnet created by Ansible"
      state: '{{ whattodo }}'
  - name: CONFIGURE BD subnet
    aci_bd_subnet:
      host: '{{ inventory_hostname }}'
      user: ansible
      private_key: /root/.pki/ansible.key
      validate_certs: false
      tenant: "MyCompany"
      bd: FrontEndWeb-Prod
      gateway: 192.168.116.1
      mask: 24
      description: "BridgeDomain subnet created by Ansible"
      state: '{{ whattodo }}'
...
And – in a few seconds (just image you want to do this via the GUI) you’ll see it being available.
For sure you don’t want to code this in a ansible script – this yells to be managed by an input file to be parsed to the yaml script. And as this is an example – all the required fields can be modified via the parameters of the modules.
With ansible 2.5 it is possible to read CSV files without additional code.
Basic concept to read a csv file like this:
tenant|bridgedomain|subnet|mask|descr
MyCompany|FrontEndWeb-Prod|192.168.116.1|24|BridgeDomain subnet created by Ansible
MyCompany|FrontEndWeb-Prod|192.168.117.1|24|BridgeDomain subnet created by Ansible
MyCompany|FrontEndWeb-Prod|192.168.118.1|24|BridgeDomain subnet created by Ansible
MyCompany|FrontEndWeb-Prod|192.168.119.1|24|BridgeDomain subnet created by Ansible
MyCompany|FrontEndWeb-Prod|192.168.120.1|24|BridgeDomain subnet created by Ansible
MyCompany|FrontEndWeb-Prod|192.168.121.1|24|BridgeDomain subnet created by Ansible
MyCompany|FrontEndWeb-Prod|192.168.122.1|24|BridgeDomain subnet created by Ansible
MyCompany|FrontEndWeb-Prod|192.168.123.1|24|BridgeDomain subnet created by Ansible
MyCompany|FrontEndWeb-Prod|192.168.124.1|24|BridgeDomain subnet created by Ansible
MyCompany|FrontEndWeb-Prod|192.168.125.1|24|BridgeDomain subnet created by Ansible
MyCompany|FrontEndWeb-Prod|192.168.126.1|24|BridgeDomain subnet created by Ansible
MyCompany|FrontEndWeb-Prod|192.168.127.1|24|BridgeDomain subnet created by Ansible
MyCompany|FrontEndWeb-Prod|192.168.128.1|24|BridgeDomain subnet created by Ansible
MyCompany|FrontEndWeb-Prod|192.168.129.1|24|BridgeDomain subnet created by Ansible
MyCompany|FrontEndWeb-Stage|192.168.116.1|24|BridgeDomain subnet created by Ansible
MyCompany|FrontEndWeb-Stage|192.168.117.1|24|BridgeDomain subnet created by Ansible
MyCompany|FrontEndWeb-Stage|192.168.118.1|24|BridgeDomain subnet created by Ansible
MyCompany|FrontEndWeb-Stage|192.168.119.1|24|BridgeDomain subnet created by Ansible
MyCompany|FrontEndWeb-Stage|192.168.120.1|24|BridgeDomain subnet created by Ansible
MyCompany|FrontEndWeb-Stage|192.168.121.1|24|BridgeDomain subnet created by Ansible
MyCompany|FrontEndWeb-Stage|192.168.122.1|24|BridgeDomain subnet created by Ansible
MyCompany|FrontEndWeb-Stage|192.168.123.1|24|BridgeDomain subnet created by Ansible
MyCompany|FrontEndWeb-Stage|192.168.124.1|24|BridgeDomain subnet created by Ansible
MyCompany|FrontEndWeb-Stage|192.168.125.1|24|BridgeDomain subnet created by Ansible
MyCompany|FrontEndWeb-Stage|192.168.126.1|24|BridgeDomain subnet created by Ansible
MyCompany|FrontEndWeb-Stage|192.168.127.1|24|BridgeDomain subnet created by Ansible
MyCompany|FrontEndWeb-Stage|192.168.128.1|24|BridgeDomain subnet created by Ansible
MyCompany|FrontEndWeb-Stage|192.168.129.1|24|BridgeDomain subnet created by Ansible
MyCompany|FrontEndWeb-Dev|192.168.116.1|24|BridgeDomain subnet created by Ansible
MyCompany|FrontEndWeb-Dev|192.168.117.1|24|BridgeDomain subnet created by Ansible
MyCompany|FrontEndWeb-Dev|192.168.118.1|24|BridgeDomain subnet created by Ansible
MyCompany|FrontEndWeb-Dev|192.168.119.1|24|BridgeDomain subnet created by Ansible
MyCompany|FrontEndWeb-Dev|192.168.120.1|24|BridgeDomain subnet created by Ansible
MyCompany|FrontEndWeb-Dev|192.168.121.1|24|BridgeDomain subnet created by Ansible
MyCompany|FrontEndWeb-Dev|192.168.122.1|24|BridgeDomain subnet created by Ansible
MyCompany|FrontEndWeb-Dev|192.168.123.1|24|BridgeDomain subnet created by Ansible
MyCompany|FrontEndWeb-Dev|192.168.124.1|24|BridgeDomain subnet created by Ansible
MyCompany|FrontEndWeb-Dev|192.168.125.1|24|BridgeDomain subnet created by Ansible
MyCompany|FrontEndWeb-Dev|192.168.126.1|24|BridgeDomain subnet created by Ansible
MyCompany|FrontEndWeb-Dev|192.168.127.1|24|BridgeDomain subnet created by Ansible
MyCompany|FrontEndWeb-Dev|192.168.128.1|24|BridgeDomain subnet created by Ansible
MyCompany|FrontEndWeb-Dev|192.168.129.1|24|BridgeDomain subnet created by Ansible
MyCompany|FrontEndWeb-Test|192.168.116.1|24|BridgeDomain subnet created by Ansible
MyCompany|FrontEndWeb-Test|192.168.117.1|24|BridgeDomain subnet created by Ansible
MyCompany|FrontEndWeb-Test|192.168.118.1|24|BridgeDomain subnet created by Ansible
MyCompany|FrontEndWeb-Test|192.168.119.1|24|BridgeDomain subnet created by Ansible
MyCompany|FrontEndWeb-Test|192.168.120.1|24|BridgeDomain subnet created by Ansible
MyCompany|FrontEndWeb-Test|192.168.121.1|24|BridgeDomain subnet created by Ansible
MyCompany|FrontEndWeb-Test|192.168.122.1|24|BridgeDomain subnet created by Ansible
MyCompany|FrontEndWeb-Test|192.168.123.1|24|BridgeDomain subnet created by Ansible
MyCompany|FrontEndWeb-Test|192.168.124.1|24|BridgeDomain subnet created by Ansible
MyCompany|FrontEndWeb-Test|192.168.125.1|24|BridgeDomain subnet created by Ansible
MyCompany|FrontEndWeb-Test|192.168.126.1|24|BridgeDomain subnet created by Ansible
MyCompany|FrontEndWeb-Test|192.168.127.1|24|BridgeDomain subnet created by Ansible
MyCompany|FrontEndWeb-Test|192.168.128.1|24|BridgeDomain subnet created by Ansible
MyCompany|FrontEndWeb-Test|192.168.129.1|24|BridgeDomain subnet created by Ansible
The first line do contain the field names, the other lines your data.
and another one:
tenant|bd|vrf|description
MyCompany|FrontEndWeb-Dev|Dev|BridgeDomain created by Ansible
MyCompany|FrontEndWeb-Test|Test|BridgeDomain created by Ansible
MyCompany|FrontEndWeb-Stage|Stage|BridgeDomain created by Ansible
MyCompany|FrontEndWeb-Prod|Prod|BridgeDomain created by Ansible
A basic script to read this file:
---
- name: Read CSV
  hosts: localhost
  tasks:
    - name: Read from CSV
      read_csv:
        path: ./data-bridge.csv
        delimiter: '|'
      register: bridgesubnets
This will put your input file data into the list „bridgesubnets“.
We do now modify our script above to a much leaner version:
---
- name: ACI Bridge Domain
  hosts: APIC
  connection: local
  gather_facts: no
  vars:
      whattodo: present
  tasks:
  - name: Read CSV bridgedomains
    read_csv:
      path: ./data-bd.csv
      delimiter: '|'
    register: bridgedomains

  - name: Read CSV bridgedomain subnets
    read_csv:
      path: ./data-bridge.csv
      delimiter: '|'
    register: bridgedomainssubnets

# Get Input from list bridgedomains
  - name: Configure BridgeDomain from CSV Inputfile
    aci_bd:
      host: '{{ inventory_hostname }}'
      user: ansible
      private_key: /root/.pki/ansible.key
      validate_certs: false
      tenant: "{{ item.tenant }}"
      bd: "{{ item.bd }}"
      vrf: "{{ item.vrf }}"
      description: "{{ item.description }}"
      state: '{{ whattodo }}'
    with_items: "{{ bridgedomains.list }}"

  - name: CONFIGURE BD subnet
    aci_bd_subnet:
      host: '{{ inventory_hostname }}'
      user: ansible
      private_key: /root/.pki/ansible.key
      validate_certs: false
      tenant: "{{ item.tenant }}"
      bd: "{{ item.bd }}"
      gateway: "{{ item.gateway }}"
      mask: "{{ item.mask }}"
      description: "{{ item.description }}"
      state: '{{ whattodo }}'
    with_items: "{{ bridgedomainssubnets.list }}"
...
Wow – result is visible after a few seconds. Just image – you’ve had to configure this via the GUI.
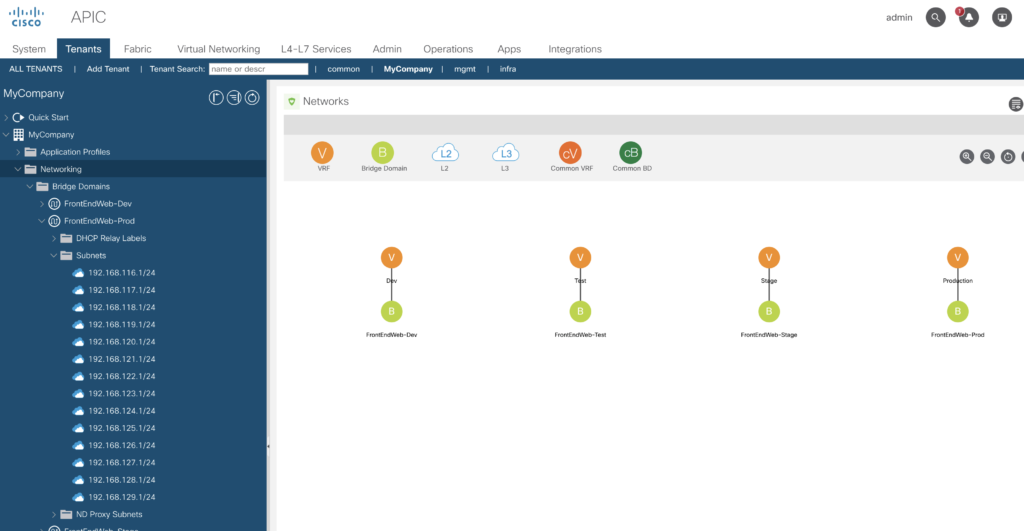
This is an example definition of our logical layer. Later we’ll create the EPGs.
Physical Layer
We’ll continue now on the physical layer. It is quite important, that you’ve fully understood the concepts behind – so please have a look into the corresponding video provided by Jason (Lesson 11 onwards). And – for the rest of this article I’m using the ansible interface only – data + playbook to build up according to those examples.
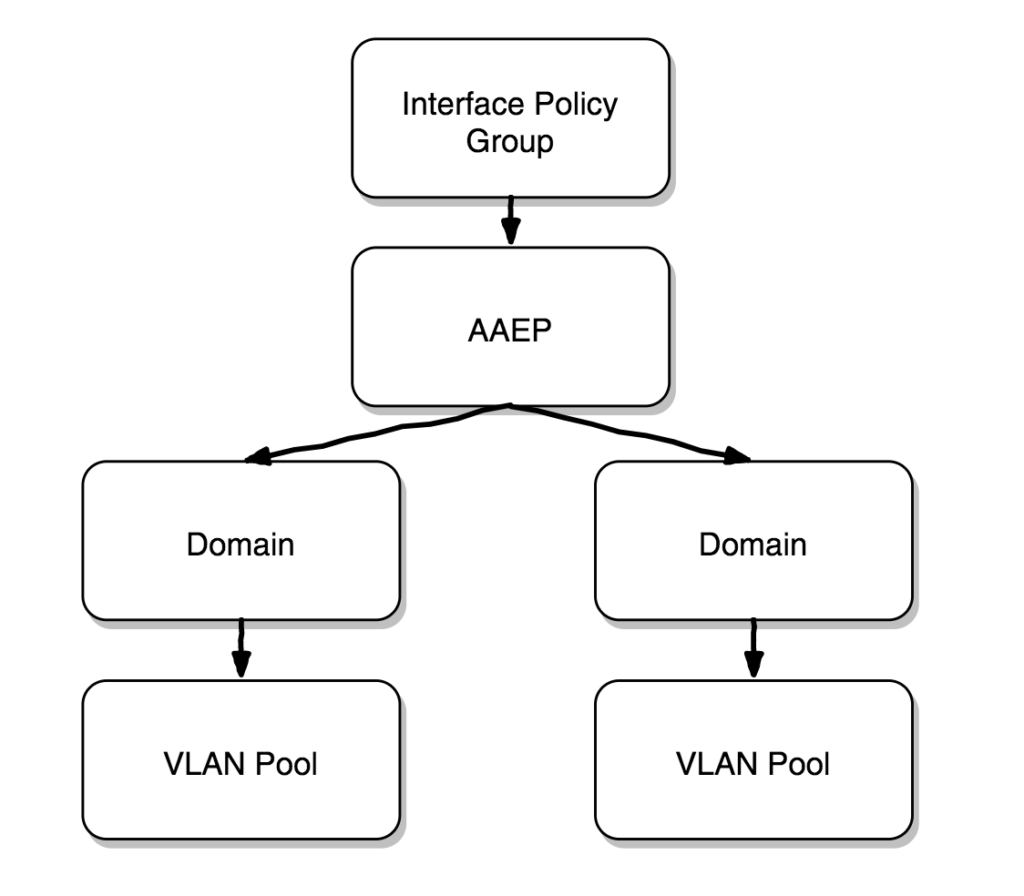
The work flow to configure an access policy is

We’ll start with the
VLAN-Pool
Two types of pools are being used, best to divide them into functional groups.
- Static (for physical workload or manual configurations)
- Dynamic (for virtualization integration or horizontal orchestration of L4-7 devices)
As an example – we create four pools
- 1000-1200 – Static : Bare-metal hosts
- 1201 – 1300 – Static : Firewalls
- 1301 – 1400 – Static : External WAN routers
- 1401 – 1600 – Dynamic : Virtual machines
We’ve to use the
- aci_vlan_pool
- aci_vlan_pool_encap_block
Two CSV files and two ansible scripts:
To create the pools
---
- name: ACI VLAN Pools
  hosts: APIC
  connection: local
  gather_facts: no
  vars:
      whattodo: present
  tasks:
  - name: Read CSV with filters
    read_csv:
      path: ./data/vlanpools.csv
      delimiter: '|'
    register: vlanpools

# Get Input from list contract
  - name: Configure filters from CSV Inputfile
    aci_vlan_pool:
      host: '{{ inventory_hostname }}'
      user: ansible
      private_key: /root/.pki/ansible.key
      validate_certs: false
      name: "{{ item.name }}"
      description: "{{ item.description }}"
      pool_allocation_mode: "{{ item.pool_allocation_mode }}"
      state: '{{ whattodo }}'
    with_items: "{{ vlanpools.list }}"
# cat data/vlanpools.csv
name|description|pool_allocation_mode
Bare-Metal|Created by Ansible|static
Firewalls|Created by Ansible|static
External_WAN|Created by Ansible|static
Virtual_Machines|Created by Ansible|dynamic
to create the blocks
---
- name: ACI VLAN Blocks
  hosts: APIC
  connection: local
  gather_facts: no
  vars:
      whattodo: present
  tasks:
  - name: Read CSV with filters
    read_csv:
      path: ./data/vlanpoolblocks.csv
      delimiter: '|'
    register: vlanpoolblocks

# Get Input from list contract
  - name: Configure filters from CSV Inputfile
    aci_vlan_pool_encap_block:
      host: '{{ inventory_hostname }}'
      user: ansible
      private_key: /root/.pki/ansible.key
      validate_certs: false
      name: "{{ item.name }}"
      pool: "{{ item.pool }}"
      description: "{{ item.description }}"
      block_start: "{{ item.block_start }}"
      block_end: "{{ item.block_end }}"
      pool_allocation_mode: "{{ item.pool_allocation_mode }}"
      state: '{{ whattodo }}'
    with_items: "{{ vlanpoolblocks.list }}"
name|description|block_start|block_end|pool|pool_allocation_mode
Block1000_1200|Created by Ansible|1000|1200|Bare-Metal|static
Block1201_1300|Created by Ansible|1201|1300|Firewalls|static
Block1301_1400|Created by Ansible|1301|1400|External_WAN|static
Block1401_1600|Created by Ansible|1401|1600|Virtual_Machines|dynamic

Domain Creation
There are five domain profiles available
- Fibre Channel
- Layer 2
- Layer 3
- Physical
- VMM
To create a domain and the binding we do need those two ansible modules:
- aci_domain
---
- name: ACI Domains
  hosts: APIC
  connection: local
  gather_facts: no
  vars:
      whattodo: present
  tasks:
  - name: Read CSV with domains
    read_csv:
      path: ./data/domains.csv
      delimiter: '|'
    register: domains

# Get Input from list contract
  - name: Configure filters from CSV Inputfile
    aci_domain:
      host: '{{ inventory_hostname }}'
      user: ansible
      private_key: /root/.pki/ansible.key
      validate_certs: false
      name: "{{ item.name }}"
      domain_type: "{{ item.domain_type }}"
      state: '{{ whattodo }}'
    with_items: "{{ domains.list }}"
CSV File
name|description|encap_mode|domain_type
BareMetall|Created by Ansible|vlan|phys
Firewalls|Created by Ansible|vlan|phys
ESXi-Servers|Created by Ansible|vlan|vmm
WAN|Created by Ansible|vlan|l3dom
Creating VMM domains requires some add. data – being lazy, I’ve copied the code instead of doing some ansible magic 🙂
---
- name: ACI Domains
  hosts: APIC
  connection: local
  gather_facts: no
  vars:
      whattodo: present
  tasks:
  - name: Read CSV with domains
    read_csv:
      path: ./data/vmmdomains.csv
      delimiter: '|'
    register: vmmdomains

# Get Input from list contract
  - name: Configure filters from CSV Inputfile
    aci_domain:
      host: '{{ inventory_hostname }}'
      user: ansible
      private_key: /root/.pki/ansible.key
      validate_certs: false
      name: "{{ item.name }}"
      domain_type: "{{ item.domain_type }}"
      vm_provider: "{{ item.vm_provider }}"
      state: '{{ whattodo }}'
    with_items: "{{ vmmdomains.list }}"
CSV File
name|description|encap_mode|domain_type|vm_provider
ESXi-Servers|Created by Ansible|vlan|vmm|vmware
HyperV|Created by Ansible|vlan|vmm|microsoft
RedHat|Created by Ansible|vlan|vmm|redhat
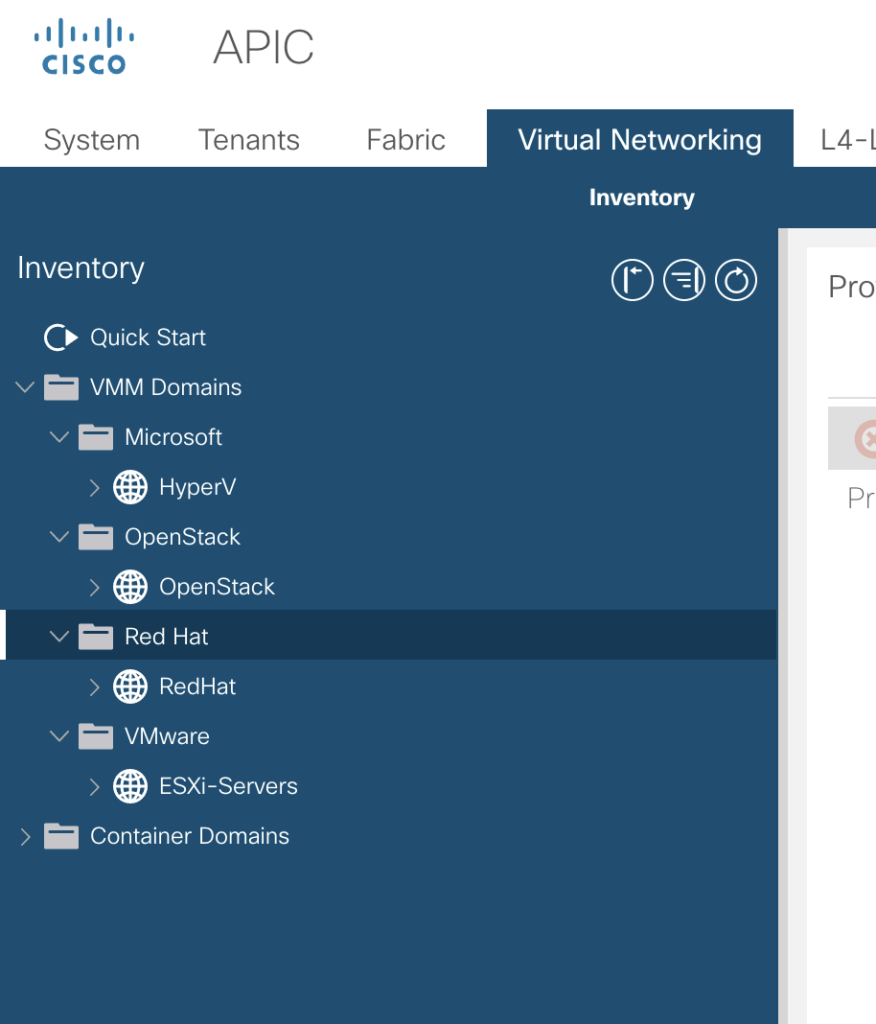
OpenStack|Created by Ansible|vlan|vmm|openstackThe new domains are visible now in the tab
-> Fabric -> Access Policies -> Physical and External Domains
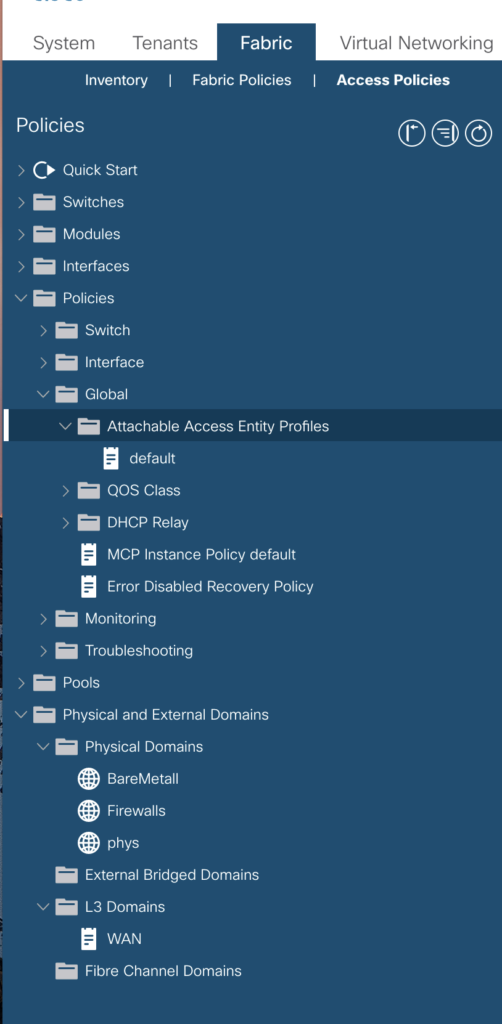
and the VMM Domains are located in a different tab
-> Virtual Networking -> VMM Domains (from my point of view it shuld be under Domains as well, but for sure there is a reason).
Attachable Access Entity Profiles (AAEP)
The AAEP is used to map domains to interface policies, thus mapping VLANs to interfaces.
On the fabric definition level there are quite a lot of policies you are able to predefine (to be used later on). Many of those are configurable by using an ansible module.
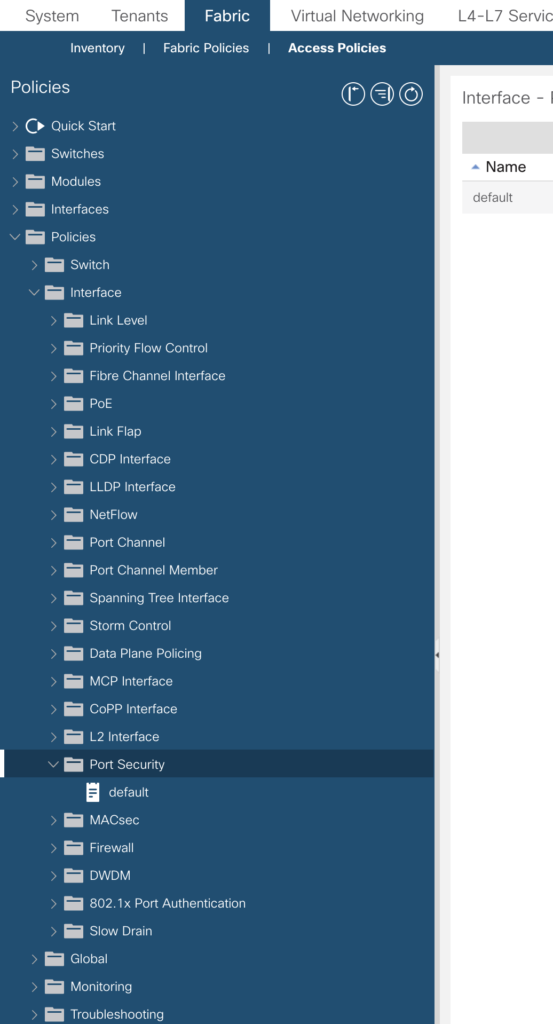
In the modul overview you’ll find
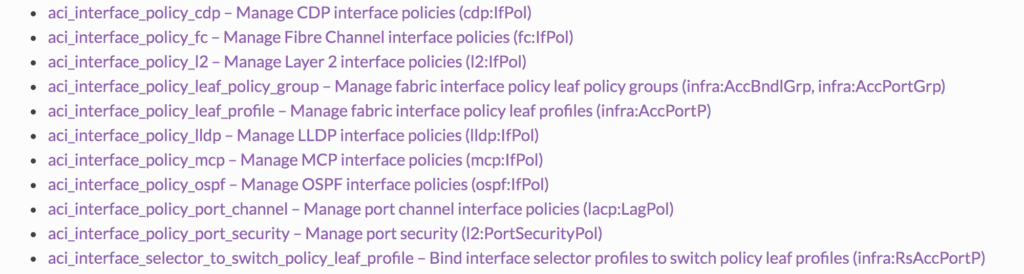
Lets try to create some of them – please have a look as well in the options
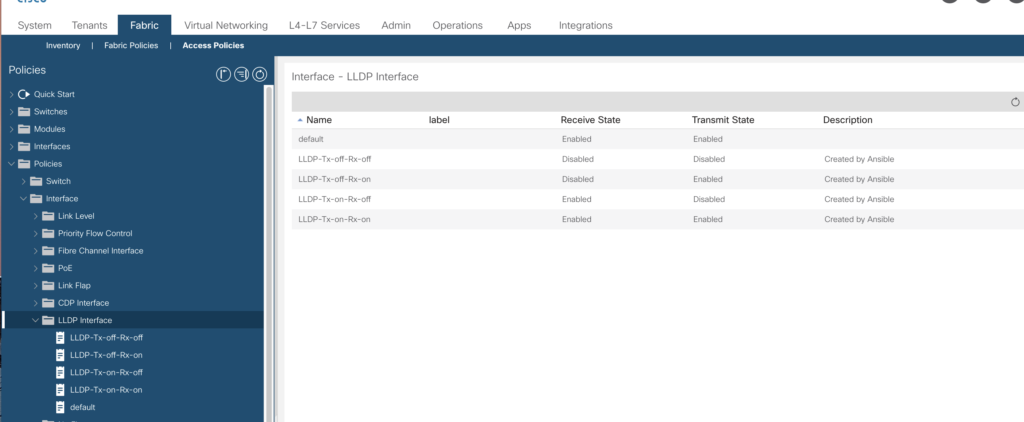
LLDP Interface Policies
The LLDP (link layer discovery protocol) can be configured regarding the receive and transmit state.
Just a simple csv file to cover all options.
lldp_policy|description|receive_state|transmit_state
LLDP-Tx-on-Rx-on|Created by Ansible|yes|yes
LLDP-Tx-off-Rx-off|Created by Ansible|no|no
LLDP-Tx-on-Rx-off|Created by Ansible|yes|no
LLDP-Tx-off-Rx-on|Created by Ansible|no|yes
and playbook
---
- name: ACI LLDP profiles
  hosts: APIC
  connection: local
  gather_facts: no
  vars:
      whattodo: present
  tasks:
  - name: Read CSV lldp profiles
    read_csv:
      path: ./data/data-int-pol-lldp.csv
      delimiter: '|'
    register: lldp

# Get Input from list lldp
  - name: Configure lldp switch profile from CSV Inputfile
    aci_interface_policy_lldp:
      host: '{{ inventory_hostname }}'
      user: ansible
      private_key: /root/.pki/ansible.key
      validate_certs: false
      lldp_policy: "{{ item.lldp_policy }}"
      description: "{{ item.description }}"
      transmit_state: "{{ item.transmit_state }}"
      receive_state: "{{ item.receive_state }}"
      state: '{{ whattodo }}'
    with_items: "{{ lldp.list }}"
Will give you
CDP (Cisco Discovery Protocol) Policy
We’ll add with this simple playbook an „enabled“ policy. Per default CDP is turned off.
---
- name: ACI CDP profiles
  hosts: APIC
  connection: local
  gather_facts: no
  vars:
      whattodo: present
  tasks:
  - name: Configure cdp Interface Policy
    aci_interface_policy_cdp:
      host: "{{ inventory_hostname }}"
      user: ansible
      private_key: /root/.pki/ansible.key
      validate_certs: false
      name: CDP_Policy
      admin_state: yes
      description: "Created by Ansible"
      state: '{{ whattodo }}'
MCP (Mis Cabling Policy)
This is another quick one. As you know, you must not cable spine to spine, leaf to leaf or endpoint to spine. This will be detected by the MCP policy. Sometimes it is required to turn this feature off – per default it is turned on.
---
- name: ACI MCP profile
  hosts: APIC
  connection: local
  gather_facts: no
  vars:
      whattodo: present
  tasks:
  - name: Configure MCP Interface Policy
    aci_interface_policy_mcp:
      host: "{{ inventory_hostname }}"
      user: ansible
      private_key: /root/.pki/ansible.key
      validate_certs: false
      name: MCP_Policy
      admin_state: no
      description: "Created by Ansible"
      state: '{{ whattodo }}'
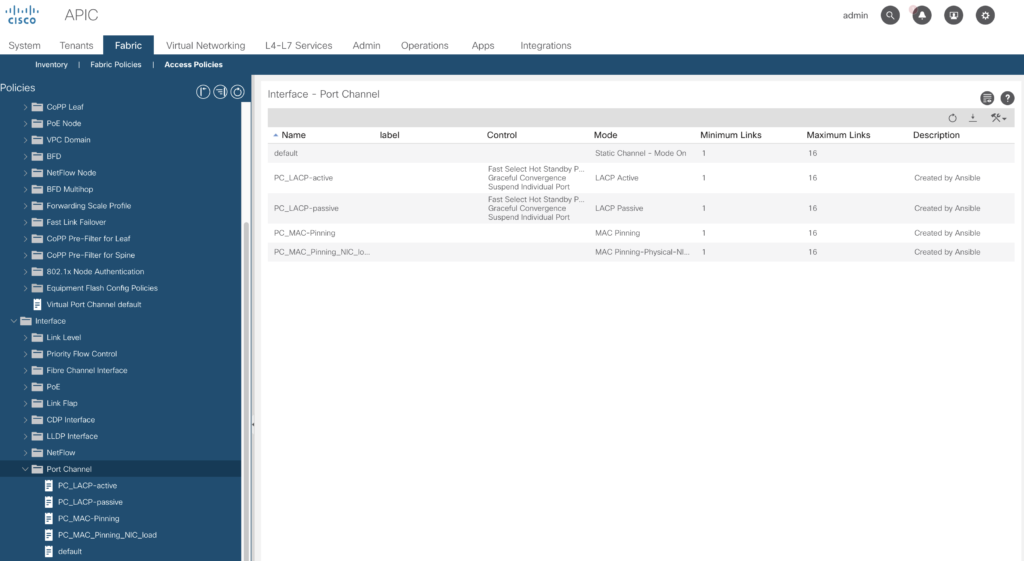
Port Channel Policies
With those you are able to distinguish if using LACP (active or passive) or MAC-Pinning.
Input by another CSV file:
port_channel|description|min_links|max_links|mode
PC_LACP-active|Created by Ansible|1|16|active
PC_LACP-passive|Created by Ansible|1|16|passive
PC_MAC-Pinning|Created by Ansible|1|16|mac-pin
PC_MAC_Pinning_NIC_load|Created by Ansible|1|16|mac-pin-nicload
and the required playbook to read in:
---
- name: ACI Port Channel profiles
  hosts: APIC
  connection: local
  gather_facts: no
  vars:
      whattodo: present
  tasks:
  - name: Read CSV PC profiles
    read_csv:
      path: ./data/data-portchannel.csv
      delimiter: '|'
    register: portchannel

# Get Input from list portchannel
  - name: Configure portchannel switch profile from CSV Inputfile
    aci_interface_policy_port_channel:
      host: '{{ inventory_hostname }}'
      user: ansible
      private_key: /root/.pki/ansible.key
      validate_certs: false
      name: "{{ item.port_channel }}"
      description: "{{ item.description }}"
      min_links: "{{ item.min_links }}"
      max_links: "{{ item.max_links }}"
      mode: "{{ item.mode }}"
      state: '{{ whattodo }}'
    with_items: "{{ portchannel.list }}"