And that brings me back to OpenSSL — which sucks. The code is a mess, the documentation is misleading, and the defaults are deceptive. Plus it is 300,000 lines of code that suffer from just about every software engineering ailment you can imagine:
No central architectural authority
6,740 goto statements
Inline assembly code
Multiple different coding styles
Obscure use of macro preprocessors
Inconsistent naming conventions
Far too many selections and options
Unexplained dead code
Misleading and incoherent comments
and so on and so on.
And it’s nobody’s fault.
No one was ever truly in charge of OpenSSL, it just sort of became the default landfill for prototypes of cryptographic inventions, and since it had everything cryptographic under the sun (somewhere , if you could find out how to use it), it also became the default source of cryptographic functionality.
i’m sure more than one person has thought „Nobody ever got fired for using OpenSSL“.
Poul is the creator of varnish – a wonderful solution for website caching. Thus I’ve started to have a look for alternative solutions. Open Source of course.
In the previous articles we’ve had a look into various aspects to access the Fabric, to configure based on small examples. In this article we’ll go through a complete build. For a very deep understanding on how ACI is working I highly recommend to watch Dave Lunde’s training videos. After watching his training series you’ll get an idea how powerful the ACI concept is.
---
- name: ACI Tenant Management
  hosts: APIC
  connection: local
  gather_facts: no
  tasks:
  - name: CONFIGURE TENANT
    aci_tenant:
      host: '{{ inventory_hostname }}'
      user: ansible
      private_key: /root/.pki/ansible.key
      validate_certs: false
      tenant: "MyCompany"
      description: "Tenant created by Ansible"
      state: present
...
By the way – if you want to remove that definition – you can either delete via the GUI or – much easier – just replace the „state: present“ with „state: absent“ and run the playbook again.
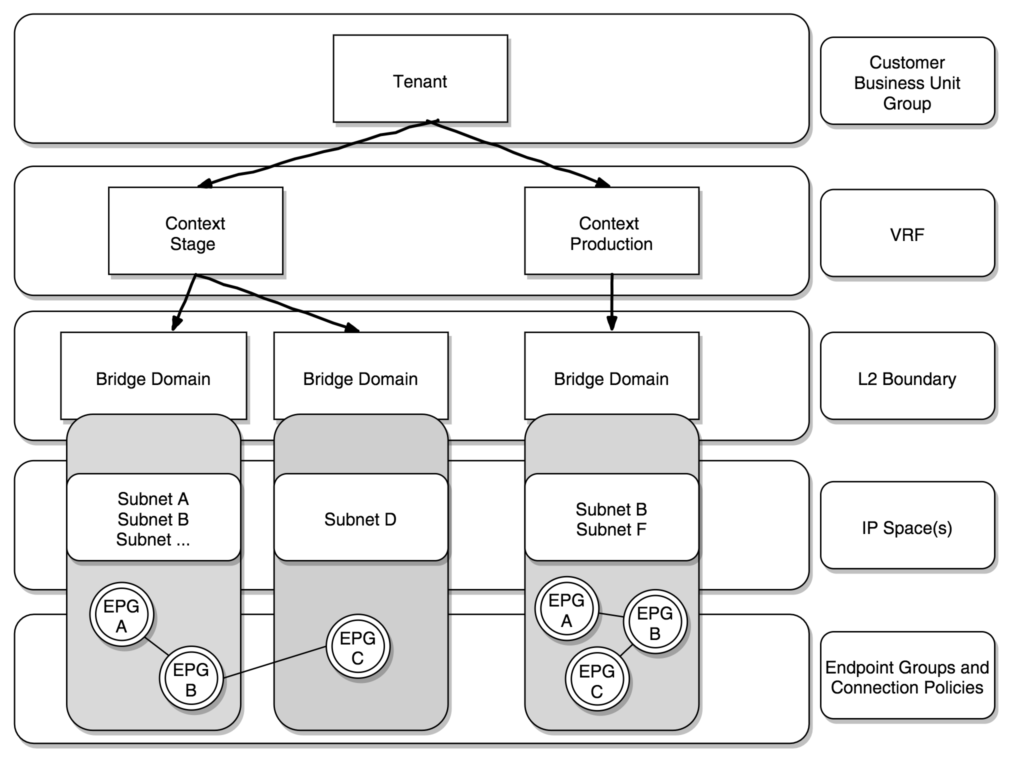
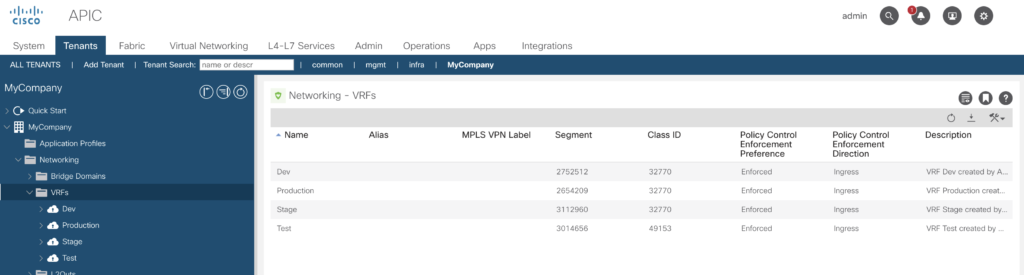
Creating the context (VRF)
Within a tenant you are able to create one or more VRFs (context). Many shops do split dev/test/stage and production. If you want to implement this, the initial ansible script will be:
---
- name: ACI VRF context
  hosts: APIC
  connection: local
  gather_facts: no
  tasks:
  - name: CONFIGURE VRF Prod
    aci_vrf:
      host: '{{ inventory_hostname }}'
      user: ansible
      private_key: /root/.pki/ansible.key
      validate_certs: false
      tenant: "MyCompany"
      vrf: "Production"
      description: "VRF Production created by Ansible"
      state: present

  - name: CONFIGURE VRF Stage
    aci_vrf:
      host: '{{ inventory_hostname }}'
      user: ansible
      private_key: /root/.pki/ansible.key
      validate_certs: false
      tenant: "MyCompany"
      vrf: "Stage"
      description: "VRF Stage created by Ansible"
      state: present

  - name: CONFIGURE VRF Test
    aci_vrf:
      host: '{{ inventory_hostname }}'
      user: ansible
      private_key: /root/.pki/ansible.key
      validate_certs: false
      tenant: "MyCompany"
      vrf: "Test"
      description: "VRF Test created by Ansible"
      state: present

  - name: CONFIGURE VRF Prod
    aci_vrf:
      host: '{{ inventory_hostname }}'
      user: ansible
      private_key: /root/.pki/ansible.key
      validate_certs: false
      tenant: "MyCompany"
      vrf: "Dev"
      description: "VRF Dev created by Ansible"
      state: present

...
Beneath the VRF context the bridge domains (BD) are placed, to simplify – those are containers for subnets.
It is possible to use the same subnets within different bridge domains – e.g. you’ve got a server, which has been tested in your VRF test context, you’ll move it over to the stage context without the requirement to change the network configuration on that server.
To create a bridge domain there is another ansible aci module available.
Let us now create a series of bridge domain by ansible (please note – I’ve introduced a variable (whattodo) – that way it is much easier to do test runs.
With whattodo set to „present“ – create it, set to „absent“ delete it.
---
- name: ACI Bridge Domain
  hosts: APIC
  connection: local
  gather_facts: no
  vars:
      whattodo:	present
  tasks:
  - name: CONFIGURE BD FE Web
    aci_bd:
      host: '{{ inventory_hostname }}'
      user: ansible
      private_key: /root/.pki/ansible.key
      validate_certs: false
      tenant: "MyCompany"
      bd: FrontEndWeb-dev
      vrf: Dev
      description: "BridgeDomain created by Ansible"
      state: '{{ whattodo }}'
  - name: CONFIGURE BD FE Web
    aci_bd:
      host: '{{ inventory_hostname }}'
      user: ansible
      private_key: /root/.pki/ansible.key
      validate_certs: false
      tenant: "MyCompany"
      bd: FrontEndWeb-test
      vrf: Test
      description: "BridgeDomain created by Ansible"
      state: '{{ whattodo }}'
  - name: CONFIGURE BD FE Web
    aci_bd:
      host: '{{ inventory_hostname }}'
      user: ansible
      private_key: /root/.pki/ansible.key
      validate_certs: false
      tenant: "MyCompany"
      bd: FrontEndWeb-stage
      vrf: Stage
      description: "BridgeDomain created by Ansible"
      state: '{{ whattodo }}'
  - name: CONFIGURE BD FE Web
    aci_bd:
      host: '{{ inventory_hostname }}'
      user: ansible
      private_key: /root/.pki/ansible.key
      validate_certs: false
      tenant: "MyCompany"
      bd: FrontEndWeb-Prod
      vrf: Production
      description: "BridgeDomain created by Ansible"
      state: '{{ whattodo }}'

...
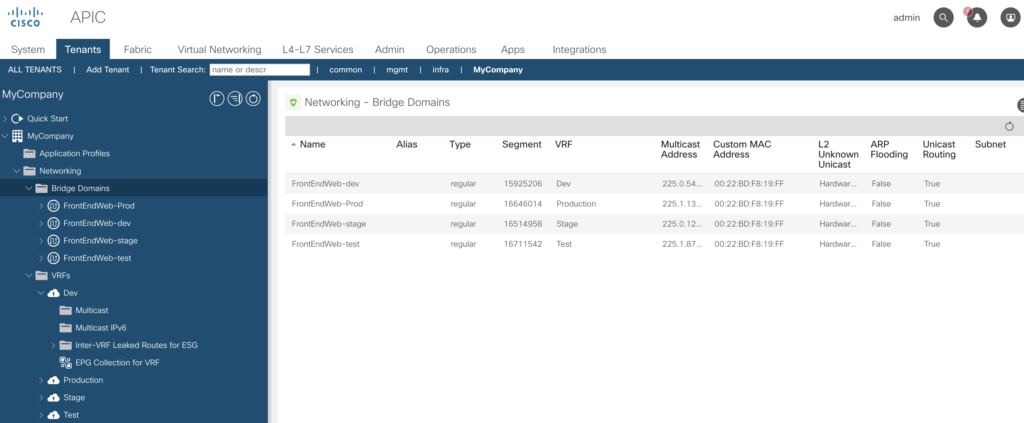
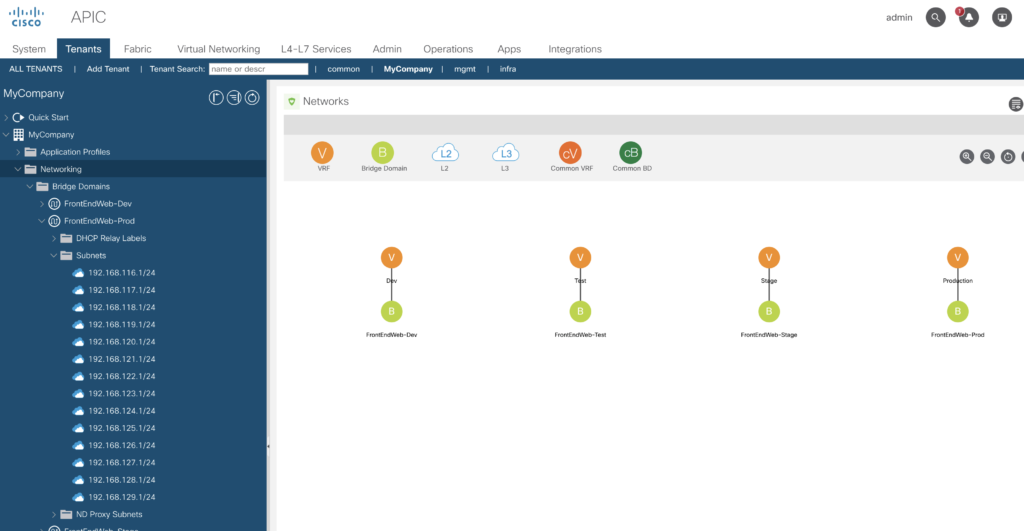
Check in the GUI:
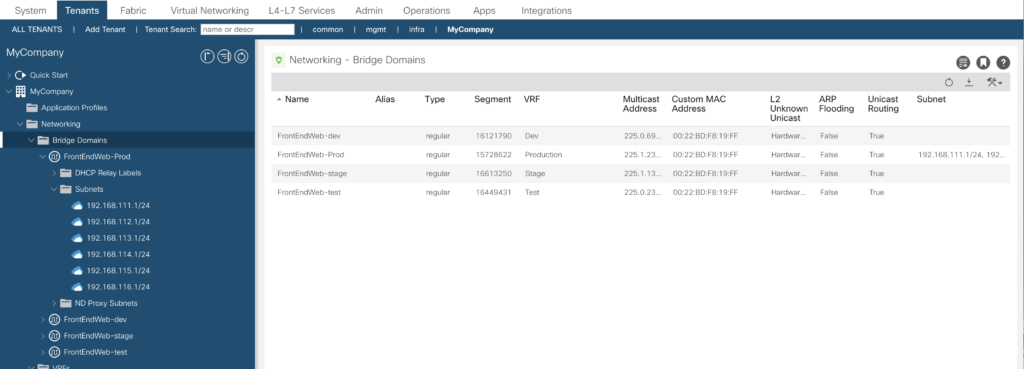
Now we do add the subnet creation to the script (it is getting longer and longer).
And – in a few seconds (just image you want to do this via the GUI) you’ll see it being available.
For sure you don’t want to code this in a ansible script – this yells to be managed by an input file to be parsed to the yaml script. And as this is an example – all the required fields can be modified via the parameters of the modules.
With ansible 2.5 it is possible to read CSV files without additional code.
Basic concept to read a csv file like this:
tenant|bridgedomain|subnet|mask|descr
MyCompany|FrontEndWeb-Prod|192.168.116.1|24|BridgeDomain subnet created by Ansible
MyCompany|FrontEndWeb-Prod|192.168.117.1|24|BridgeDomain subnet created by Ansible
MyCompany|FrontEndWeb-Prod|192.168.118.1|24|BridgeDomain subnet created by Ansible
MyCompany|FrontEndWeb-Prod|192.168.119.1|24|BridgeDomain subnet created by Ansible
MyCompany|FrontEndWeb-Prod|192.168.120.1|24|BridgeDomain subnet created by Ansible
MyCompany|FrontEndWeb-Prod|192.168.121.1|24|BridgeDomain subnet created by Ansible
MyCompany|FrontEndWeb-Prod|192.168.122.1|24|BridgeDomain subnet created by Ansible
MyCompany|FrontEndWeb-Prod|192.168.123.1|24|BridgeDomain subnet created by Ansible
MyCompany|FrontEndWeb-Prod|192.168.124.1|24|BridgeDomain subnet created by Ansible
MyCompany|FrontEndWeb-Prod|192.168.125.1|24|BridgeDomain subnet created by Ansible
MyCompany|FrontEndWeb-Prod|192.168.126.1|24|BridgeDomain subnet created by Ansible
MyCompany|FrontEndWeb-Prod|192.168.127.1|24|BridgeDomain subnet created by Ansible
MyCompany|FrontEndWeb-Prod|192.168.128.1|24|BridgeDomain subnet created by Ansible
MyCompany|FrontEndWeb-Prod|192.168.129.1|24|BridgeDomain subnet created by Ansible
MyCompany|FrontEndWeb-Stage|192.168.116.1|24|BridgeDomain subnet created by Ansible
MyCompany|FrontEndWeb-Stage|192.168.117.1|24|BridgeDomain subnet created by Ansible
MyCompany|FrontEndWeb-Stage|192.168.118.1|24|BridgeDomain subnet created by Ansible
MyCompany|FrontEndWeb-Stage|192.168.119.1|24|BridgeDomain subnet created by Ansible
MyCompany|FrontEndWeb-Stage|192.168.120.1|24|BridgeDomain subnet created by Ansible
MyCompany|FrontEndWeb-Stage|192.168.121.1|24|BridgeDomain subnet created by Ansible
MyCompany|FrontEndWeb-Stage|192.168.122.1|24|BridgeDomain subnet created by Ansible
MyCompany|FrontEndWeb-Stage|192.168.123.1|24|BridgeDomain subnet created by Ansible
MyCompany|FrontEndWeb-Stage|192.168.124.1|24|BridgeDomain subnet created by Ansible
MyCompany|FrontEndWeb-Stage|192.168.125.1|24|BridgeDomain subnet created by Ansible
MyCompany|FrontEndWeb-Stage|192.168.126.1|24|BridgeDomain subnet created by Ansible
MyCompany|FrontEndWeb-Stage|192.168.127.1|24|BridgeDomain subnet created by Ansible
MyCompany|FrontEndWeb-Stage|192.168.128.1|24|BridgeDomain subnet created by Ansible
MyCompany|FrontEndWeb-Stage|192.168.129.1|24|BridgeDomain subnet created by Ansible
MyCompany|FrontEndWeb-Dev|192.168.116.1|24|BridgeDomain subnet created by Ansible
MyCompany|FrontEndWeb-Dev|192.168.117.1|24|BridgeDomain subnet created by Ansible
MyCompany|FrontEndWeb-Dev|192.168.118.1|24|BridgeDomain subnet created by Ansible
MyCompany|FrontEndWeb-Dev|192.168.119.1|24|BridgeDomain subnet created by Ansible
MyCompany|FrontEndWeb-Dev|192.168.120.1|24|BridgeDomain subnet created by Ansible
MyCompany|FrontEndWeb-Dev|192.168.121.1|24|BridgeDomain subnet created by Ansible
MyCompany|FrontEndWeb-Dev|192.168.122.1|24|BridgeDomain subnet created by Ansible
MyCompany|FrontEndWeb-Dev|192.168.123.1|24|BridgeDomain subnet created by Ansible
MyCompany|FrontEndWeb-Dev|192.168.124.1|24|BridgeDomain subnet created by Ansible
MyCompany|FrontEndWeb-Dev|192.168.125.1|24|BridgeDomain subnet created by Ansible
MyCompany|FrontEndWeb-Dev|192.168.126.1|24|BridgeDomain subnet created by Ansible
MyCompany|FrontEndWeb-Dev|192.168.127.1|24|BridgeDomain subnet created by Ansible
MyCompany|FrontEndWeb-Dev|192.168.128.1|24|BridgeDomain subnet created by Ansible
MyCompany|FrontEndWeb-Dev|192.168.129.1|24|BridgeDomain subnet created by Ansible
MyCompany|FrontEndWeb-Test|192.168.116.1|24|BridgeDomain subnet created by Ansible
MyCompany|FrontEndWeb-Test|192.168.117.1|24|BridgeDomain subnet created by Ansible
MyCompany|FrontEndWeb-Test|192.168.118.1|24|BridgeDomain subnet created by Ansible
MyCompany|FrontEndWeb-Test|192.168.119.1|24|BridgeDomain subnet created by Ansible
MyCompany|FrontEndWeb-Test|192.168.120.1|24|BridgeDomain subnet created by Ansible
MyCompany|FrontEndWeb-Test|192.168.121.1|24|BridgeDomain subnet created by Ansible
MyCompany|FrontEndWeb-Test|192.168.122.1|24|BridgeDomain subnet created by Ansible
MyCompany|FrontEndWeb-Test|192.168.123.1|24|BridgeDomain subnet created by Ansible
MyCompany|FrontEndWeb-Test|192.168.124.1|24|BridgeDomain subnet created by Ansible
MyCompany|FrontEndWeb-Test|192.168.125.1|24|BridgeDomain subnet created by Ansible
MyCompany|FrontEndWeb-Test|192.168.126.1|24|BridgeDomain subnet created by Ansible
MyCompany|FrontEndWeb-Test|192.168.127.1|24|BridgeDomain subnet created by Ansible
MyCompany|FrontEndWeb-Test|192.168.128.1|24|BridgeDomain subnet created by Ansible
MyCompany|FrontEndWeb-Test|192.168.129.1|24|BridgeDomain subnet created by Ansible
The first line do contain the field names, the other lines your data.
and another one:
tenant|bd|vrf|description
MyCompany|FrontEndWeb-Dev|Dev|BridgeDomain created by Ansible
MyCompany|FrontEndWeb-Test|Test|BridgeDomain created by Ansible
MyCompany|FrontEndWeb-Stage|Stage|BridgeDomain created by Ansible
MyCompany|FrontEndWeb-Prod|Prod|BridgeDomain created by Ansible
Wow – result is visible after a few seconds. Just image – you’ve had to configure this via the GUI.
This is an example definition of our logical layer. Later we’ll create the EPGs.
Physical Layer
We’ll continue now on the physical layer. It is quite important, that you’ve fully understood the concepts behind – so please have a look into the corresponding video provided by Jason (Lesson 11 onwards). And – for the rest of this article I’m using the ansible interface only – data + playbook to build up according to those examples.
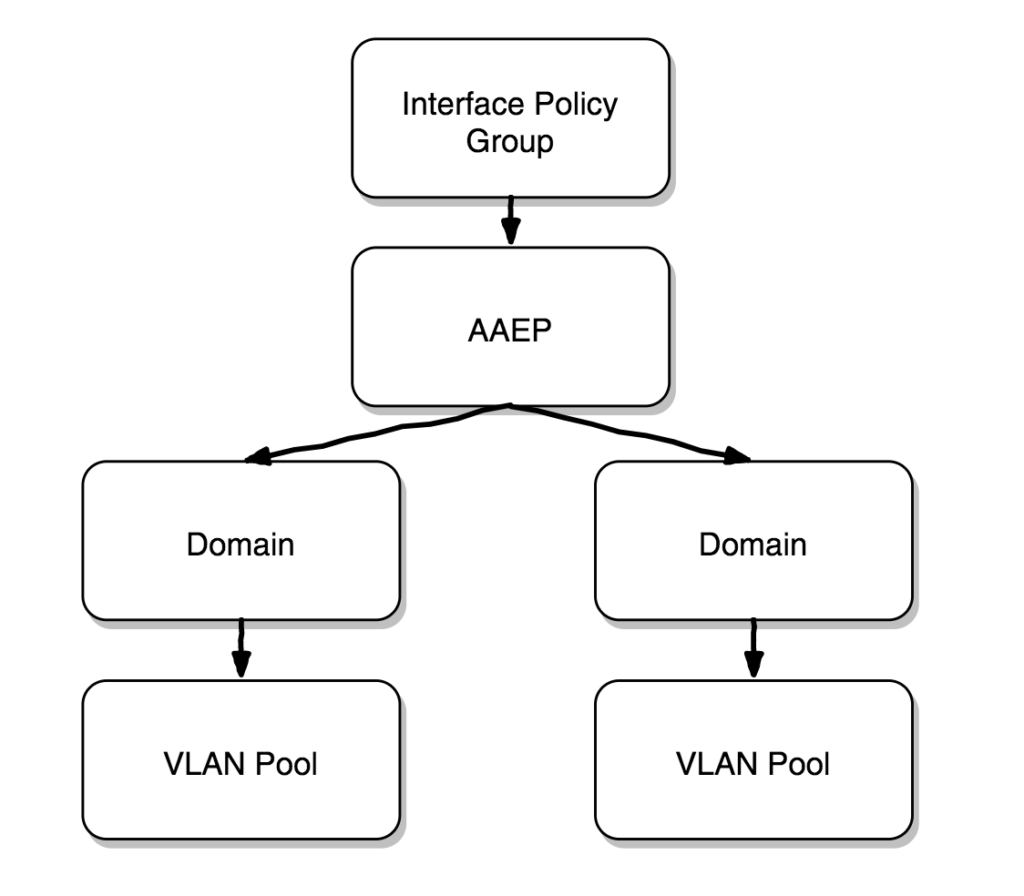
The work flow to configure an access policy is
We’ll start with the
VLAN-Pool
Two types of pools are being used, best to divide them into functional groups.
Static (for physical workload or manual configurations)
Dynamic (for virtualization integration or horizontal orchestration of L4-7 devices)
# cat data/vlanpools.csv
name|description|pool_allocation_mode
Bare-Metal|Created by Ansible|static
Firewalls|Created by Ansible|static
External_WAN|Created by Ansible|static
Virtual_Machines|Created by Ansible|dynamic
name|description|block_start|block_end|pool|pool_allocation_mode
Block1000_1200|Created by Ansible|1000|1200|Bare-Metal|static
Block1201_1300|Created by Ansible|1201|1300|Firewalls|static
Block1301_1400|Created by Ansible|1301|1400|External_WAN|static
Block1401_1600|Created by Ansible|1401|1600|Virtual_Machines|dynamic
Domain Creation
There are five domain profiles available
Fibre Channel
Layer 2
Layer 3
Physical
VMM
To create a domain and the binding we do need those two ansible modules:
aci_domain
---
- name: ACI Domains
  hosts: APIC
  connection: local
  gather_facts: no
  vars:
      whattodo: present
  tasks:
  - name: Read CSV with domains
    read_csv:
      path: ./data/domains.csv
      delimiter: '|'
    register: domains

# Get Input from list contract
  - name: Configure filters from CSV Inputfile
    aci_domain:
      host: '{{ inventory_hostname }}'
      user: ansible
      private_key: /root/.pki/ansible.key
      validate_certs: false
      name: "{{ item.name }}"
      domain_type: "{{ item.domain_type }}"
      state: '{{ whattodo }}'
    with_items: "{{ domains.list }}"
CSV File
name|description|encap_mode|domain_type
BareMetall|Created by Ansible|vlan|phys
Firewalls|Created by Ansible|vlan|phys
ESXi-Servers|Created by Ansible|vlan|vmm
WAN|Created by Ansible|vlan|l3dom
Creating VMM domains requires some add. data – being lazy, I’ve copied the code instead of doing some ansible magic 🙂
name|description|encap_mode|domain_type|vm_provider
ESXi-Servers|Created by Ansible|vlan|vmm|vmware
HyperV|Created by Ansible|vlan|vmm|microsoft
RedHat|Created by Ansible|vlan|vmm|redhat
OpenStack|Created by Ansible|vlan|vmm|openstack
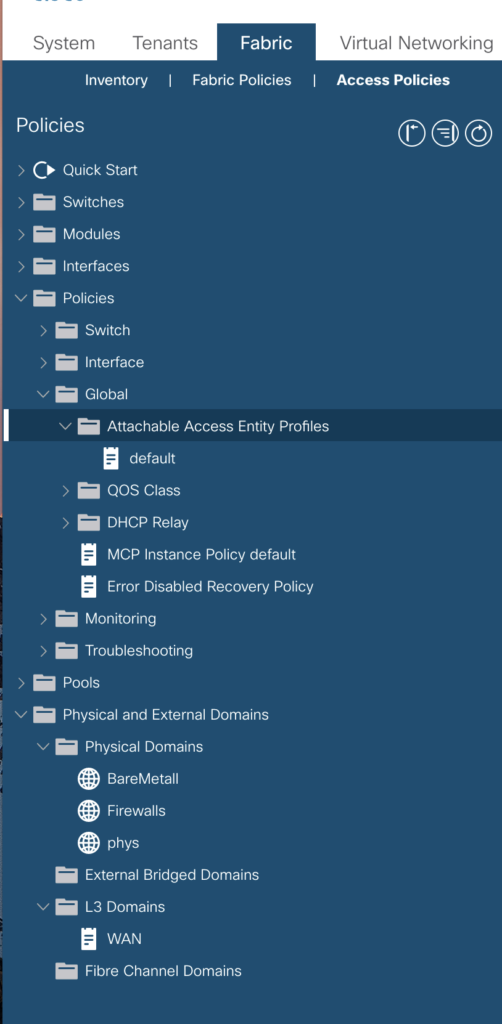
The new domains are visible now in the tab
-> Fabric -> Access Policies -> Physical and External Domains
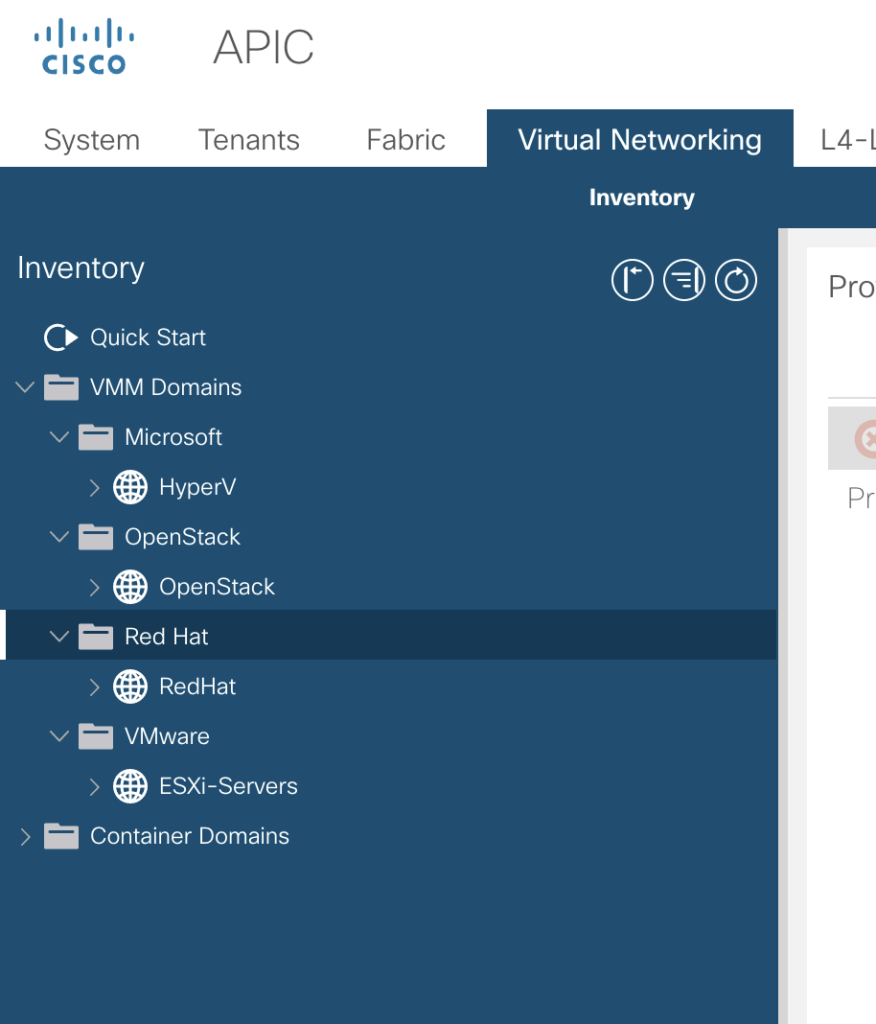
and the VMM Domains are located in a different tab
-> Virtual Networking -> VMM Domains (from my point of view it shuld be under Domains as well, but for sure there is a reason).
Attachable Access Entity Profiles (AAEP)
The AAEP is used to map domains to interface policies, thus mapping VLANs to interfaces.
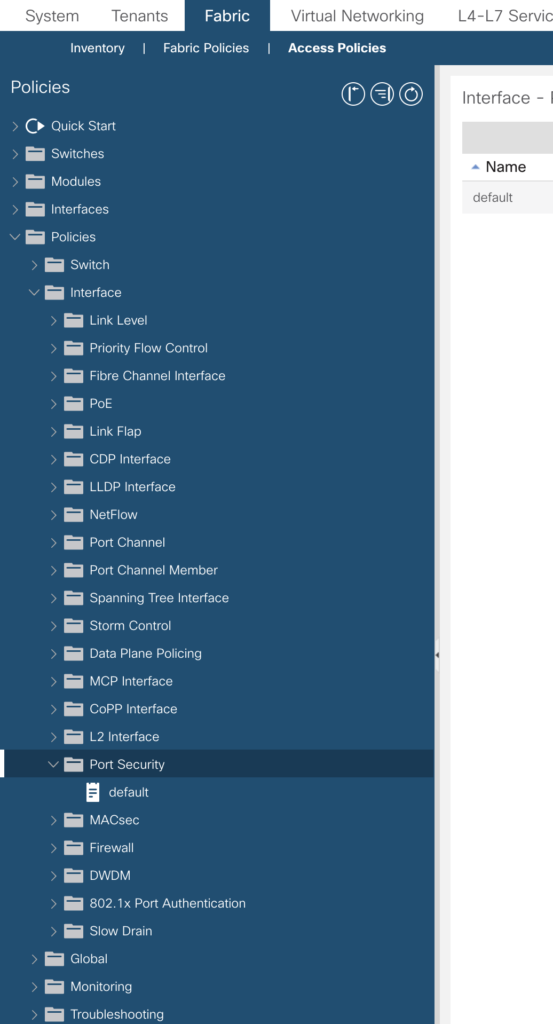
On the fabric definition level there are quite a lot of policies you are able to predefine (to be used later on). Many of those are configurable by using an ansible module.
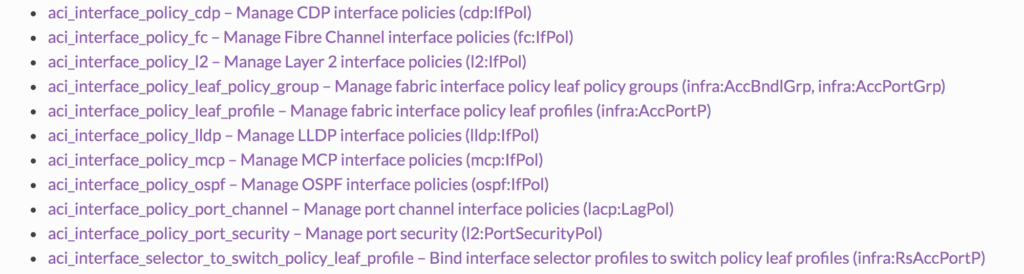
In the modul overview you’ll find
Lets try to create some of them – please have a look as well in the options
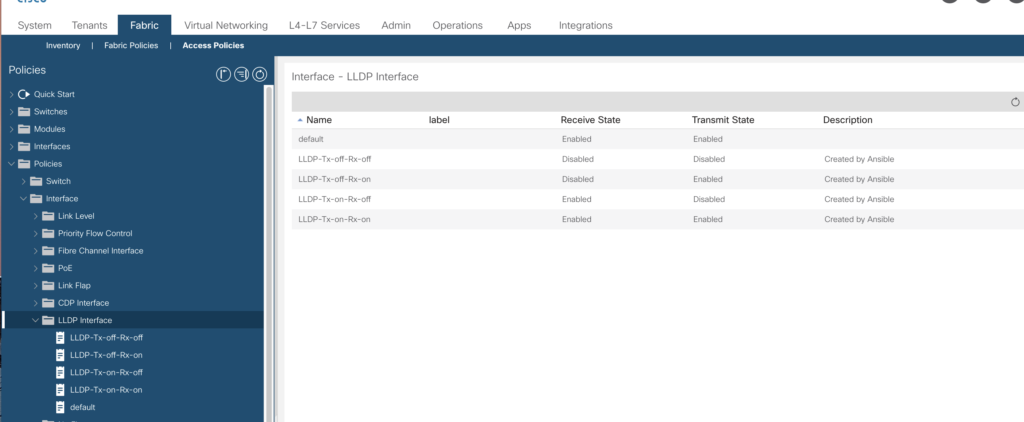
LLDP Interface Policies
The LLDP (link layer discovery protocol) can be configured regarding the receive and transmit state.
lldp_policy|description|receive_state|transmit_state
LLDP-Tx-on-Rx-on|Created by Ansible|yes|yes
LLDP-Tx-off-Rx-off|Created by Ansible|no|no
LLDP-Tx-on-Rx-off|Created by Ansible|yes|no
LLDP-Tx-off-Rx-on|Created by Ansible|no|yes
This is another quick one. As you know, you must not cable spine to spine, leaf to leaf or endpoint to spine. This will be detected by the MCP policy. Sometimes it is required to turn this feature off – per default it is turned on.
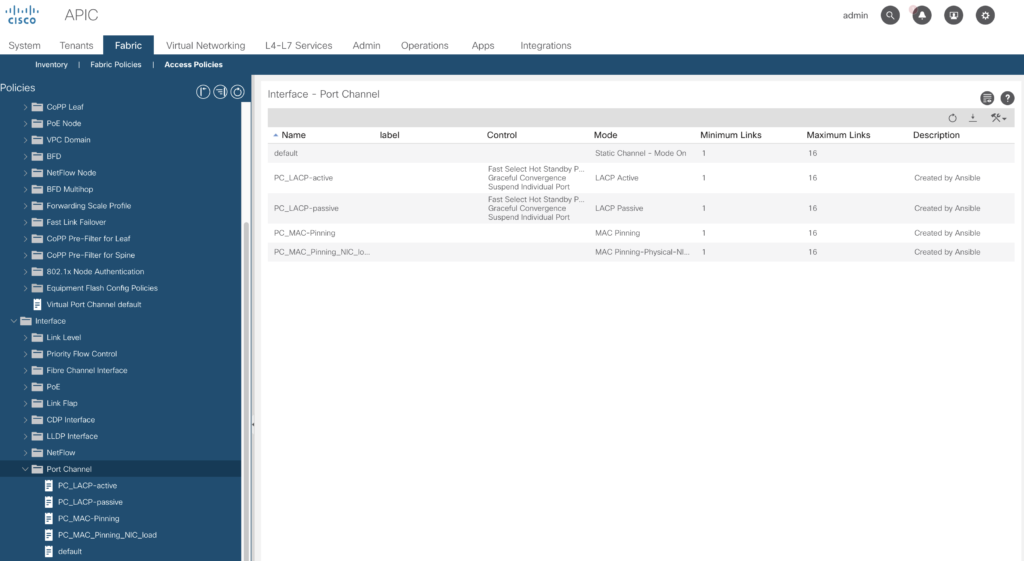
With those you are able to distinguish if using LACP (active or passive) or MAC-Pinning.
Input by another CSV file:
port_channel|description|min_links|max_links|mode
PC_LACP-active|Created by Ansible|1|16|active
PC_LACP-passive|Created by Ansible|1|16|passive
PC_MAC-Pinning|Created by Ansible|1|16|mac-pin
PC_MAC_Pinning_NIC_load|Created by Ansible|1|16|mac-pin-nicload
Potentially you are already used to Ansible, if so, just skip the introduction in this article.
Installing Ansible
Ansible is a huge and powerful tool set to automate activities – there a so many options. Ansible follows an approach they call „batteries included“ – means – all the modules and tools are always part of the distribution. And this includes as well the Cisco ACI automation capabilities.
If you look around – tutorials are available – from both the ansible team as well from other contributors.
As you can see, config file location (for CentOS) is /etc/ansible.cfg.
Please install as well two tools:
yamllint
ansible-lint
as the yaml syntax is quite picky especially regarding indentitation.
Ansible hosts
Another important file is stored in /etc/ansible as well, the hosts file.
Let us create a simple entry there:
# This is the default ansible 'hosts' file.
#
# It should live in /etc/ansible/hosts
#
#   - Comments begin with the '#' character
#   - Blank lines are ignored
#   - Groups of hosts are delimited by [header] elements
#   - You can enter hostnames or ip addresses
#   - A hostname/ip can be a member of multiple groups

# APIC host

[APIC]
192.168.140.40 ansible_user=ansible ansible_connection=local
Next step is to create a user ansible within the fabric.
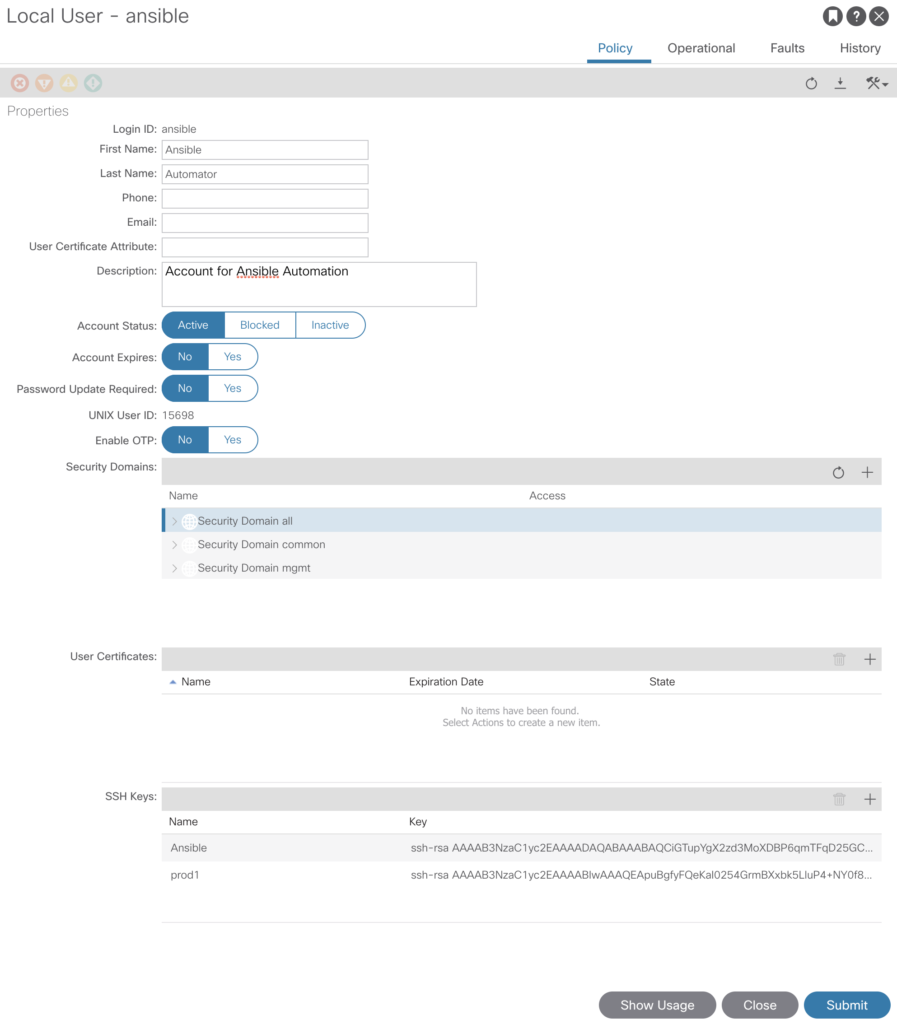
Create Ansible User
As we’ve already done – go to -> Admin -> AAA -> Users and create a new local user. Add your public key from the box you are running ansible from and store it in the SSH Keys section.
Quick check, if we are now able to connect to the box.
One last step – I’m not a big fan of storing plain passwords – starting with Ansible 2.5 it is possible to use private keys to authenticate. This requires some additional steps.
First you have to create a private key and a .crt file (to be used on APIC AAA).
# openssl req -new -newkey rsa:1024 -days 36500 -nodes -x509 -keyout ansible.key -out ansible.crt -subj '/CN=ansible/O=proGIS/C=DE'
Generating a 1024 bit RSA private key
...................................................................++++++
....++++++
writing new private key to 'ansible.key'
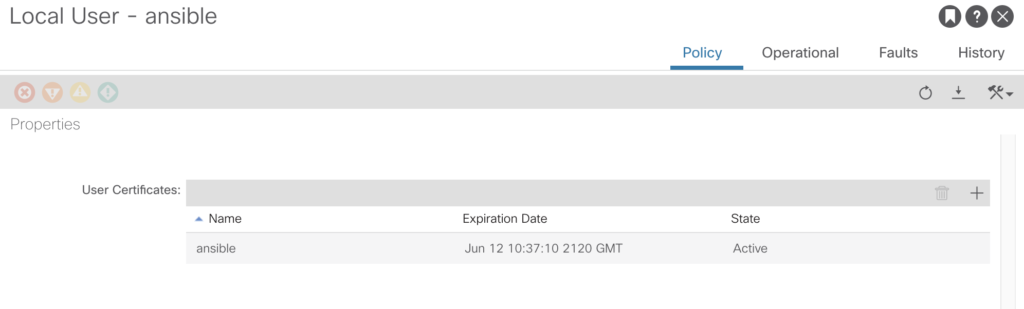
After running this command you’ll find two new files in the directory where you’ve executed the command.
ansible.key (your private key)
ansible.crt (the file required in APIC)
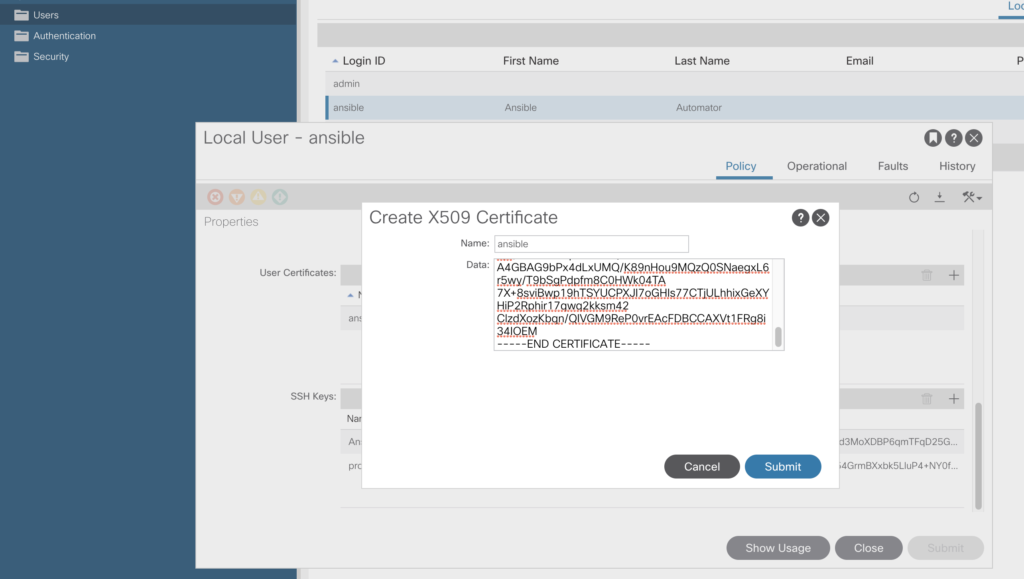
Go now to –> Admin -> AAA -> Users
and add the .crt file content in the user certificates section.
Just replace now the password entry with private_key details, the file looks like this:
---
- name: ACI Tenant Management
  hosts: APIC
  connection: local
  gather_facts: no
  tasks:
  - name: CONFIGURE TENANT
    aci_tenant:
      host: '{{ inventory_hostname }}'
      user: ansible
      private_key: /root/.pki/ansible.key
      validate_certs: false
      tenant: "Beaker"
      description: "Beaker created Using Ansible"
      state: present
...
This works! If you want to see more details about the activities behind the scene – please add -vvvv to you playbook command line.
# ansible-playbook tenant.yml -vvvv
ansible-playbook 2.9.10
  config file = /etc/ansible/ansible.cfg
  configured module search path = [u'/root/.ansible/plugins/modules', u'/usr/share/ansible/plugins/modules']
  ansible python module location = /usr/lib/python2.7/site-packages/ansible
  executable location = /usr/bin/ansible-playbook
  python version = 2.7.5 (default, Apr  2 2020, 13:16:51) [GCC 4.8.5 20150623 (Red Hat 4.8.5-39)]
Using /etc/ansible/ansible.cfg as config file
setting up inventory plugins
host_list declined parsing /etc/ansible/hosts as it did not pass its verify_file() method
script declined parsing /etc/ansible/hosts as it did not pass its verify_file() method
auto declined parsing /etc/ansible/hosts as it did not pass its verify_file() method
Parsed /etc/ansible/hosts inventory source with ini plugin
Loading callback plugin default of type stdout, v2.0 from /usr/lib/python2.7/site-packages/ansible/plugins/callback/default.pyc

PLAYBOOK: tenant.yml *****************************************************************************************************************************************************************************************************
Positional arguments: tenant.yml
become_method: sudo
inventory: (u'/etc/ansible/hosts',)
forks: 5
tags: (u'all',)
verbosity: 4
connection: smart
timeout: 10
1 plays in tenant.yml

PLAY [ACI Tenant Management] *********************************************************************************************************************************************************************************************
META: ran handlers

TASK [CONFIGURE TENANT] **************************************************************************************************************************************************************************************************
task path: /root/nxos/tenant.yml:7
<192.168.140.40> ESTABLISH LOCAL CONNECTION FOR USER: root
<192.168.140.40> EXEC /bin/sh -c 'echo ~root && sleep 0'
<192.168.140.40> EXEC /bin/sh -c '( umask 77 && mkdir -p "` echo /root/.ansible/tmp `"&& mkdir /root/.ansible/tmp/ansible-tmp-1594034388.72-15831-57970545921562 && echo ansible-tmp-1594034388.72-15831-57970545921562="` echo /root/.ansible/tmp/ansible-tmp-1594034388.72-15831-57970545921562 `" ) && sleep 0'
<192.168.140.40> Attempting python interpreter discovery
<192.168.140.40> EXEC /bin/sh -c 'echo PLATFORM; uname; echo FOUND; command -v '"'"'/usr/bin/python'"'"'; command -v '"'"'python3.7'"'"'; command -v '"'"'python3.6'"'"'; command -v '"'"'python3.5'"'"'; command -v '"'"'python2.7'"'"'; command -v '"'"'python2.6'"'"'; command -v '"'"'/usr/libexec/platform-python'"'"'; command -v '"'"'/usr/bin/python3'"'"'; command -v '"'"'python'"'"'; echo ENDFOUND && sleep 0'
<192.168.140.40> EXEC /bin/sh -c '/usr/bin/python && sleep 0'
Using module file /usr/lib/python2.7/site-packages/ansible/modules/network/aci/aci_tenant.py
<192.168.140.40> PUT /root/.ansible/tmp/ansible-local-15822LIJPe1/tmpfW12QD TO /root/.ansible/tmp/ansible-tmp-1594034388.72-15831-57970545921562/AnsiballZ_aci_tenant.py
<192.168.140.40> EXEC /bin/sh -c 'chmod u+x /root/.ansible/tmp/ansible-tmp-1594034388.72-15831-57970545921562/ /root/.ansible/tmp/ansible-tmp-1594034388.72-15831-57970545921562/AnsiballZ_aci_tenant.py && sleep 0'
<192.168.140.40> EXEC /bin/sh -c '/usr/bin/python /root/.ansible/tmp/ansible-tmp-1594034388.72-15831-57970545921562/AnsiballZ_aci_tenant.py && sleep 0'
<192.168.140.40> EXEC /bin/sh -c 'rm -f -r /root/.ansible/tmp/ansible-tmp-1594034388.72-15831-57970545921562/ > /dev/null 2>&1 && sleep 0'
changed: [192.168.140.40] => {
    "ansible_facts": {
        "discovered_interpreter_python": "/usr/bin/python"
    },
    "changed": true,
    "current": [
        {
            "fvTenant": {
                "attributes": {
                    "annotation": "",
                    "descr": "Beaker created Using Ansible",
                    "dn": "uni/tn-Beaker",
                    "name": "Beaker",
                    "nameAlias": "",
                    "ownerKey": "",
                    "ownerTag": "",
                    "userdom": ":all:mgmt:common:"
                }
            }
        }
    ],
    "invocation": {
        "module_args": {
            "certificate_name": "ansible",
            "description": "Beaker created Using Ansible",
            "host": "192.168.140.40",
            "output_level": "normal",
            "password": null,
            "port": null,
            "private_key": "VALUE_SPECIFIED_IN_NO_LOG_PARAMETER",
            "protocol": "https",
            "state": "present",
            "tenant": "Beaker",
            "timeout": 30,
            "use_proxy": true,
            "use_ssl": true,
            "user": "ansible",
            "username": "ansible",
            "validate_certs": false
        }
    }
}
META: ran handlers
META: ran handlers

PLAY RECAP ***************************************************************************************************************************************************************************************************************
192.168.140.40             : ok=1    changed=1    unreachable=0    failed=0    skipped=0    rescued=0    ignored=0
Starting with rel. 2.8 ansible offers encryption of the private key as well. Please find more details at the bottom of this article.
After we’ve mastered our access to an ACI fabric via Postman – how about the same thing from a script?
Why a script? Firstly – this will give you a deeper understanding how this is working. And secondly – using a script gives you more control, especially if you are planning to automate things.
Just a simple example – you want to create in an automated way changes into the fabric – in the end unattended and in the background. There a so many tools to support you.
Workflow could be:
create your demand as a database entry and trigger the build process
details are being pushed out to a config file
your delivery environment (e.g. GoCD ) detects this config file and
launches your script (python, ansible, shell, whatever you prefer)
changes will be implemented failsafe (in theory 🙂 as we all know – life can be guileful)
The procedure is always the same – send a post request to the API, and check have a look into the results.
Using Curl in a shell script
We’ll start with a simple curl command line – to login into the box.
As this works – we’ll put this into a bash script.
#!/bin/bash
#
# Script to login to APIC via curl
#

# Credentials
user=admin
pwd=donttell
# Curl Post
curl -i --insecure -H "content-type:application/json" -XPOST https://192.168.140.40/api/aaaLogin.json -d '{ "aaaUser" : { "attributes": {"name":"'$user'","pwd":"'$pwd'" } } } '

printf "\n\n Done\n\n"

# End of script
Works as designed – nice.
In the end – we’ll follow the same approach as we did with Postman.
The only difference – we’ve to store the session cookie we’ll get after the login (named APIC-cookie) and hand it over to the curl command to create the test tenant.
#!/bin/bash
#
# Script to create a tenant via curl
#
# Credentials
user=admin
pwd=sosecretsosecret
# Curl Post to get logged in
# Cookie is being stored in file named "Cookie"
curl -i --insecure -H "content-type:application/json" -XPOST https://192.168.140.40/api/aaaLogin.json -d '{ "aaaUser" : { "attributes": {"name":"'$user'","pwd":"'$pwd'" } } } ' -c Cookie
printf "\n\n Logged in\n\n"
printf "\n\n Create tenant\n\n"
# Curl Post to create the tenant
# Cookie being read in
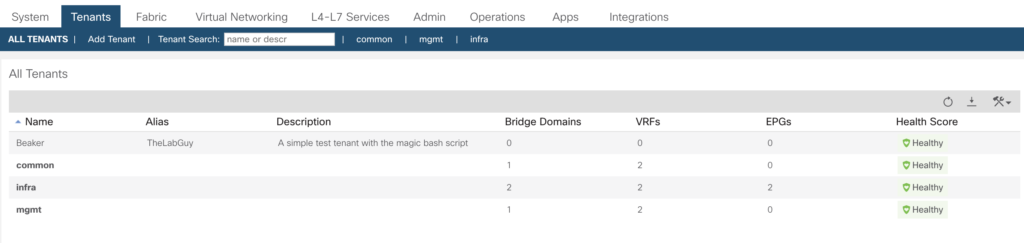
curl -i --insecure -H "content-type:application/json" -XPOST https://192.168.140.40/api/node/mo/uni/tn-Beaker.json -d '{"fvTenant":{"attributes":{"dn":"uni/tn-Beaker","name":"Beaker","nameAlias":"TheLabGuy","descr":"A simple test tenant with the magic bash script","rn":"tn-Beaker","status":"created"},"children":[]}}' -b Cookie
printf "\n\n Done\n\n"
# End of script
Run the script and have a look on your APIC console.
The most obvious advantage of using a script instead of Postman – you don’t need to install a huge software package (OSX version has a 350 MB size), much leaner.
On the other hand – you’ve got much more options at hand by using Postman, so as always – you’ve to decide which approach fits best. In most cases – both – depends on your use case.
JSON PP (Pretty Printer)
If you modify the curl call a little bit, you are able to use tools like json_pp (man json_pp).
ACI can be configured via the CLI console command and the web based interface. But there is another option – which enables automation by scripted configuration.
Lets have first a view on the internals.
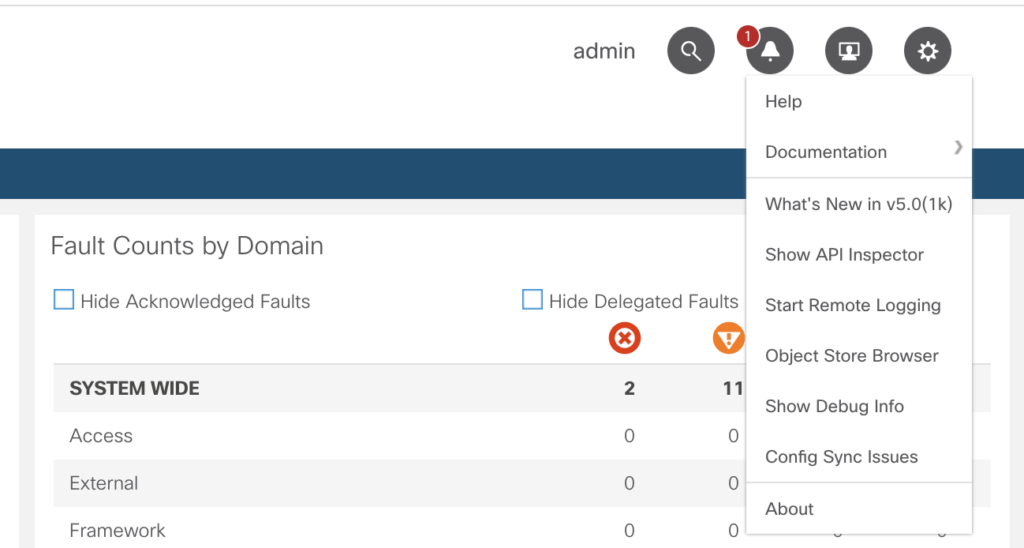
If you click on the gear symbol on the upper right side of the web based interface you’ll notice an option „Show API inspector“.
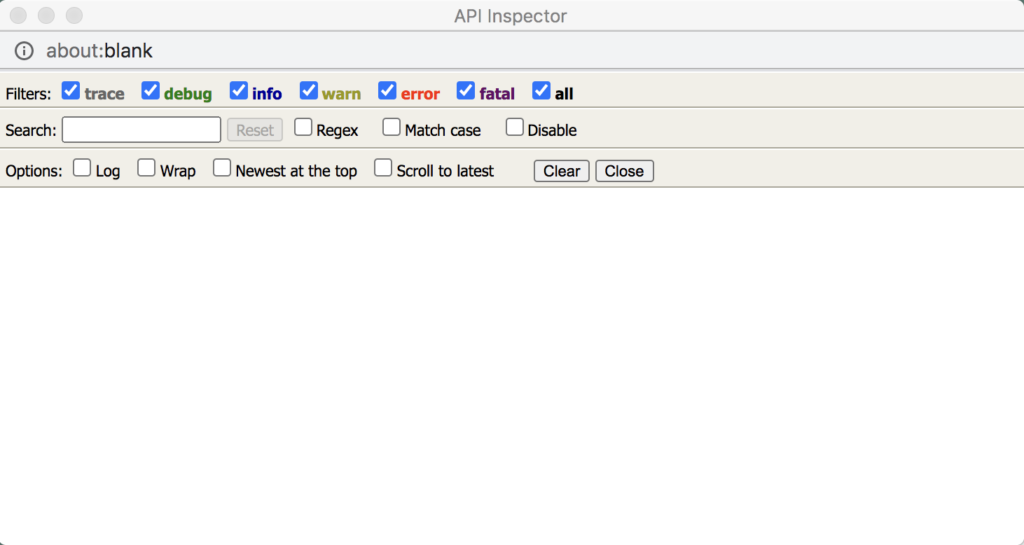
Now you’ll get an additional window – the API inspector.
and if you choose the various pages within the APIC web console, you’ll see the corresponding communication within the API inspector.
There are filters available, and it is possible to search in the output for certain keywords.
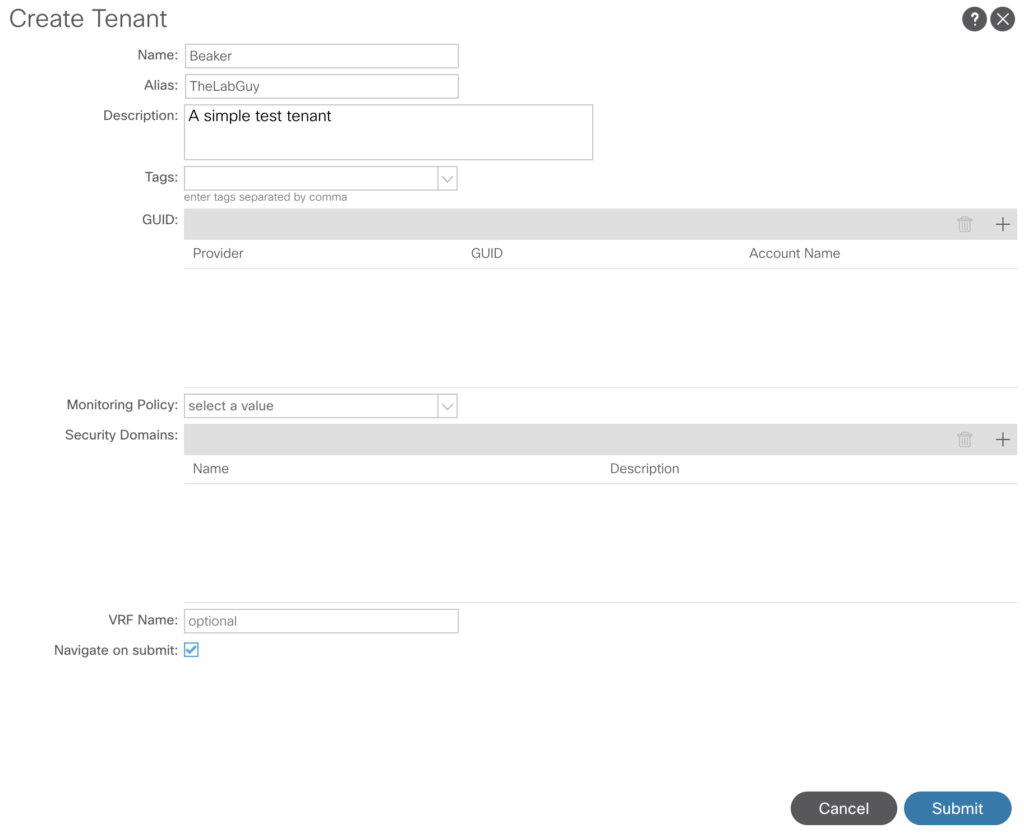
As an example – we just add a Tenant.
-> Tenants -> Add Tenant
To keep it simple, I’ve just filled in three fields.
After pressing „Submit“ the API inspector is being updated.
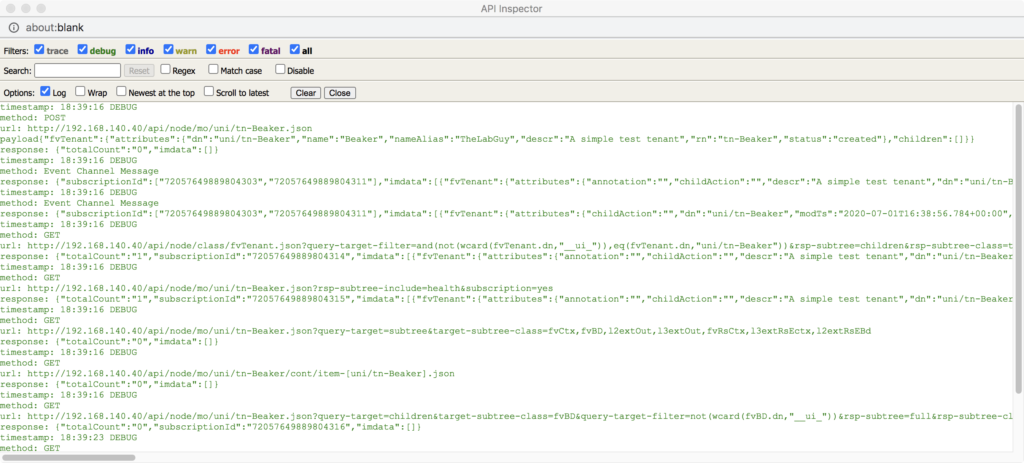
if you now search for „POST“ – here we go.
method: POST
url: http://192.168.140.40/api/node/mo/uni/tn-Beaker.json
payload{"fvTenant":{"attributes":{"dn":"uni/tn-Beaker","name":"Beaker","nameAlias":"TheLabGuy","descr":"A simple test tenant","rn":"tn-Beaker","status":"created"},"children":[]}}
response: {"totalCount":"0","imdata":[]}
timestamp: 18:39:16 DEBUG
That is the payload JSON code triggering the creation of a tenant.
But how to do this from an external tool or even better by a script?
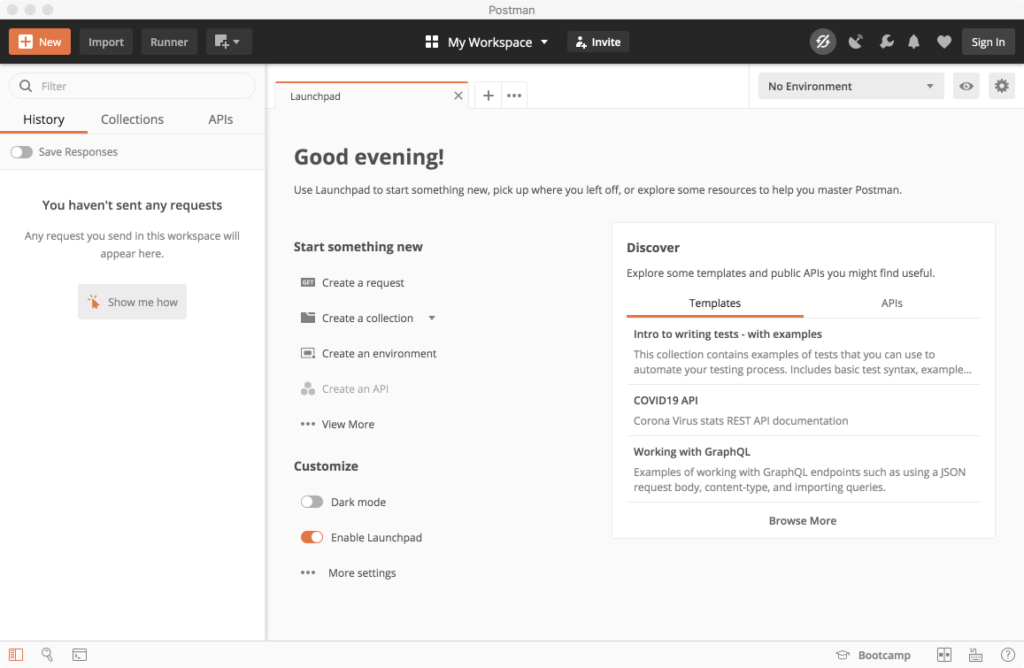
To achieve this, we’ll start with Postman, a collaboration platform with huge capabilities – to go into detail is far beyond of our scope here. We’ll install the application and have a look how this works in principle.
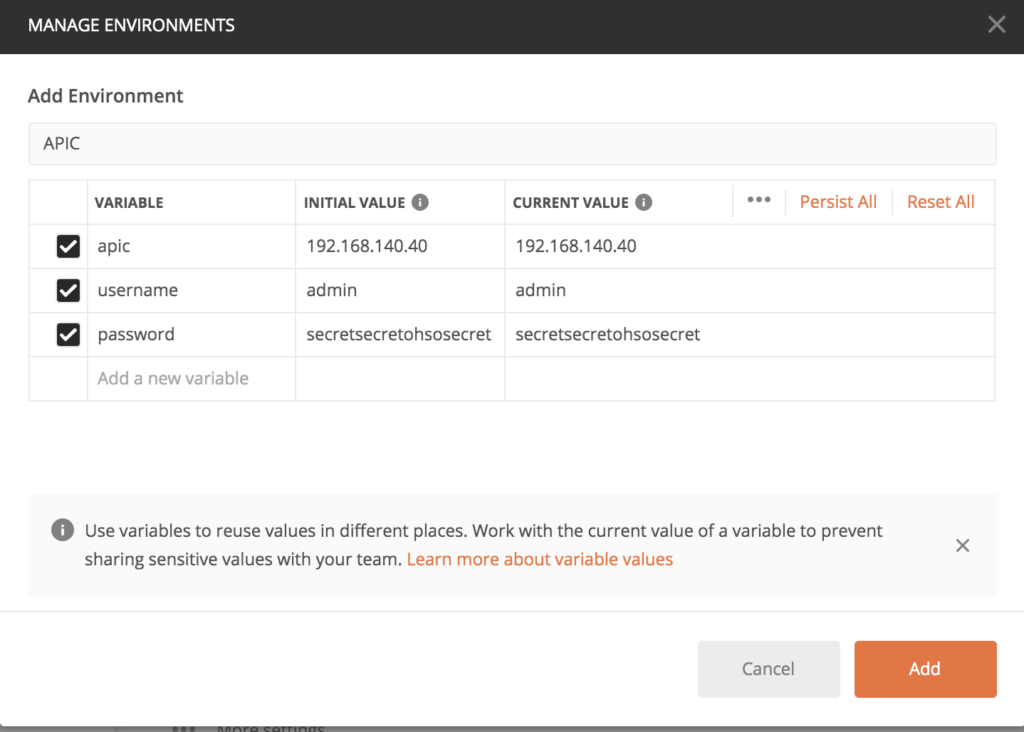
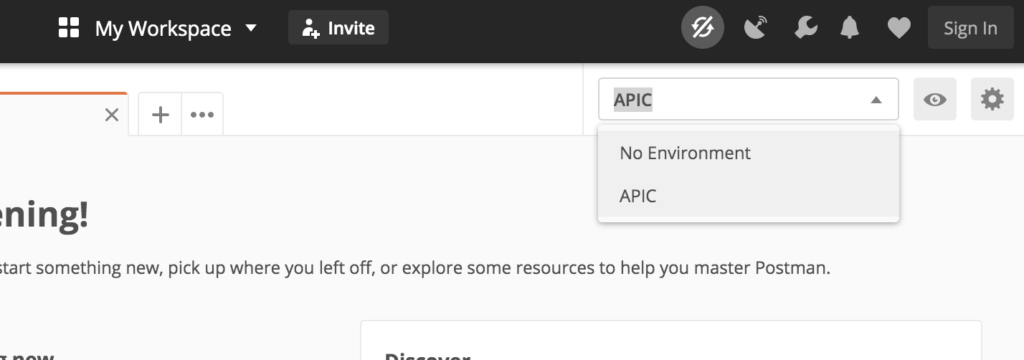
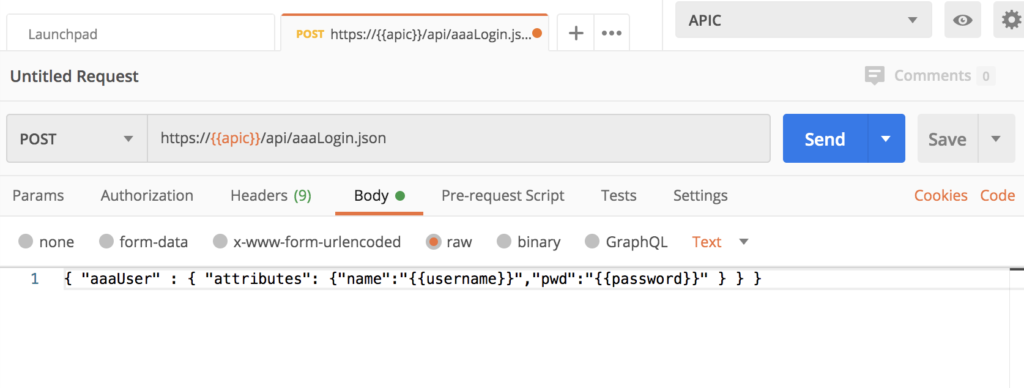
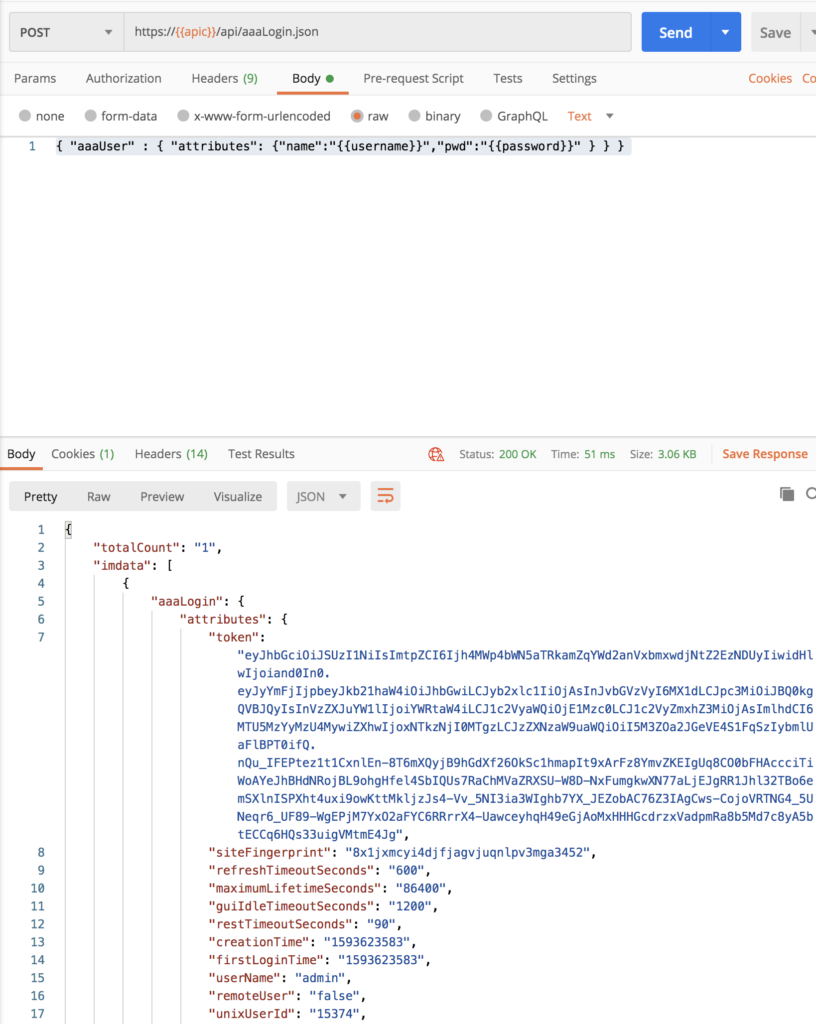
apic, username and password are the variables we’ve defined for the environment.
After pressing „Send“ – you’ll get an answer from the system.
Another achievement – we are now able to communicate via Postman.
Next step – we’d like to create a new tenant. If we go up – we’ll see all the information required to launch this via our tool.
CAVEAT: The API inspector captured call ist http – but it has to be https. http is only being used internally in the APIC.
The POST-URL will be:
https://{{apic}}/api/node/mo/uni/tn-Beaker.json
and the payload (the information for the body section) will be.
{"fvTenant":{"attributes":{"dn":"uni/tn-Beaker","name":"Beaker","nameAlias":"TheLabGuy","descr":"A simple test tenant with Postman","rn":"tn-Beaker","status":"created"},"children":[]}}
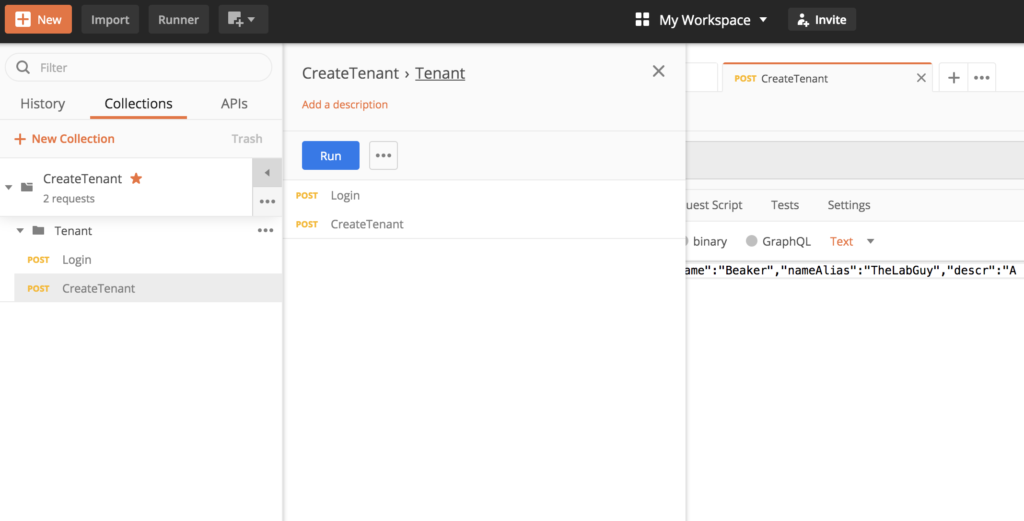
you’ve to add those two request into one collection.
Pressing „Run“ will open a new window.
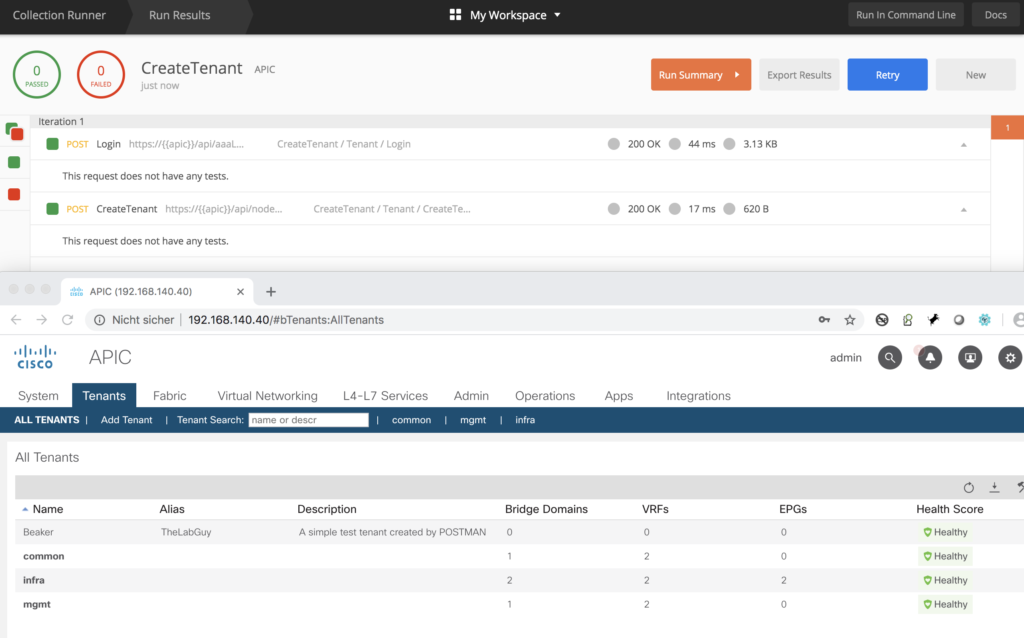
Pressing „Run CreateTenant“ triggers the collection to be executed.
The lower half of the image shows in the APIC console our new tenant.
Postman and Excel Input
To stay with our example above – how to create multiple tenants with one go based on the input of an excel table. This is quite straight forward.
We do need:
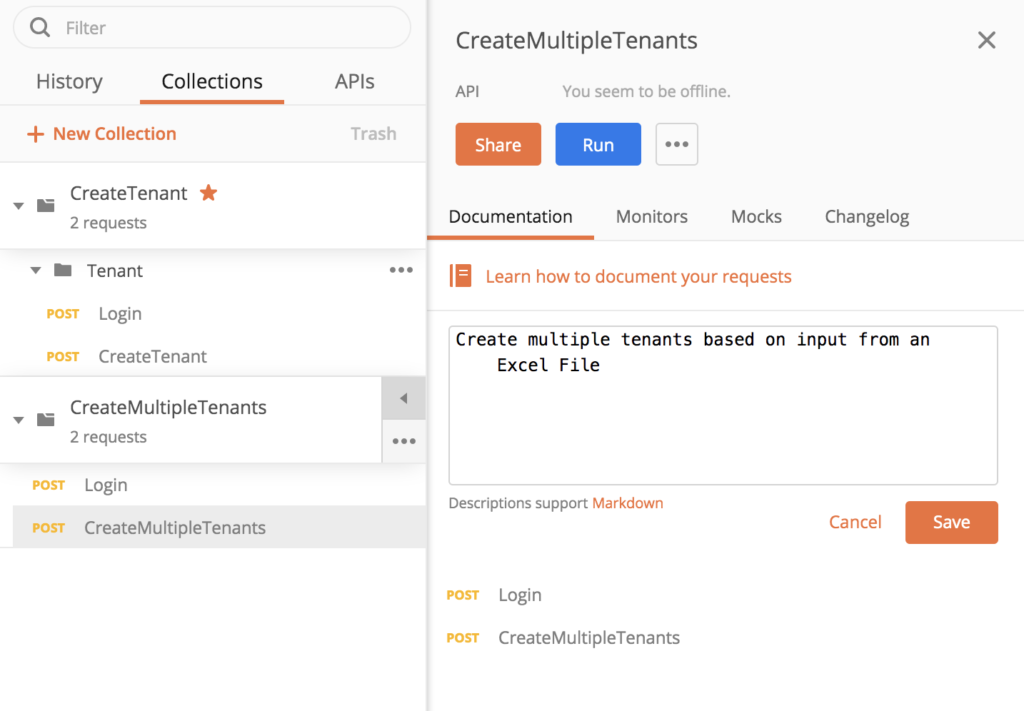
Collection to control the build
within the collection the commands to login to the APIC (we’ll just copy the one we’ve already created)
and a control table (in this case an excel file)
The input we do need for this simple example is the name of the tenant, an alias and a description.
Save this list as a comma-separated CSV file (important!).
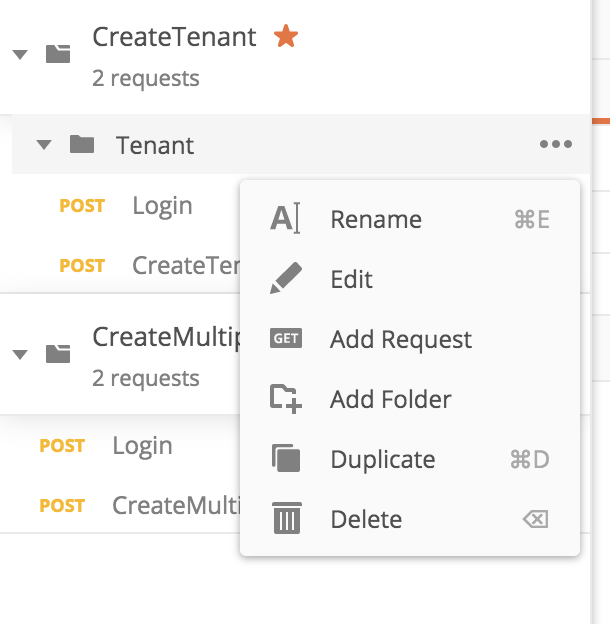
We’re going now to create a new collection with the modified payload to use the input list, we just copy the existing two examples (right to the request name there are three dots, which will give you a context menu).
Next step – modify the payload and replace the static values with variable names (use those header names from the excel list).
Static version:
{"fvTenant":{"attributes":{"dn":"uni/tn-Beaker","name":"Beaker","nameAlias":"TheLabGuy","descr":"A simple test tenant created by POSTMAN","rn":"tn-Beaker","status":"created"},"children":[]}}
Save your work – and press run as in the example above.
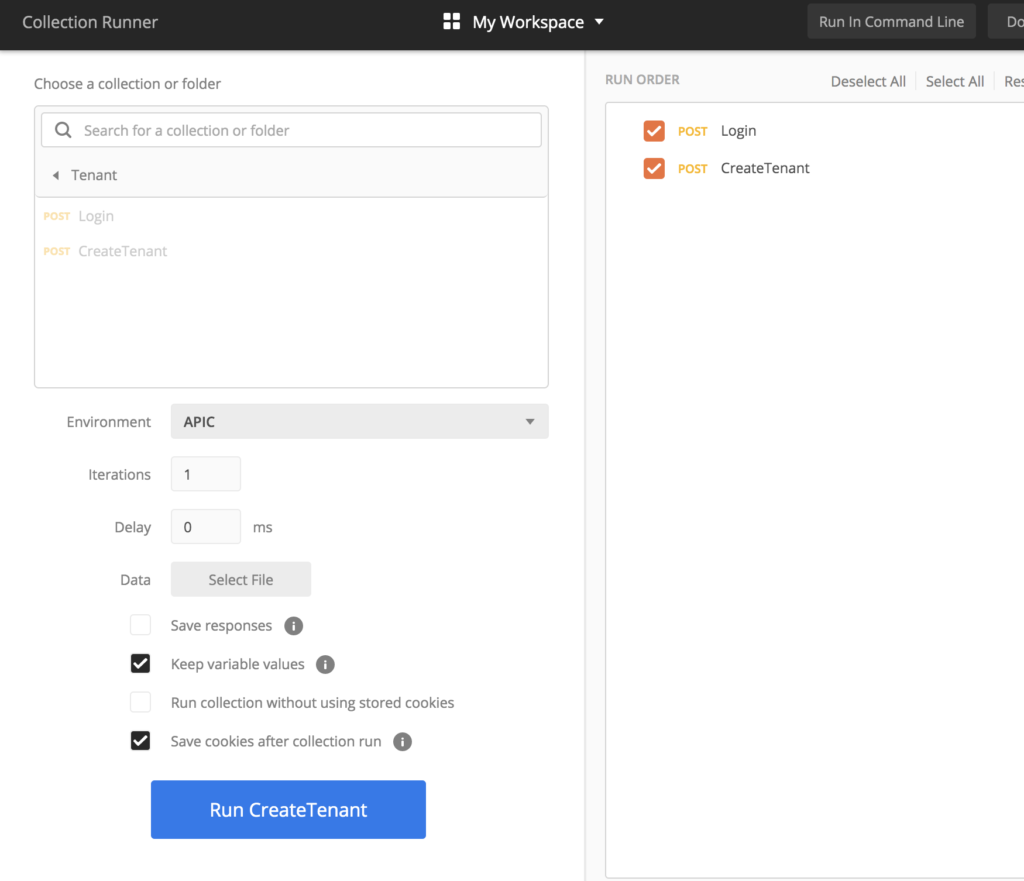
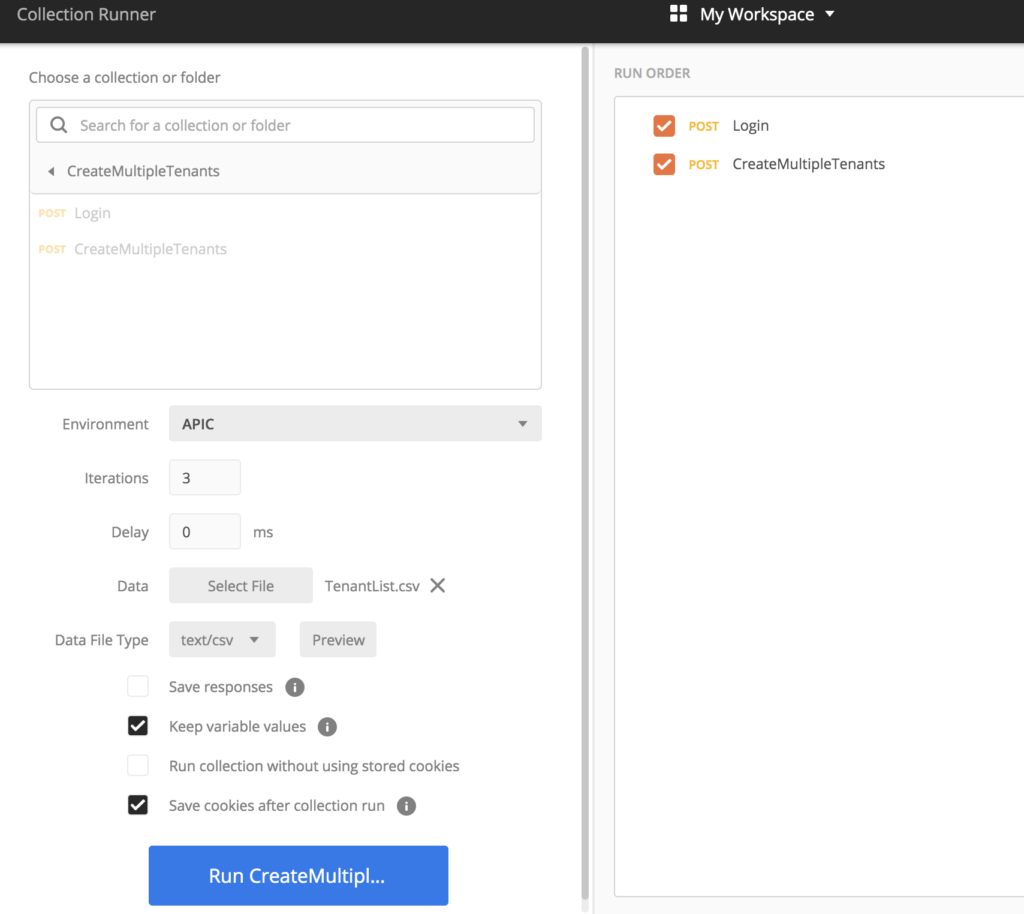
After pressing „Run“ the control window will open.
Select your environment and (by pressing on „Select File“ next to Data ) your control file.
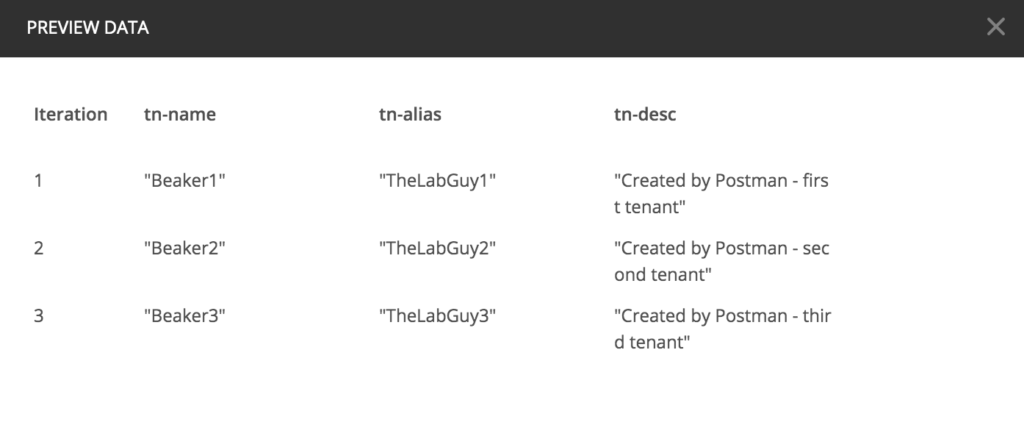
After loading you can do a last sanity check by selecting „Preview“.
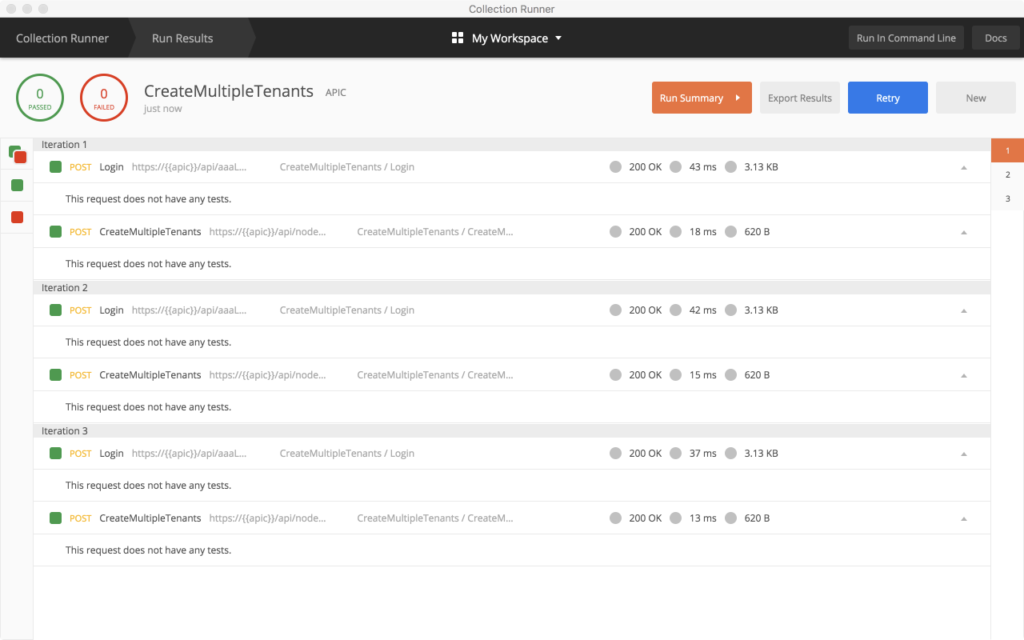
And now – another drum roll please – click on „Run CreateMultipleTenants“
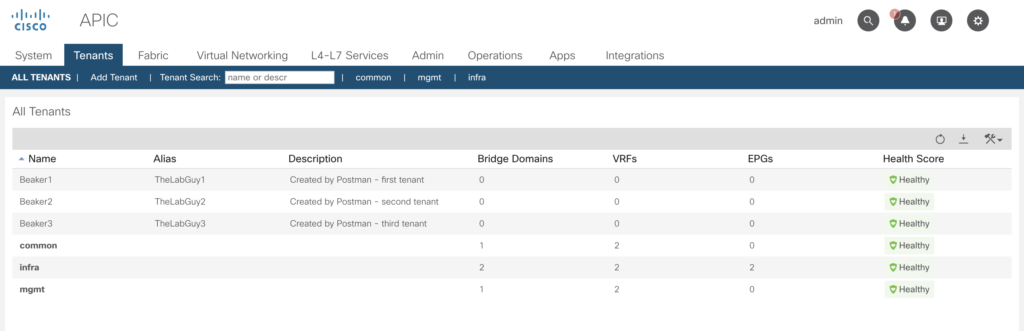
In your APIC console the result of your run is immediately visible.
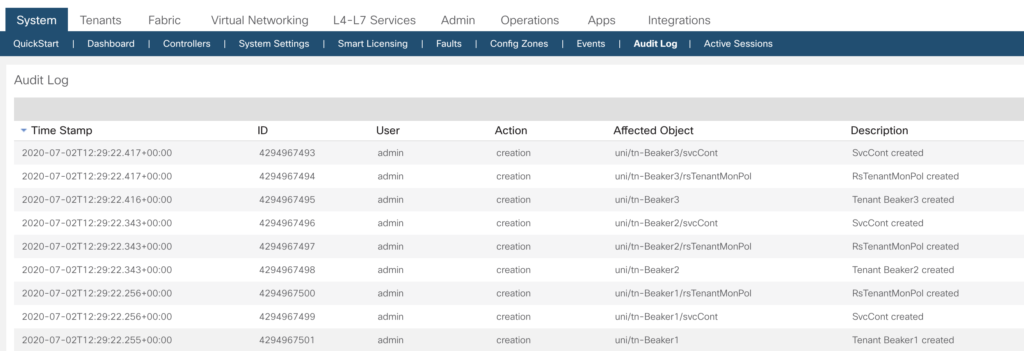
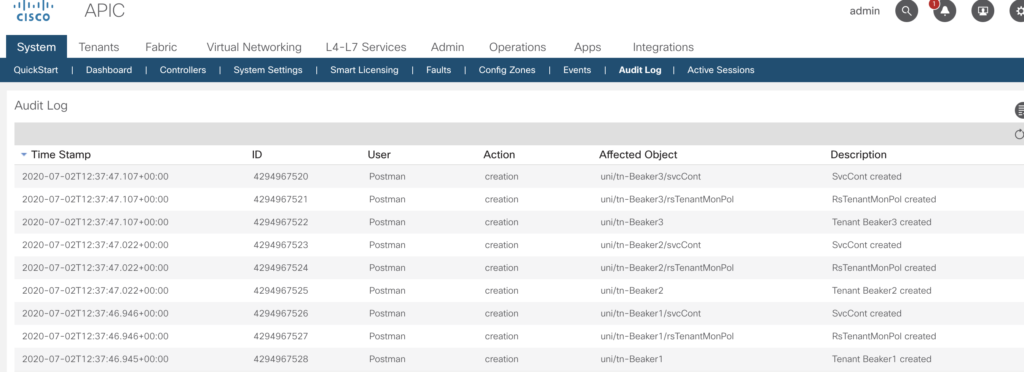
and as well – it is being tracked in the audit log.
At this point – think about user management – rather simple to create a dedicated account for your postman activities, that way it is much easier to track changes.
As we all know – a working backup is a must in every IT configuration. And even more important – the backup ought to be usable for a restore.
As the ACI simulator will always be an untouched configuration after boot we’ll have a look how to apply a backup to restore the configuration.
This approach can be chosen as well to restore a production configuration to a clone – but – please be aware – certain configuration details have to be the same. (e.g. TEP pool, mgmt VLAN, etc.) and can’t be changed.
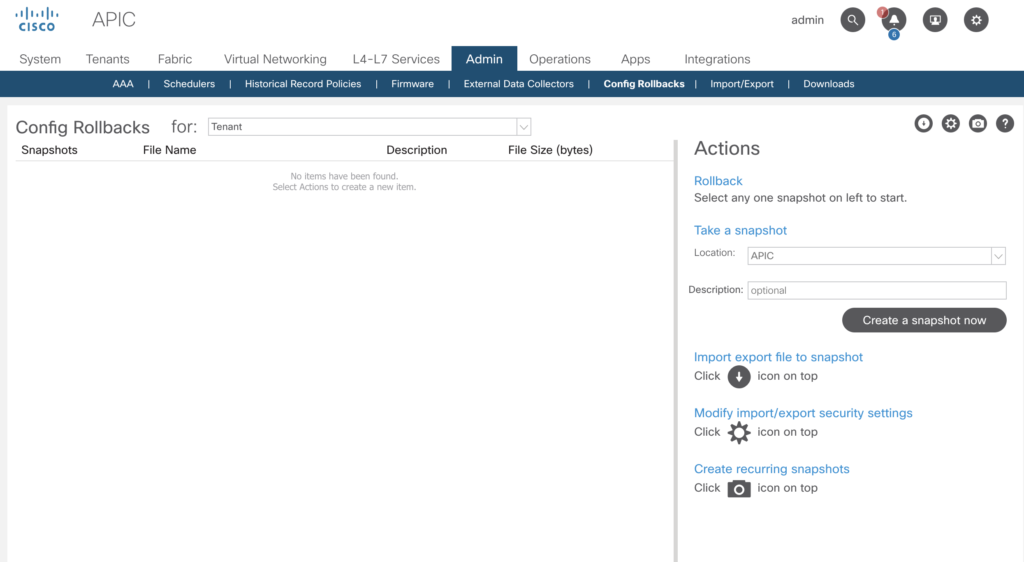
Creating a snapshot
After you’ve done your configuration, it is time to create your backup.
Please move to
–> Admin –> Config Rollbacks
This snapshot is being stored on the apic in directory /data2/snapshots, you can give it name as well.
apic1# pwd
/data2/snapshots
apic1# ls -l
insgesamt 40
-rw-r--r-- 1 ifc admin 40611 29. Jun 20:50 ce2_defaultOneTime-2020-06-29T20-50-49.tar.gz
Now you are able to copy this snapshot file via scp (ftp and sftp is possible as well) to our jump server, it is gzipped tar ball with all the configuration steps you’ve done before.
While waiting for the initial start, I’ve created a backup user on the jump server, and moved the snapshot to /home/backup.
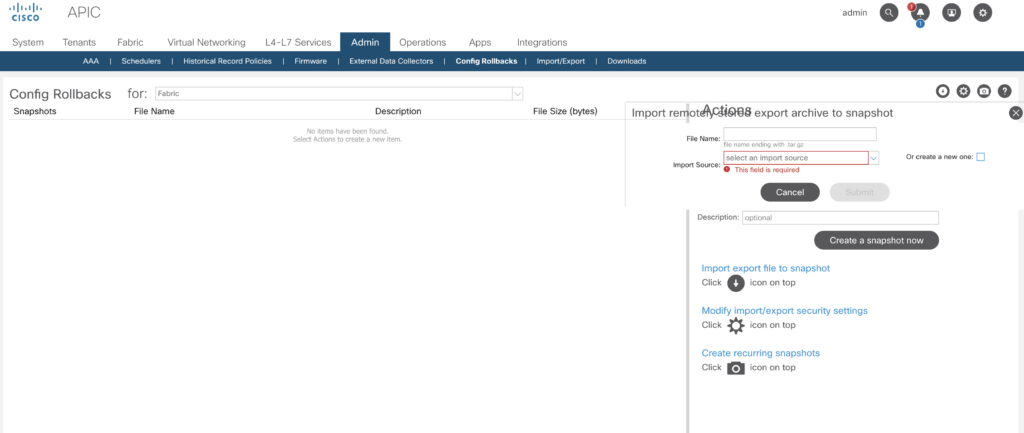
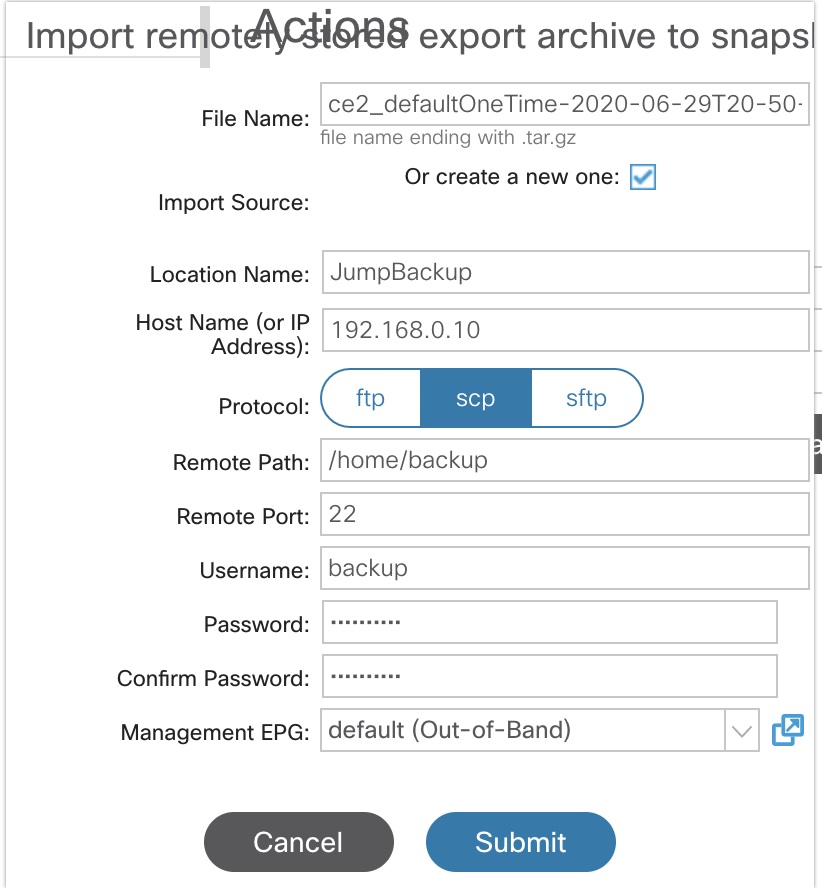
We now move to the very same location (-> Admin -> Config Rollbacks) , but this time we do select the up arrow in the right upper left.
and fill in the details to advise the system to pull the backup file.
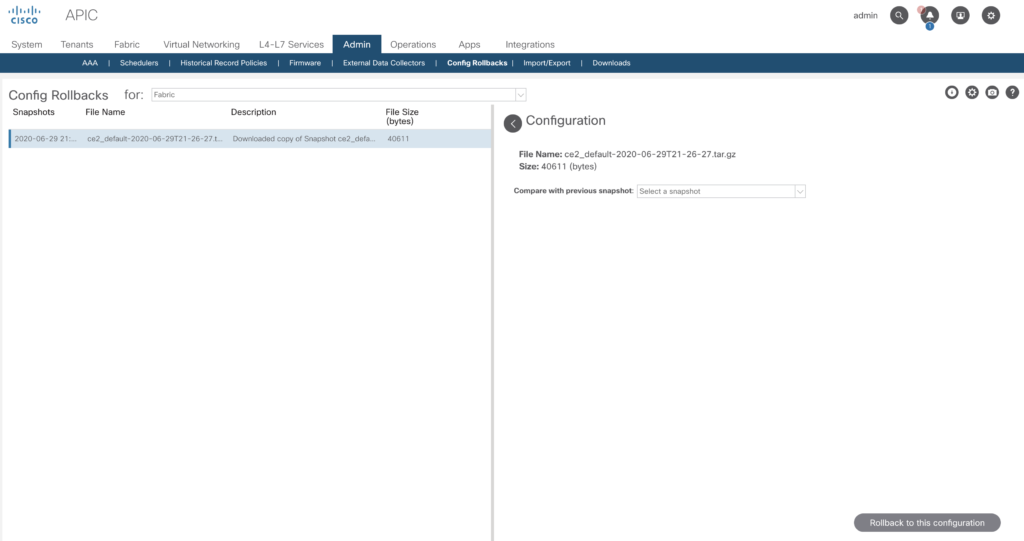
The upload happens pretty fast and you’ll be able to see the snapshot file.
And – the big moment – press Rollback in the lower left corner.
One last question:
and more or less immediately you’re going to see a green checkmark – nice.
Give the fabric a while to apply all the changes this will cause a lot of activity – but you’ll see the setup as you’ve made the snapshot prior shutting down the simulator.
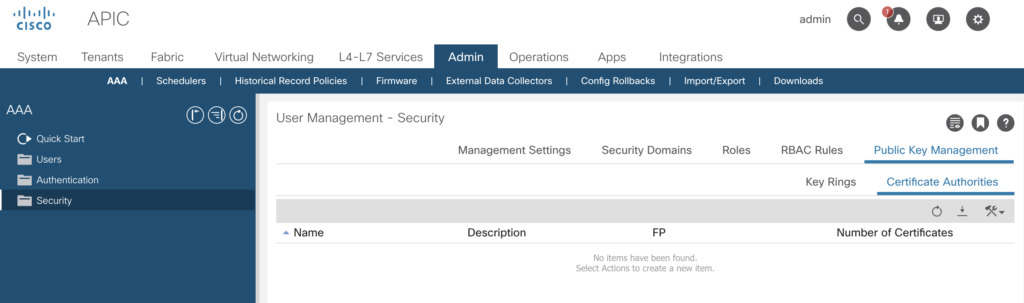
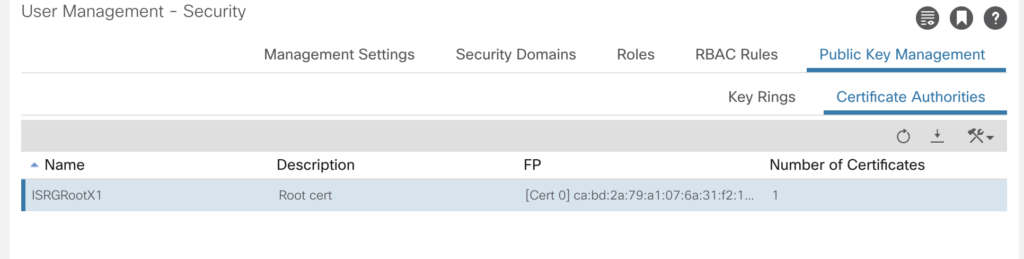
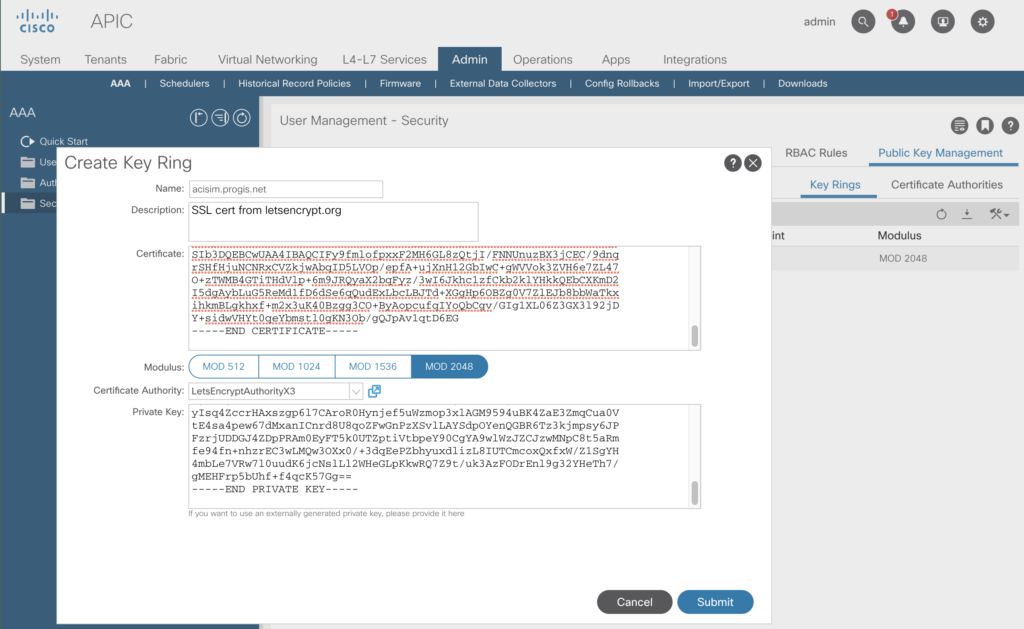
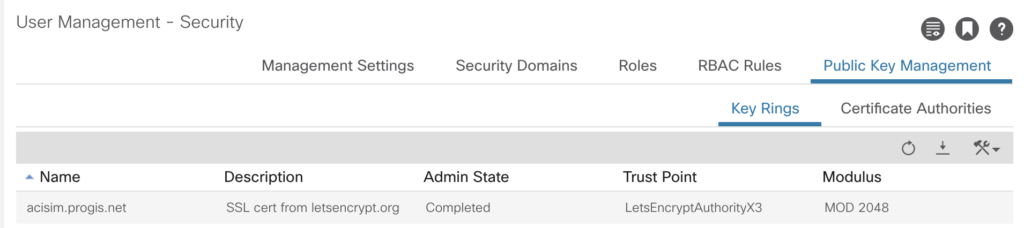
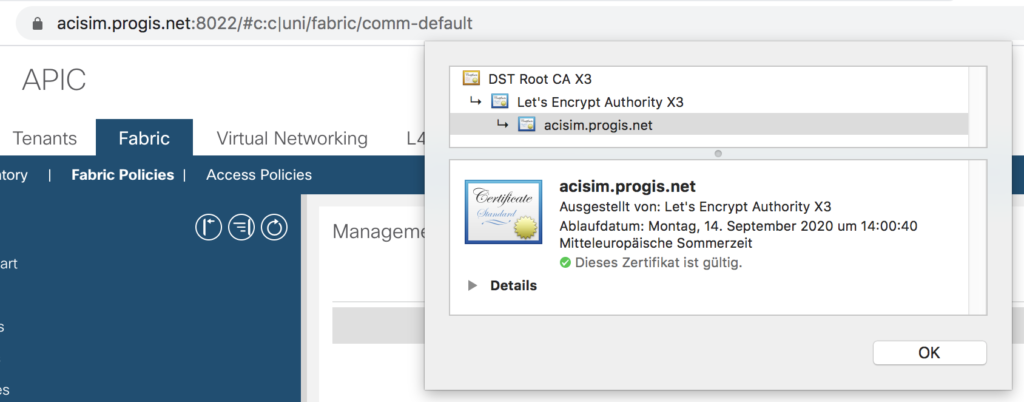
When connecting to the APIC you are enforced to use SSL. And in this case, you are either expected to use a valid SSL cert or a self-signed one. In the latter case and if this is not configured properly, you’ll get bothered by those browser warnings.
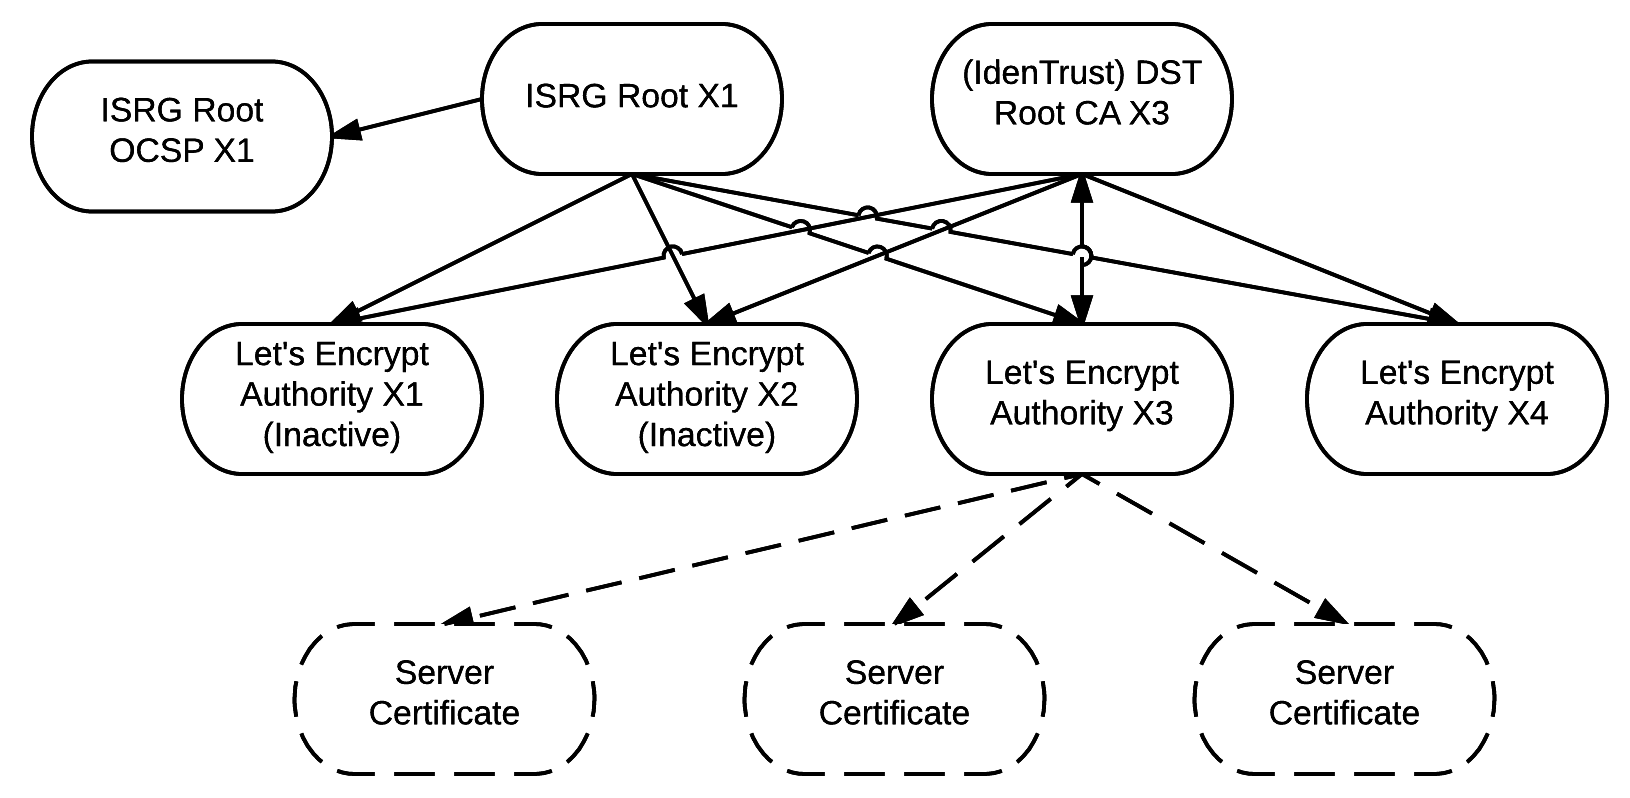
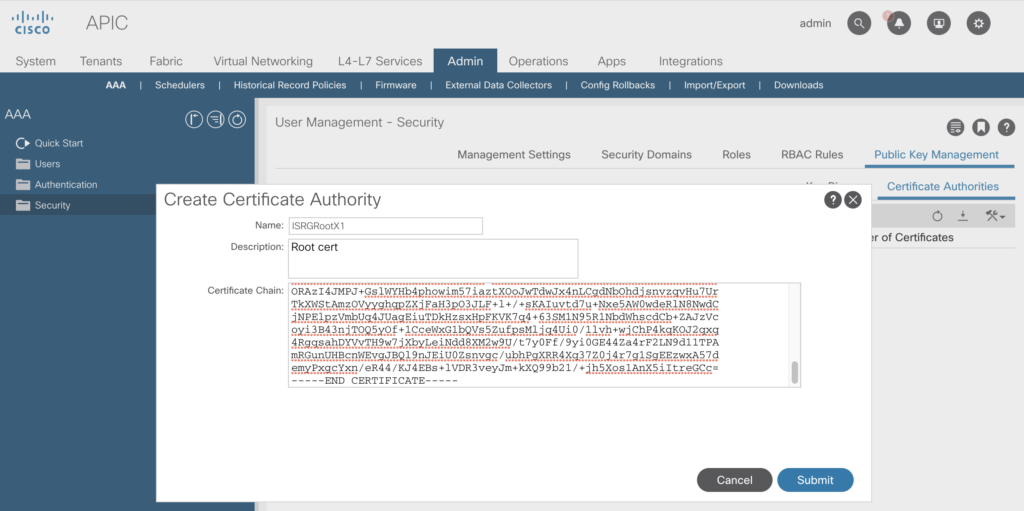
One option is to request certs from a commercial provider (being one or two year valid) or – and this is becoming more and more standard – using a letsencrypt.org validated cert.
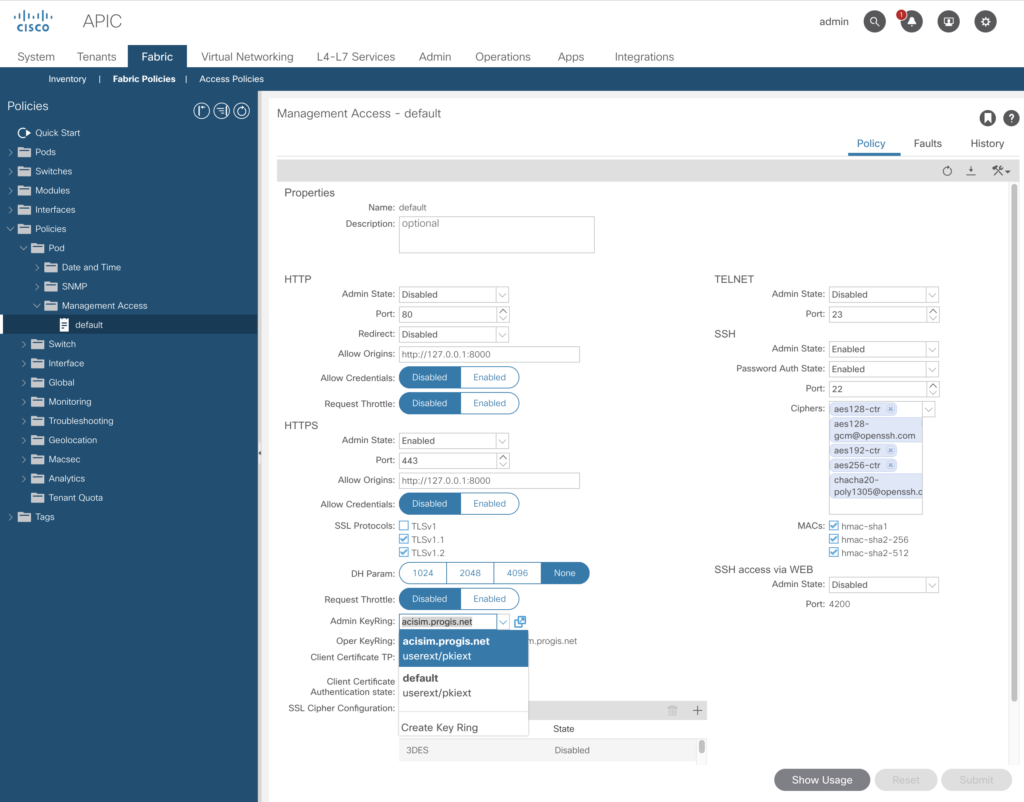
Choose there the Admin KeyRing you’ve just created.
A quick check via a webbrowser – all set.
By the way – in this configuration tab you are able to enable plain http as well – e.g. to use a NGINX reverse proxy in front of.
NGINX Setup
To use Nginx as a reverse proxy it is required to handle the websocket connections properly.
If take away the SSL offloading from the APIC and move it to the Nginx, things are much easier to handle. Requires to turn on http internally, and to create this configuration.
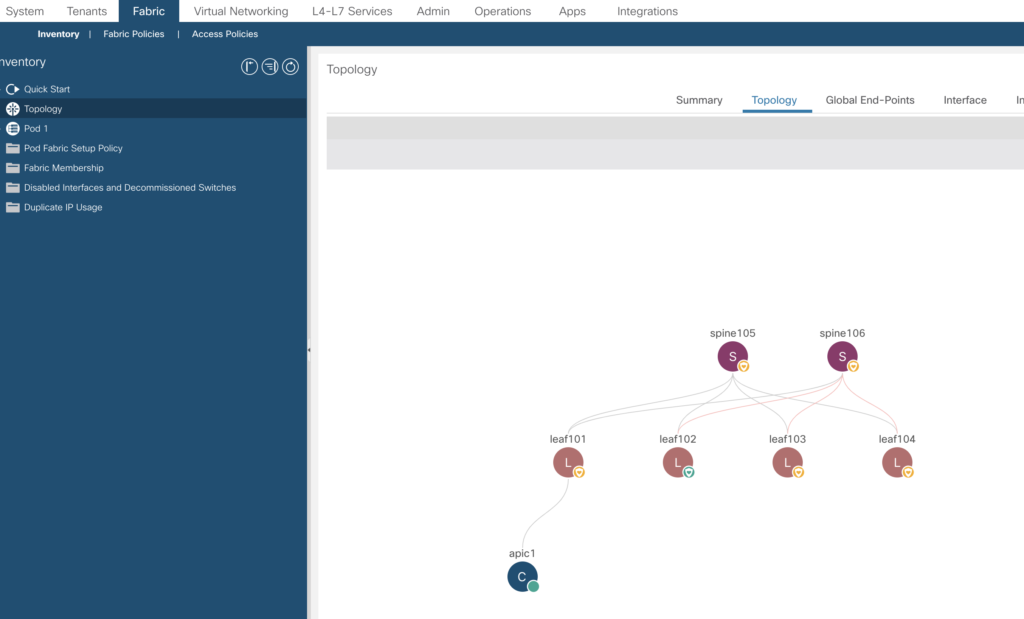
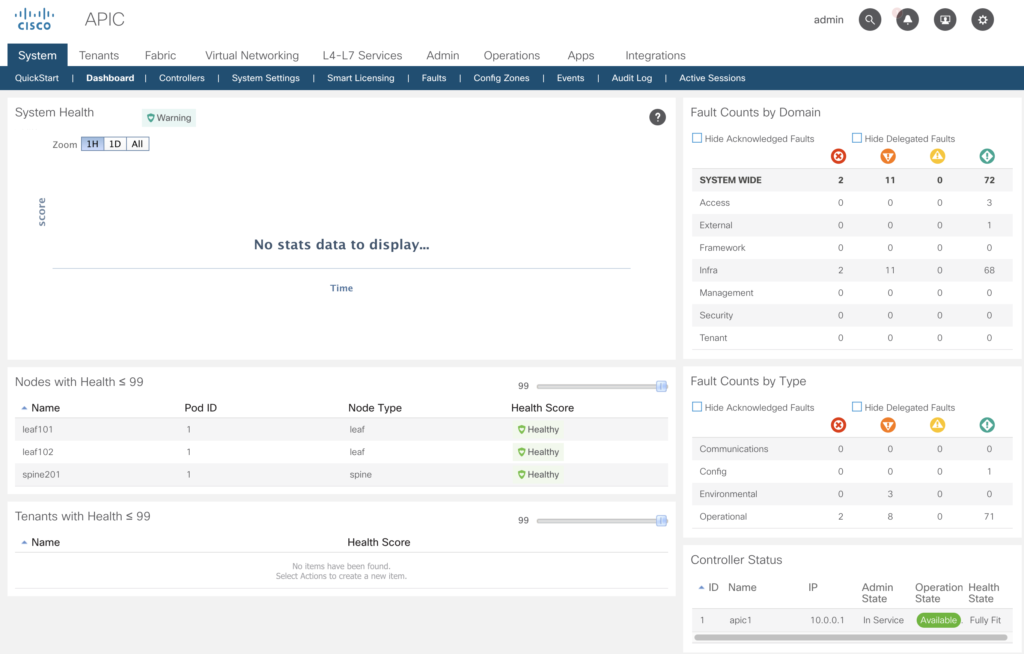
The APIC is the core component for ACI. All configuration will be issued and maintained from this system.
After the login the dashboard is being presented – will give you an overview on system health and some statistics.
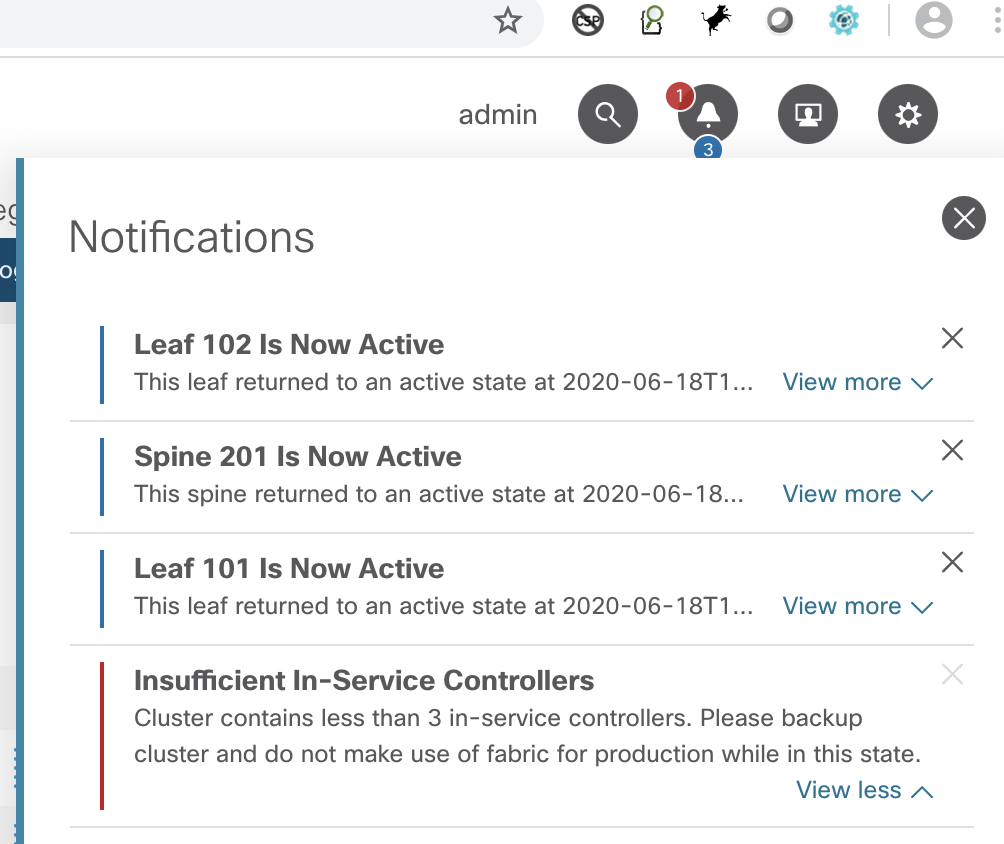
In our simulator we’ve got only one APIC, in production setups there have to be at least three nodes. That’s why you will see constantly in your simulator a warning in your notification field.
Three nodes to avoid the risk of cluster fragmentation (sometimes called „split brain“).
Briefly explained – if there are only two nodes acting as APIC, and they will lose connectivity – there is no way to decide for the now isolated APIC, if the other node is down or just not reachable. Worst case scenario for this failure – both nodes are guessing, the other one is down, and that way the configuration will differ.
To avoid this situation the solution is to provide a n+1 requirement. Means – only if a node is part of a majority, than this node will continue to run. So – if e.g. apic1 and apic2 are having connectivity, but apic3 hasn’t, apic3 will cease operation.
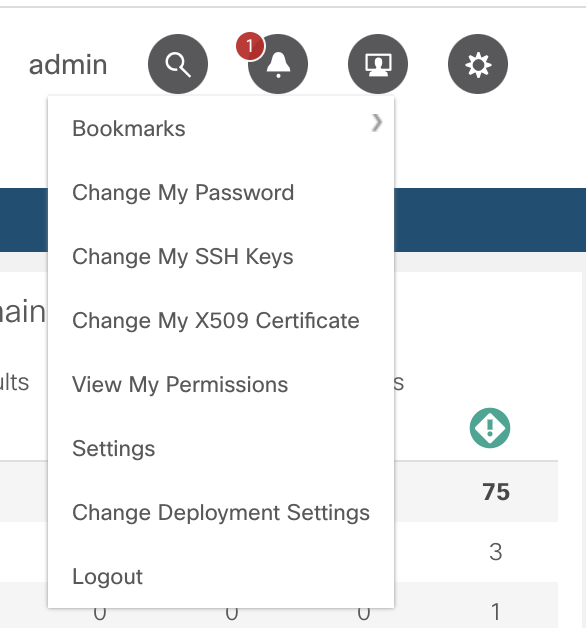
After login you’ll find many tabs and sub-tabs. We’ll just go briefly through them.
At the top right there are four icons, the second from the right expands to:
Nice – Change My SSH Keys – here you are able to store the public key from your jump server (if you are using one).
After deploying – the passwordless ssh-key based access is working. Automatically on all nodes.
iMac:~ andreasfassl$ ssh -l admin 192.168.140.40
Application Policy Infrastructure Controller
Last login: 2020-06-18T14:08:12.000+00:00 UTC
apic1#
Connection to 192.168.140.40 closed.
iMac:~ andreasfassl$ ssh -l admin 192.168.140.41

admin@leaf1:~>
After being quite a while ( 🙂 ) in IT I’d like to share some of my experience, as I’m benefiting from the work of so many people – I’ll try to share as well.
I hope you’ll enjoy the show – please feel free to contact me for feedback, improvement proposals.
While exploring the new environment you’ll find out – the NX-OS is modified CentOS-System. When logging in, you’ll be able to use both – the „traditional“ linux commands and as well the NX-OS commands.
Reference document for all NX-OS commands is available here:
When accessing the ACI components via the CLI – you ought to be really, really careful! When accessing the APIC via the GUI, there is quite a lot of logic active behind the scene to avoid evil things to happen.
In the beginning (APIC release 1.0 – 1.2) the default CLI was the bash shell, this has changed to the NX-OS style CLI.
Being used to CISCO IOS, you’ll find out the command completion is the same – by using the „TAB“ key will help you. As well as using a „?“ to get the next command option.
apic1# show running-config ?
 <CR>
 aaa                      Show Authentication, Authorization, and Accounting configuration
 all                      Show running-config with defaults
 analytics                Show external analytics reachability information
 bd-enf-exp-ip            Enable Enforced BD Flag
 bgp-fabric               Border Gateway Protocol (BGP)
 callhome                 Show Callhome policy
 clock                    Show Clock
 comm-policy              Show communication policy
 controller               Show Controller Node
 coop-fabric              Council Of Oracles Protocol (COOP)
 crypto                   Show crypto settings
...
To get the entire system setup –
apic1# show running-config all
# Command: show running-config all
# Time: Thu Jun 18 11:44:32 2020
  power redundancy-policy default
    redundancy-mode combined
    exit
  aaa banner 'Application Policy Infrastructure Controller'
  aaa user default-role no-login
  aaa authentication login console
    realm local
    exit
  aaa authentication login default
    realm local
    exit
  aaa authentication login domain fallback
    realm local
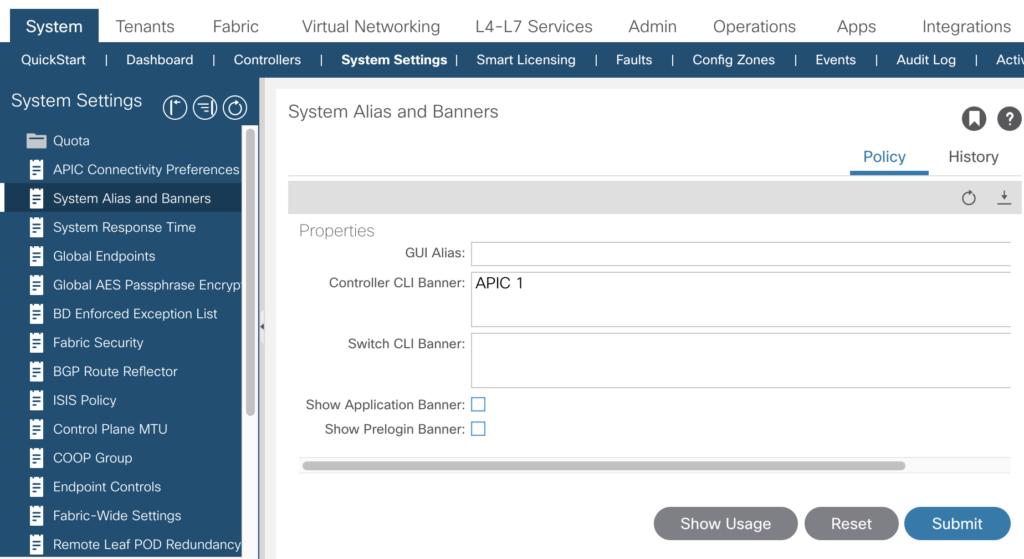
Just as a quick example – the Controller CLI Banner can be changed by either the CLI or the GUI.
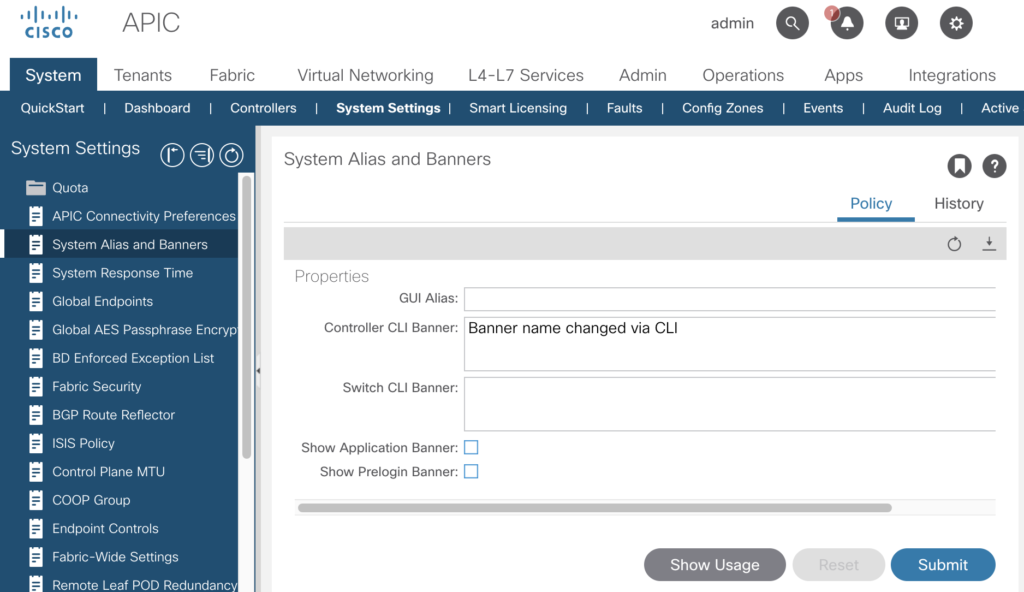
After pressing „Submit“ the change is visible as well via the CLI
apic1(config)# aaa banner "Banner name changed via CLI"
apic1(config)#
you’ll see the change (after pressing the refresh button right over the properties box) immediately.
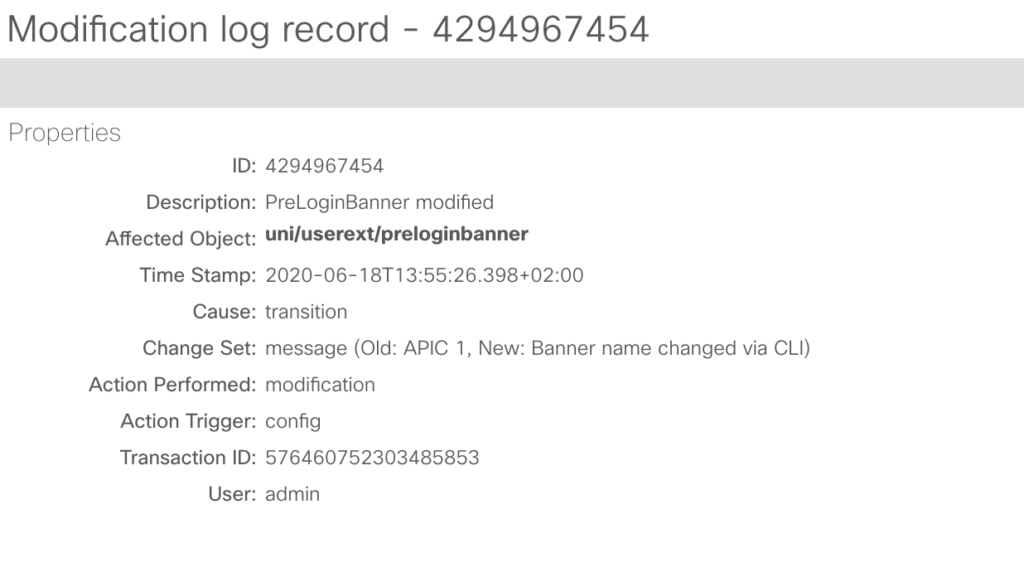
And the changes will be logged by auditing as well.
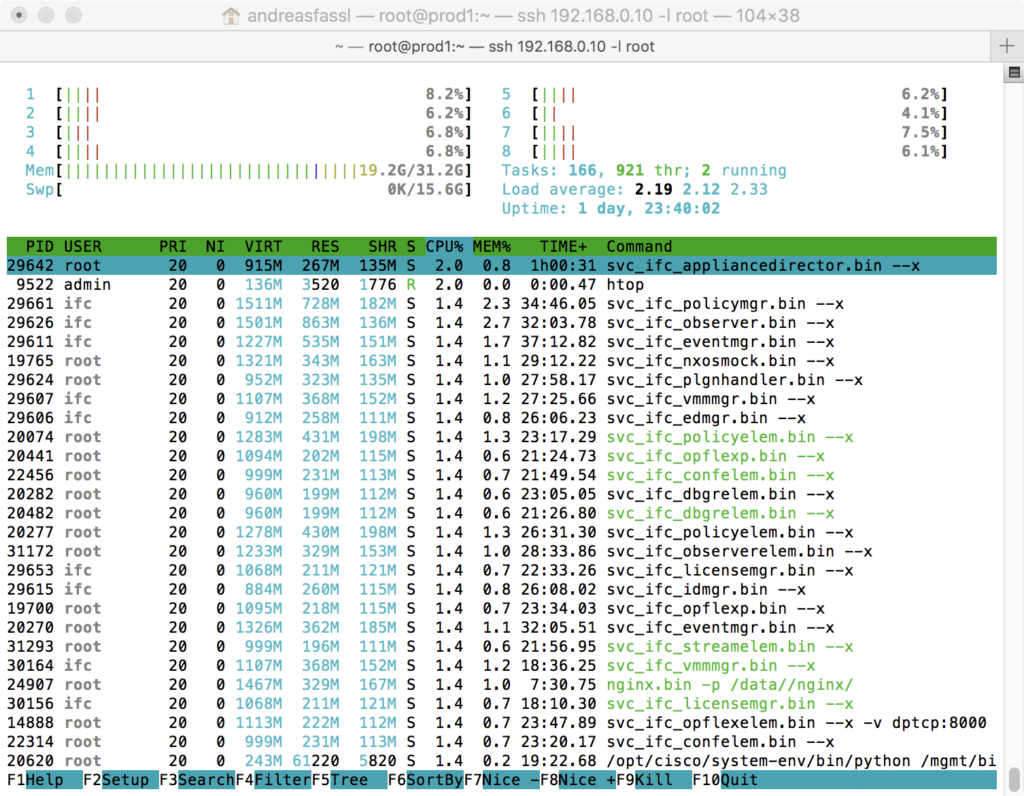
From a linux perspective – many of the standard commands are available. But – and this is to protect the environment and in the end yourself – the capabilities are restricted, you won’t be able to root level access.
quite nice – included is my favorite „htop“ command.
If you are used to linux – you should spend some time to explore the box – but don’t waste too much time.
And you’ll see as well, that the simulated components (spine, leaf) are detached processes running on that VM.