ACI – Build from Scratch #I

In the previous articles we’ve had a look into various aspects to access the Fabric, to configure based on small examples. In this article we’ll go through a complete build. For a very deep understanding on how ACI is working I highly recommend to watch Dave Lunde’s training videos. After watching his training series you’ll get an idea how powerful the ACI concept is.

His full training series is available here

https://www.twistedit.com/

– consisting of 40 units – hours of most valuable information. If interested in UCS – he is offering a course as well.

Creating a tenant

A tenant is more or less representing a logical representation – a company, a branch or whatever you want use to separate your fabric consumers.

The logical binding overview
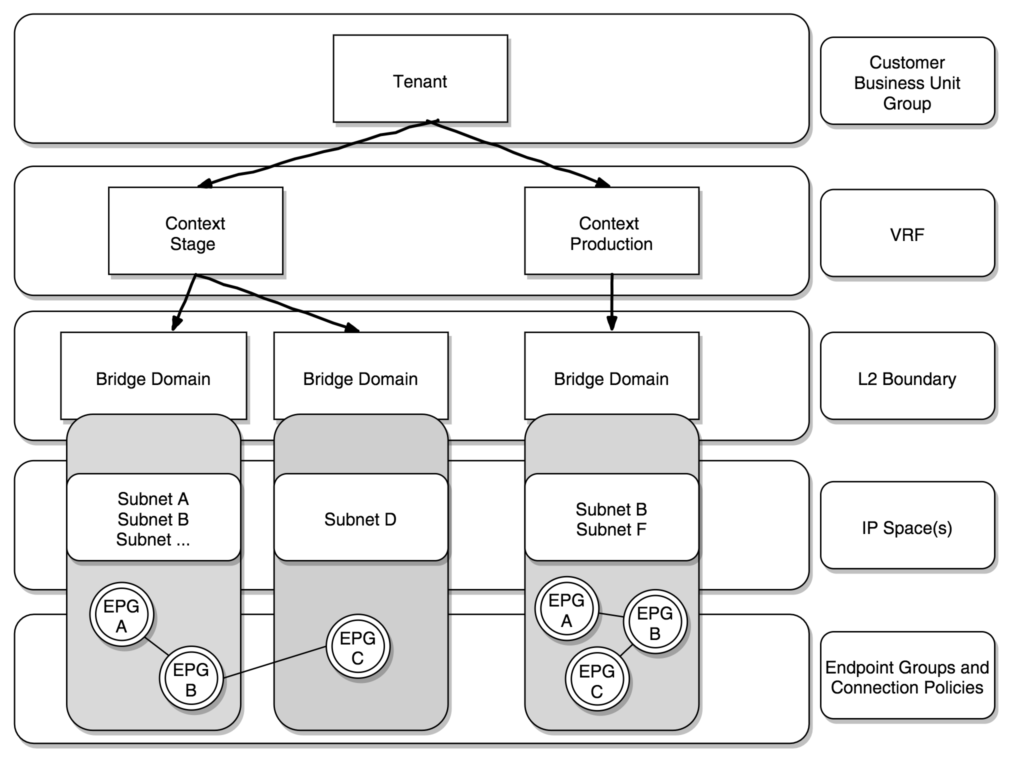
ACI classifies three types of endpoints:

  • Physical endpoints
  • Virtual endpoints
  • External endpoints

We’ve done this in the previous articles with various approaches, but for our initial build we’ll use the ansible way.

Reference to the ansible module:

https://docs.ansible.com/ansible/latest/modules/aci_tenant_module.html

Ansible Code:

---
- name: ACI Tenant Management
  hosts: APIC
  connection: local
  gather_facts: no
  tasks:
  - name: CONFIGURE TENANT
    aci_tenant:
      host: '{{ inventory_hostname }}'
      user: ansible
      private_key: /root/.pki/ansible.key
      validate_certs: false
      tenant: "MyCompany"
      description: "Tenant created by Ansible"
      state: present
...

By the way – if you want to remove that definition – you can either delete via the GUI or – much easier – just replace the „state: present“ with „state: absent“ and run the playbook again.

Creating the context (VRF)

Within a tenant you are able to create one or more VRFs (context). Many shops do split dev/test/stage and production. If you want to implement this, the initial ansible script will be:

---
- name: ACI VRF context
  hosts: APIC
  connection: local
  gather_facts: no
  tasks:
  - name: CONFIGURE VRF Prod
    aci_vrf:
      host: '{{ inventory_hostname }}'
      user: ansible
      private_key: /root/.pki/ansible.key
      validate_certs: false
      tenant: "MyCompany"
      vrf: "Production"
      description: "VRF Production created by Ansible"
      state: present

  - name: CONFIGURE VRF Stage
    aci_vrf:
      host: '{{ inventory_hostname }}'
      user: ansible
      private_key: /root/.pki/ansible.key
      validate_certs: false
      tenant: "MyCompany"
      vrf: "Stage"
      description: "VRF Stage created by Ansible"
      state: present

  - name: CONFIGURE VRF Test
    aci_vrf:
      host: '{{ inventory_hostname }}'
      user: ansible
      private_key: /root/.pki/ansible.key
      validate_certs: false
      tenant: "MyCompany"
      vrf: "Test"
      description: "VRF Test created by Ansible"
      state: present

  - name: CONFIGURE VRF Prod
    aci_vrf:
      host: '{{ inventory_hostname }}'
      user: ansible
      private_key: /root/.pki/ansible.key
      validate_certs: false
      tenant: "MyCompany"
      vrf: "Dev"
      description: "VRF Dev created by Ansible"
      state: present

...

Running the playbook:

# ansible-playbook vrf.yml

PLAY [ACI VRF context] ****************************************************************************************

TASK [CONFIGURE VRF Prod] *************************************************************************************
changed: [192.168.140.40]

TASK [CONFIGURE VRF Stage] ************************************************************************************
changed: [192.168.140.40]

TASK [CONFIGURE VRF Test] *************************************************************************************
changed: [192.168.140.40]

TASK [CONFIGURE VRF Prod] *************************************************************************************
changed: [192.168.140.40]

PLAY RECAP ****************************************************************************************************
192.168.140.40             : ok=4    changed=4    unreachable=0    failed=0    skipped=0    rescued=0    ignored=0   

Quick check via the GUI – all there.


Creating Bridge Domains

Beneath the VRF context the bridge domains (BD) are placed, to simplify – those are containers for subnets.

It is possible to use the same subnets within different bridge domains – e.g. you’ve got a server, which has been tested in your VRF test context, you’ll move it over to the stage context without the requirement to change the network configuration on that server.

To create a bridge domain there is another ansible aci module available.

https://docs.ansible.com/ansible/latest/modules/aci_bd_module.html#aci-bd-module

and to create subnets within the BD this module should be used.

https://docs.ansible.com/ansible/latest/modules/aci_bd_subnet_module.html#aci-bd-subnet-module

Let us now create a series of bridge domain by ansible (please note – I’ve introduced a variable (whattodo) – that way it is much easier to do test runs.

With whattodo set to „present“ – create it, set to „absent“ delete it.

---
- name: ACI Bridge Domain
  hosts: APIC
  connection: local
  gather_facts: no
  vars:
      whattodo:	present
  tasks:
  - name: CONFIGURE BD FE Web
    aci_bd:
      host: '{{ inventory_hostname }}'
      user: ansible
      private_key: /root/.pki/ansible.key
      validate_certs: false
      tenant: "MyCompany"
      bd: FrontEndWeb-dev
      vrf: Dev
      description: "BridgeDomain created by Ansible"
      state: '{{ whattodo }}'
  - name: CONFIGURE BD FE Web
    aci_bd:
      host: '{{ inventory_hostname }}'
      user: ansible
      private_key: /root/.pki/ansible.key
      validate_certs: false
      tenant: "MyCompany"
      bd: FrontEndWeb-test
      vrf: Test
      description: "BridgeDomain created by Ansible"
      state: '{{ whattodo }}'
  - name: CONFIGURE BD FE Web
    aci_bd:
      host: '{{ inventory_hostname }}'
      user: ansible
      private_key: /root/.pki/ansible.key
      validate_certs: false
      tenant: "MyCompany"
      bd: FrontEndWeb-stage
      vrf: Stage
      description: "BridgeDomain created by Ansible"
      state: '{{ whattodo }}'
  - name: CONFIGURE BD FE Web
    aci_bd:
      host: '{{ inventory_hostname }}'
      user: ansible
      private_key: /root/.pki/ansible.key
      validate_certs: false
      tenant: "MyCompany"
      bd: FrontEndWeb-Prod
      vrf: Production
      description: "BridgeDomain created by Ansible"
      state: '{{ whattodo }}'

...

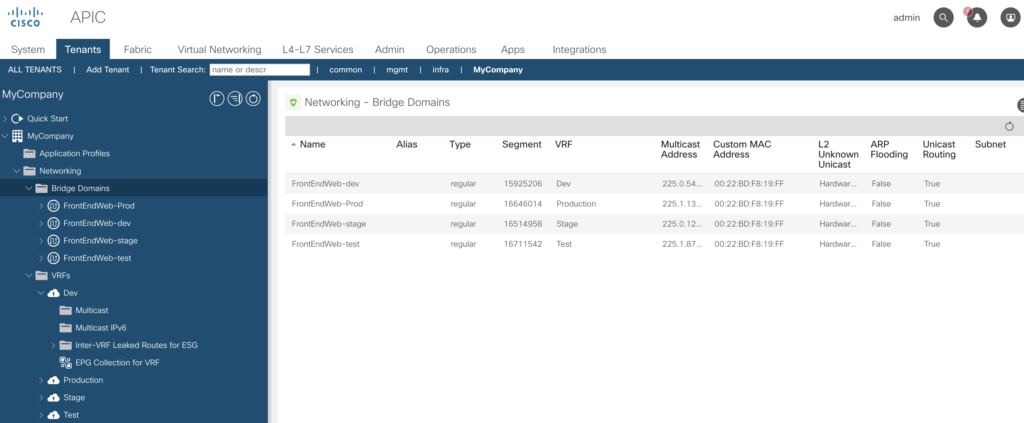
Check in the GUI:

Now we do add the subnet creation to the script (it is getting longer and longer).

---
- name: ACI Bridge Domain
  hosts: APIC
  connection: local
  gather_facts: no
  vars:
      whattodo: present
  tasks:
  - name: CONFIGURE BD FE Web
    aci_bd:
      host: '{{ inventory_hostname }}'
      user: ansible
      private_key: /root/.pki/ansible.key
      validate_certs: false
      tenant: "MyCompany"
      bd: FrontEndWeb-dev
      vrf: Dev
      description: "BridgeDomain created by Ansible"
      state: '{{ whattodo }}'
  - name: CONFIGURE BD FE Web
    aci_bd:
      host: '{{ inventory_hostname }}'
      user: ansible
      private_key: /root/.pki/ansible.key
      validate_certs: false
      tenant: "MyCompany"
      bd: FrontEndWeb-test
      vrf: Test
      description: "BridgeDomain created by Ansible"
      state: '{{ whattodo }}'
  - name: CONFIGURE BD FE Web
    aci_bd:
      host: '{{ inventory_hostname }}'
      user: ansible
      private_key: /root/.pki/ansible.key
      validate_certs: false
      tenant: "MyCompany"
      bd: FrontEndWeb-stage
      vrf: Stage
      description: "BridgeDomain created by Ansible"
      state: '{{ whattodo }}'
  - name: CONFIGURE BD FE Web
    aci_bd:
      host: '{{ inventory_hostname }}'
      user: ansible
      private_key: /root/.pki/ansible.key
      validate_certs: false
      tenant: "MyCompany"
      bd: FrontEndWeb-Prod
      vrf: Production
      description: "BridgeDomain created by Ansible"
      state: '{{ whattodo }}'
  - name: CONFIGURE BD subnet
    aci_bd_subnet:
      host: '{{ inventory_hostname }}'
      user: ansible
      private_key: /root/.pki/ansible.key
      validate_certs: false
      tenant: "MyCompany"
      bd: FrontEndWeb-Prod
      gateway: 192.168.111.1
      mask: 24
      description: "BridgeDomain subnet created by Ansible"
      state: '{{ whattodo }}'
  - name: CONFIGURE BD subnet
    aci_bd_subnet:
      host: '{{ inventory_hostname }}'
      user: ansible
      private_key: /root/.pki/ansible.key
      validate_certs: false
      tenant: "MyCompany"
      bd: FrontEndWeb-Prod
      gateway: 192.168.112.1
      mask: 24
      description: "BridgeDomain subnet created by Ansible"
      state: '{{ whattodo }}'
  - name: CONFIGURE BD subnet
    aci_bd_subnet:
      host: '{{ inventory_hostname }}'
      user: ansible
      private_key: /root/.pki/ansible.key
      validate_certs: false
      tenant: "MyCompany"
      bd: FrontEndWeb-Prod
      gateway: 192.168.113.1
      mask: 24
      description: "BridgeDomain subnet created by Ansible"
      state: '{{ whattodo }}'
  - name: CONFIGURE BD subnet
    aci_bd_subnet:
      host: '{{ inventory_hostname }}'
      user: ansible
      private_key: /root/.pki/ansible.key
      validate_certs: false
      tenant: "MyCompany"
      bd: FrontEndWeb-Prod
      gateway: 192.168.114.1
      mask: 24
      description: "BridgeDomain subnet created by Ansible"
      state: '{{ whattodo }}'
  - name: CONFIGURE BD subnet
    aci_bd_subnet:
      host: '{{ inventory_hostname }}'
      user: ansible
      private_key: /root/.pki/ansible.key
      validate_certs: false
      tenant: "MyCompany"
      bd: FrontEndWeb-Prod
      gateway: 192.168.115.1
      mask: 24
      description: "BridgeDomain subnet created by Ansible"
      state: '{{ whattodo }}'
  - name: CONFIGURE BD subnet
    aci_bd_subnet:
      host: '{{ inventory_hostname }}'
      user: ansible
      private_key: /root/.pki/ansible.key
      validate_certs: false
      tenant: "MyCompany"
      bd: FrontEndWeb-Prod
      gateway: 192.168.116.1
      mask: 24
      description: "BridgeDomain subnet created by Ansible"
      state: '{{ whattodo }}'
...

And – in a few seconds (just image you want to do this via the GUI) you’ll see it being available.
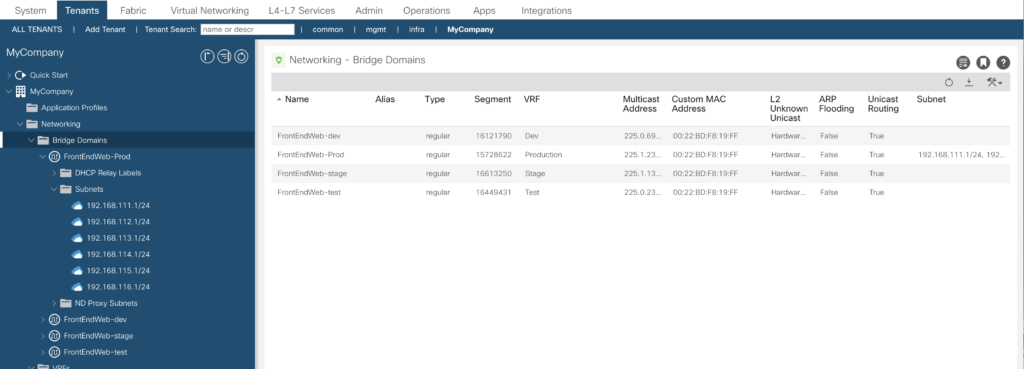

For sure you don’t want to code this in a ansible script – this yells to be managed by an input file to be parsed to the yaml script. And as this is an example – all the required fields can be modified via the parameters of the modules.

With ansible 2.5 it is possible to read CSV files without additional code.

Basic concept to read a csv file like this:

tenant|bridgedomain|subnet|mask|descr
MyCompany|FrontEndWeb-Prod|192.168.116.1|24|BridgeDomain subnet created by Ansible
MyCompany|FrontEndWeb-Prod|192.168.117.1|24|BridgeDomain subnet created by Ansible
MyCompany|FrontEndWeb-Prod|192.168.118.1|24|BridgeDomain subnet created by Ansible
MyCompany|FrontEndWeb-Prod|192.168.119.1|24|BridgeDomain subnet created by Ansible
MyCompany|FrontEndWeb-Prod|192.168.120.1|24|BridgeDomain subnet created by Ansible
MyCompany|FrontEndWeb-Prod|192.168.121.1|24|BridgeDomain subnet created by Ansible
MyCompany|FrontEndWeb-Prod|192.168.122.1|24|BridgeDomain subnet created by Ansible
MyCompany|FrontEndWeb-Prod|192.168.123.1|24|BridgeDomain subnet created by Ansible
MyCompany|FrontEndWeb-Prod|192.168.124.1|24|BridgeDomain subnet created by Ansible
MyCompany|FrontEndWeb-Prod|192.168.125.1|24|BridgeDomain subnet created by Ansible
MyCompany|FrontEndWeb-Prod|192.168.126.1|24|BridgeDomain subnet created by Ansible
MyCompany|FrontEndWeb-Prod|192.168.127.1|24|BridgeDomain subnet created by Ansible
MyCompany|FrontEndWeb-Prod|192.168.128.1|24|BridgeDomain subnet created by Ansible
MyCompany|FrontEndWeb-Prod|192.168.129.1|24|BridgeDomain subnet created by Ansible
MyCompany|FrontEndWeb-Stage|192.168.116.1|24|BridgeDomain subnet created by Ansible
MyCompany|FrontEndWeb-Stage|192.168.117.1|24|BridgeDomain subnet created by Ansible
MyCompany|FrontEndWeb-Stage|192.168.118.1|24|BridgeDomain subnet created by Ansible
MyCompany|FrontEndWeb-Stage|192.168.119.1|24|BridgeDomain subnet created by Ansible
MyCompany|FrontEndWeb-Stage|192.168.120.1|24|BridgeDomain subnet created by Ansible
MyCompany|FrontEndWeb-Stage|192.168.121.1|24|BridgeDomain subnet created by Ansible
MyCompany|FrontEndWeb-Stage|192.168.122.1|24|BridgeDomain subnet created by Ansible
MyCompany|FrontEndWeb-Stage|192.168.123.1|24|BridgeDomain subnet created by Ansible
MyCompany|FrontEndWeb-Stage|192.168.124.1|24|BridgeDomain subnet created by Ansible
MyCompany|FrontEndWeb-Stage|192.168.125.1|24|BridgeDomain subnet created by Ansible
MyCompany|FrontEndWeb-Stage|192.168.126.1|24|BridgeDomain subnet created by Ansible
MyCompany|FrontEndWeb-Stage|192.168.127.1|24|BridgeDomain subnet created by Ansible
MyCompany|FrontEndWeb-Stage|192.168.128.1|24|BridgeDomain subnet created by Ansible
MyCompany|FrontEndWeb-Stage|192.168.129.1|24|BridgeDomain subnet created by Ansible
MyCompany|FrontEndWeb-Dev|192.168.116.1|24|BridgeDomain subnet created by Ansible
MyCompany|FrontEndWeb-Dev|192.168.117.1|24|BridgeDomain subnet created by Ansible
MyCompany|FrontEndWeb-Dev|192.168.118.1|24|BridgeDomain subnet created by Ansible
MyCompany|FrontEndWeb-Dev|192.168.119.1|24|BridgeDomain subnet created by Ansible
MyCompany|FrontEndWeb-Dev|192.168.120.1|24|BridgeDomain subnet created by Ansible
MyCompany|FrontEndWeb-Dev|192.168.121.1|24|BridgeDomain subnet created by Ansible
MyCompany|FrontEndWeb-Dev|192.168.122.1|24|BridgeDomain subnet created by Ansible
MyCompany|FrontEndWeb-Dev|192.168.123.1|24|BridgeDomain subnet created by Ansible
MyCompany|FrontEndWeb-Dev|192.168.124.1|24|BridgeDomain subnet created by Ansible
MyCompany|FrontEndWeb-Dev|192.168.125.1|24|BridgeDomain subnet created by Ansible
MyCompany|FrontEndWeb-Dev|192.168.126.1|24|BridgeDomain subnet created by Ansible
MyCompany|FrontEndWeb-Dev|192.168.127.1|24|BridgeDomain subnet created by Ansible
MyCompany|FrontEndWeb-Dev|192.168.128.1|24|BridgeDomain subnet created by Ansible
MyCompany|FrontEndWeb-Dev|192.168.129.1|24|BridgeDomain subnet created by Ansible
MyCompany|FrontEndWeb-Test|192.168.116.1|24|BridgeDomain subnet created by Ansible
MyCompany|FrontEndWeb-Test|192.168.117.1|24|BridgeDomain subnet created by Ansible
MyCompany|FrontEndWeb-Test|192.168.118.1|24|BridgeDomain subnet created by Ansible
MyCompany|FrontEndWeb-Test|192.168.119.1|24|BridgeDomain subnet created by Ansible
MyCompany|FrontEndWeb-Test|192.168.120.1|24|BridgeDomain subnet created by Ansible
MyCompany|FrontEndWeb-Test|192.168.121.1|24|BridgeDomain subnet created by Ansible
MyCompany|FrontEndWeb-Test|192.168.122.1|24|BridgeDomain subnet created by Ansible
MyCompany|FrontEndWeb-Test|192.168.123.1|24|BridgeDomain subnet created by Ansible
MyCompany|FrontEndWeb-Test|192.168.124.1|24|BridgeDomain subnet created by Ansible
MyCompany|FrontEndWeb-Test|192.168.125.1|24|BridgeDomain subnet created by Ansible
MyCompany|FrontEndWeb-Test|192.168.126.1|24|BridgeDomain subnet created by Ansible
MyCompany|FrontEndWeb-Test|192.168.127.1|24|BridgeDomain subnet created by Ansible
MyCompany|FrontEndWeb-Test|192.168.128.1|24|BridgeDomain subnet created by Ansible
MyCompany|FrontEndWeb-Test|192.168.129.1|24|BridgeDomain subnet created by Ansible

The first line do contain the field names, the other lines your data.

and another one:

tenant|bd|vrf|description
MyCompany|FrontEndWeb-Dev|Dev|BridgeDomain created by Ansible
MyCompany|FrontEndWeb-Test|Test|BridgeDomain created by Ansible
MyCompany|FrontEndWeb-Stage|Stage|BridgeDomain created by Ansible
MyCompany|FrontEndWeb-Prod|Prod|BridgeDomain created by Ansible

A basic script to read this file:

---
- name: Read CSV
  hosts: localhost
  tasks:
    - name: Read from CSV
      read_csv:
        path: ./data-bridge.csv
        delimiter: '|'
      register: bridgesubnets

This will put your input file data into the list „bridgesubnets“.

We do now modify our script above to a much leaner version:

---
- name: ACI Bridge Domain
  hosts: APIC
  connection: local
  gather_facts: no
  vars:
      whattodo: present
  tasks:
  - name: Read CSV bridgedomains
    read_csv:
      path: ./data-bd.csv
      delimiter: '|'
    register: bridgedomains
  
  - name: Read CSV bridgedomain subnets
    read_csv:
      path: ./data-bridge.csv
      delimiter: '|'
    register: bridgedomainssubnets
  
# Get Input from list bridgedomains
  - name: Configure BridgeDomain from CSV Inputfile
    aci_bd:
      host: '{{ inventory_hostname }}'
      user: ansible
      private_key: /root/.pki/ansible.key
      validate_certs: false
      tenant: "{{ item.tenant }}"
      bd: "{{ item.bd }}"
      vrf: "{{ item.vrf }}"
      description: "{{ item.description }}"
      state: '{{ whattodo }}'
    with_items: "{{ bridgedomains.list }}"

  - name: CONFIGURE BD subnet
    aci_bd_subnet:
      host: '{{ inventory_hostname }}'
      user: ansible
      private_key: /root/.pki/ansible.key
      validate_certs: false
      tenant: "{{ item.tenant }}"
      bd: "{{ item.bd }}"
      gateway: "{{ item.gateway }}"
      mask: "{{ item.mask }}"
      description: "{{ item.description }}"
      state: '{{ whattodo }}'
    with_items: "{{ bridgedomainssubnets.list }}"
...

Wow – result is visible after a few seconds. Just image – you’ve had to configure this via the GUI.
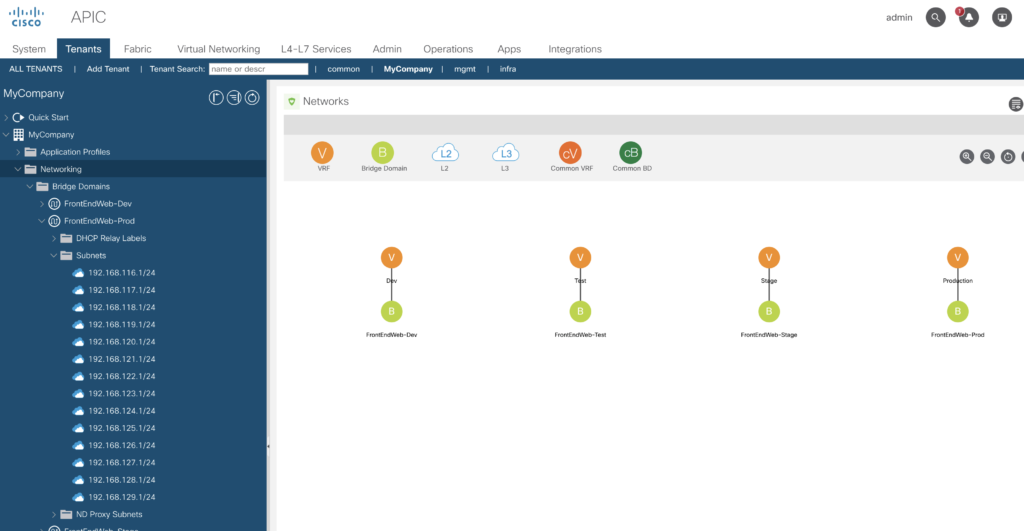

This is an example definition of our logical layer. Later we’ll create the EPGs.

Physical Layer

We’ll continue now on the physical layer. It is quite important, that you’ve fully understood the concepts behind – so please have a look into the corresponding video provided by Jason (Lesson 11 onwards). And – for the rest of this article I’m using the ansible interface only – data + playbook to build up according to those examples.
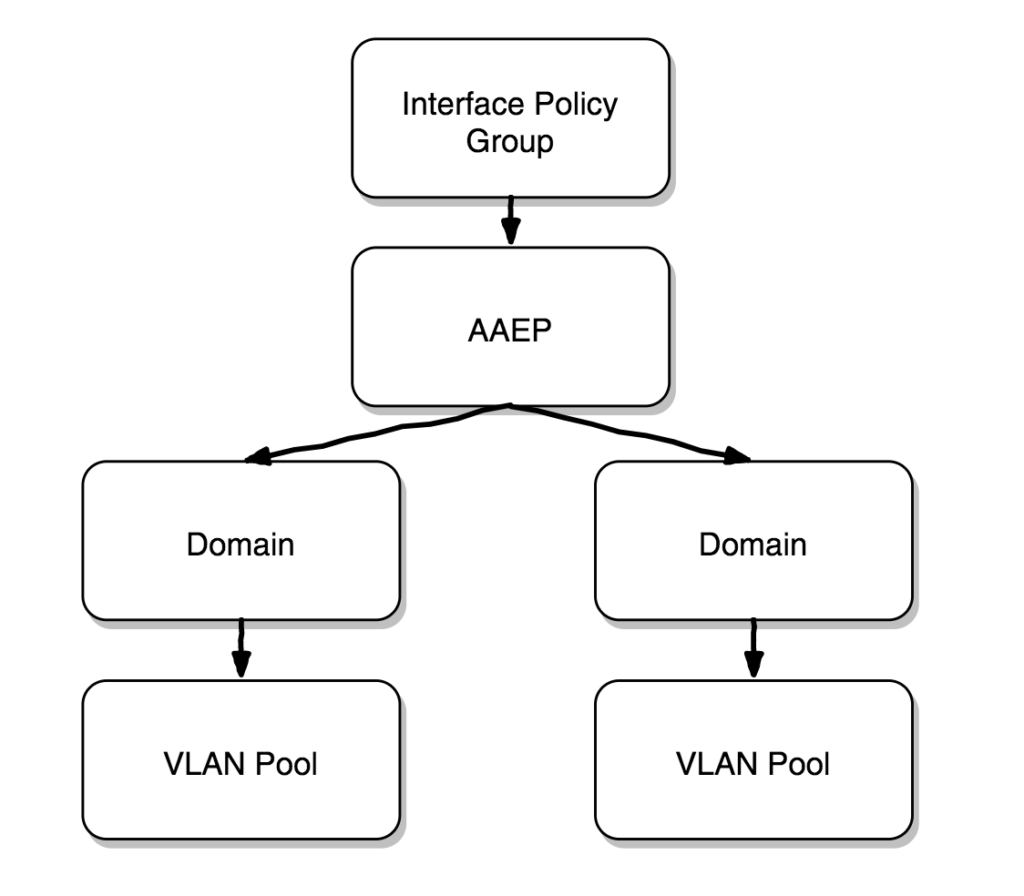
The work flow to configure an access policy is

We’ll start with the

VLAN-Pool

Two types of pools are being used, best to divide them into functional groups.

  • Static (for physical workload or manual configurations)
  • Dynamic (for virtualization integration or horizontal orchestration of L4-7 devices)

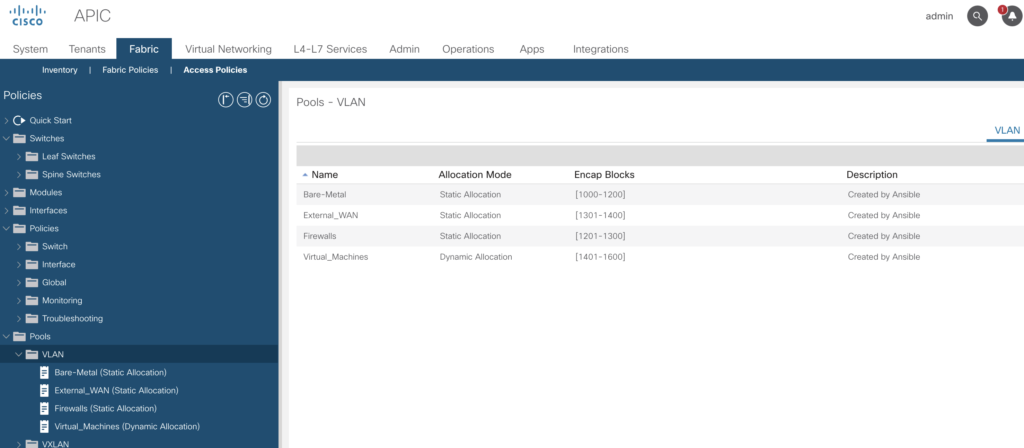
As an example – we create four pools

  • 1000-1200 – Static : Bare-metal hosts
  • 1201 – 1300 – Static : Firewalls
  • 1301 – 1400 – Static : External WAN routers
  • 1401 – 1600 – Dynamic : Virtual machines

We’ve to use the

  • aci_vlan_pool
  • aci_vlan_pool_encap_block

Two CSV files and two ansible scripts:

To create the pools

---
- name: ACI VLAN Pools
  hosts: APIC
  connection: local
  gather_facts: no
  vars:
      whattodo: present
  tasks:
  - name: Read CSV with filters
    read_csv:
      path: ./data/vlanpools.csv
      delimiter: '|'
    register: vlanpools
  
# Get Input from list contract
  - name: Configure filters from CSV Inputfile
    aci_vlan_pool:
      host: '{{ inventory_hostname }}'
      user: ansible
      private_key: /root/.pki/ansible.key
      validate_certs: false
      name: "{{ item.name }}"
      description: "{{ item.description }}"
      pool_allocation_mode: "{{ item.pool_allocation_mode }}"
      state: '{{ whattodo }}'
    with_items: "{{ vlanpools.list }}"
# cat data/vlanpools.csv 
name|description|pool_allocation_mode
Bare-Metal|Created by Ansible|static
Firewalls|Created by Ansible|static
External_WAN|Created by Ansible|static
Virtual_Machines|Created by Ansible|dynamic

to create the blocks

---
- name: ACI VLAN Blocks
  hosts: APIC
  connection: local
  gather_facts: no
  vars:
      whattodo: present
  tasks:
  - name: Read CSV with filters
    read_csv:
      path: ./data/vlanpoolblocks.csv
      delimiter: '|'
    register: vlanpoolblocks
  
# Get Input from list contract
  - name: Configure filters from CSV Inputfile
    aci_vlan_pool_encap_block:
      host: '{{ inventory_hostname }}'
      user: ansible
      private_key: /root/.pki/ansible.key
      validate_certs: false
      name: "{{ item.name }}"
      pool: "{{ item.pool }}"
      description: "{{ item.description }}"
      block_start: "{{ item.block_start }}"
      block_end: "{{ item.block_end }}"
      pool_allocation_mode: "{{ item.pool_allocation_mode }}"
      state: '{{ whattodo }}'
    with_items: "{{ vlanpoolblocks.list }}"

name|description|block_start|block_end|pool|pool_allocation_mode
Block1000_1200|Created by Ansible|1000|1200|Bare-Metal|static
Block1201_1300|Created by Ansible|1201|1300|Firewalls|static
Block1301_1400|Created by Ansible|1301|1400|External_WAN|static
Block1401_1600|Created by Ansible|1401|1600|Virtual_Machines|dynamic
Domain Creation

There are five domain profiles available

  • Fibre Channel
  • Layer 2
  • Layer 3
  • Physical
  • VMM

To create a domain and the binding we do need those two ansible modules:

  • aci_domain 
---
- name: ACI Domains
  hosts: APIC
  connection: local
  gather_facts: no
  vars:
      whattodo: present
  tasks:
  - name: Read CSV with domains
    read_csv:
      path: ./data/domains.csv
      delimiter: '|'
    register: domains
  
# Get Input from list contract
  - name: Configure filters from CSV Inputfile
    aci_domain:
      host: '{{ inventory_hostname }}'
      user: ansible
      private_key: /root/.pki/ansible.key
      validate_certs: false
      name: "{{ item.name }}"
      domain_type: "{{ item.domain_type }}"
      state: '{{ whattodo }}'
    with_items: "{{ domains.list }}"

CSV File

name|description|encap_mode|domain_type
BareMetall|Created by Ansible|vlan|phys
Firewalls|Created by Ansible|vlan|phys
ESXi-Servers|Created by Ansible|vlan|vmm
WAN|Created by Ansible|vlan|l3dom

Creating VMM domains requires some add. data – being lazy, I’ve copied the code instead of doing some ansible magic 🙂

---
- name: ACI Domains
  hosts: APIC
  connection: local
  gather_facts: no
  vars:
      whattodo: present
  tasks:
  - name: Read CSV with domains
    read_csv:
      path: ./data/vmmdomains.csv
      delimiter: '|'
    register: vmmdomains
  
# Get Input from list contract
  - name: Configure filters from CSV Inputfile
    aci_domain:
      host: '{{ inventory_hostname }}'
      user: ansible
      private_key: /root/.pki/ansible.key
      validate_certs: false
      name: "{{ item.name }}"
      domain_type: "{{ item.domain_type }}"
      vm_provider: "{{ item.vm_provider }}"
      state: '{{ whattodo }}'
    with_items: "{{ vmmdomains.list }}"

CSV File

name|description|encap_mode|domain_type|vm_provider
ESXi-Servers|Created by Ansible|vlan|vmm|vmware
HyperV|Created by Ansible|vlan|vmm|microsoft
RedHat|Created by Ansible|vlan|vmm|redhat
OpenStack|Created by Ansible|vlan|vmm|openstack

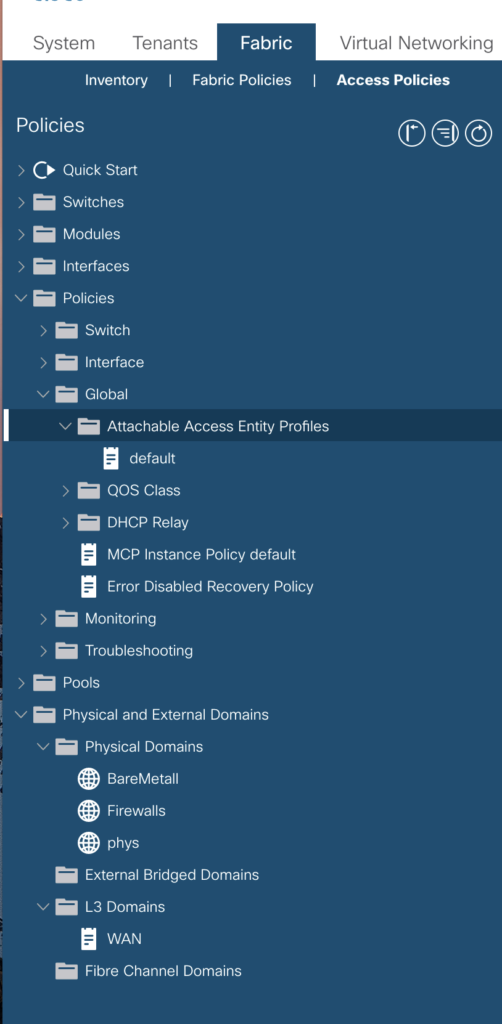
The new domains are visible now in the tab

-> Fabric -> Access Policies -> Physical and External Domains
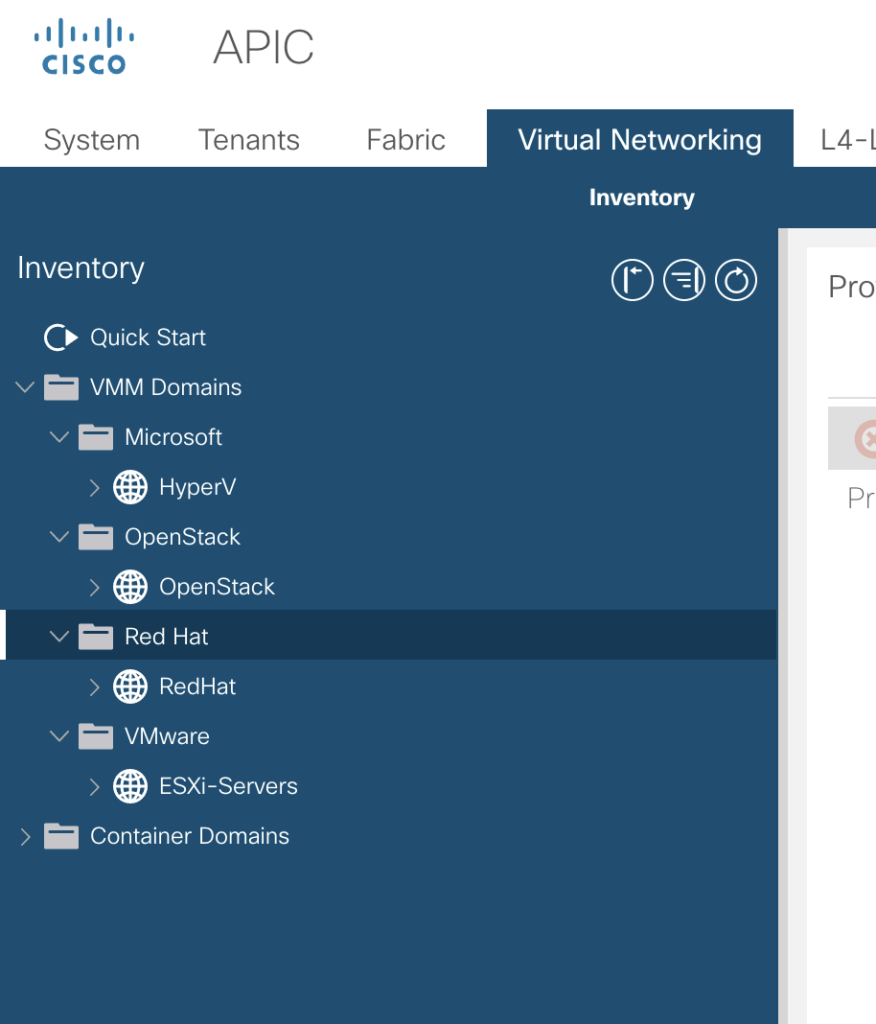
and the VMM Domains are located in a different tab

-> Virtual Networking -> VMM Domains (from my point of view it shuld be under Domains as well, but for sure there is a reason).
Attachable Access Entity Profiles (AAEP)

The AAEP is used to map domains to interface policies, thus mapping VLANs to interfaces.

On the fabric definition level there are quite a lot of policies you are able to predefine (to be used later on). Many of those are configurable by using an ansible module.
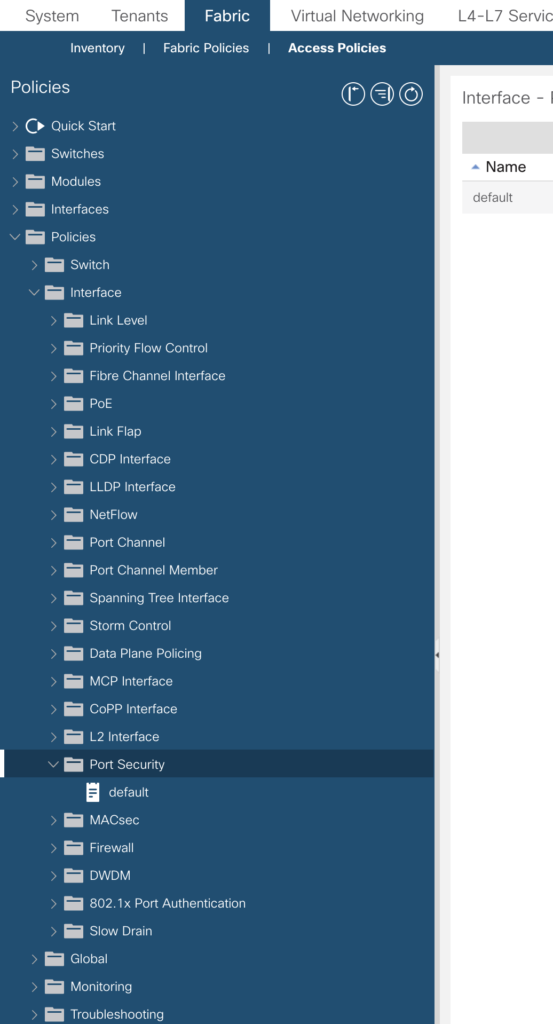

In the modul overview you’ll find


Lets try to create some of them – please have a look as well in the options

LLDP Interface Policies

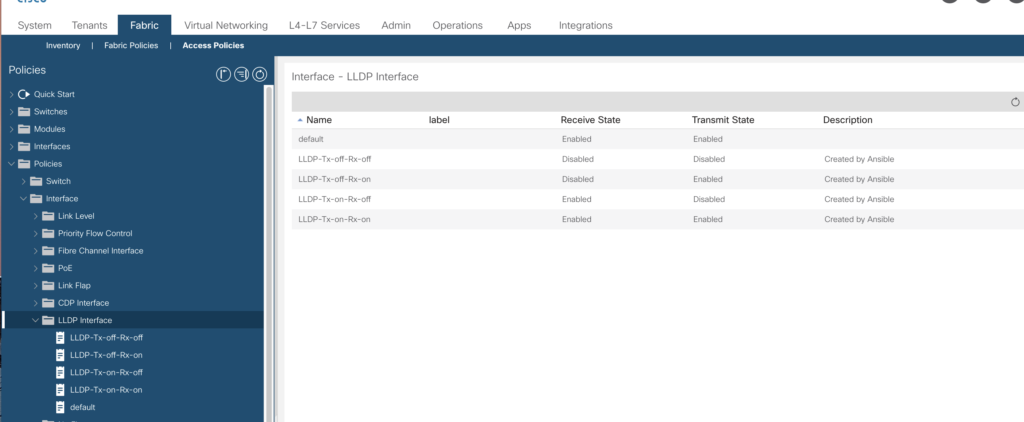
The LLDP (link layer discovery protocol) can be configured regarding the receive and transmit state.

https://docs.ansible.com/ansible/latest/modules/aci_interface_policy_lldp_module.html#aci-interface-policy-lldp-module

Just a simple csv file to cover all options.

lldp_policy|description|receive_state|transmit_state
LLDP-Tx-on-Rx-on|Created by Ansible|yes|yes
LLDP-Tx-off-Rx-off|Created by Ansible|no|no
LLDP-Tx-on-Rx-off|Created by Ansible|yes|no
LLDP-Tx-off-Rx-on|Created by Ansible|no|yes

and playbook

---
- name: ACI LLDP profiles
  hosts: APIC
  connection: local
  gather_facts: no
  vars:
      whattodo: present
  tasks:
  - name: Read CSV lldp profiles
    read_csv:
      path: ./data/data-int-pol-lldp.csv
      delimiter: '|'
    register: lldp
  
# Get Input from list lldp
  - name: Configure lldp switch profile from CSV Inputfile
    aci_interface_policy_lldp:
      host: '{{ inventory_hostname }}'
      user: ansible
      private_key: /root/.pki/ansible.key
      validate_certs: false
      lldp_policy: "{{ item.lldp_policy }}"
      description: "{{ item.description }}"
      transmit_state: "{{ item.transmit_state }}"
      receive_state: "{{ item.receive_state }}"
      state: '{{ whattodo }}'
    with_items: "{{ lldp.list }}"

Will give you
CDP (Cisco Discovery Protocol) Policy

We’ll add with this simple playbook an „enabled“ policy. Per default CDP is turned off.

https://docs.ansible.com/ansible/latest/modules/aci_interface_policy_cdp_module.html#aci-interface-policy-cdp-module

---
- name: ACI CDP profiles
  hosts: APIC
  connection: local
  gather_facts: no
  vars:
      whattodo: present
  tasks:
  - name: Configure cdp Interface Policy
    aci_interface_policy_cdp:
      host: "{{ inventory_hostname }}"
      user: ansible
      private_key: /root/.pki/ansible.key
      validate_certs: false
      name: CDP_Policy
      admin_state: yes
      description: "Created by Ansible"
      state: '{{ whattodo }}'

MCP (Mis Cabling Policy)

This is another quick one. As you know, you must not cable spine to spine, leaf to leaf or endpoint to spine. This will be detected by the MCP policy. Sometimes it is required to turn this feature off – per default it is turned on.

---
- name: ACI MCP profile
  hosts: APIC
  connection: local
  gather_facts: no
  vars:
      whattodo: present
  tasks:
  - name: Configure MCP Interface Policy
    aci_interface_policy_mcp:
      host: "{{ inventory_hostname }}"
      user: ansible
      private_key: /root/.pki/ansible.key
      validate_certs: false
      name: MCP_Policy
      admin_state: no
      description: "Created by Ansible"
      state: '{{ whattodo }}'

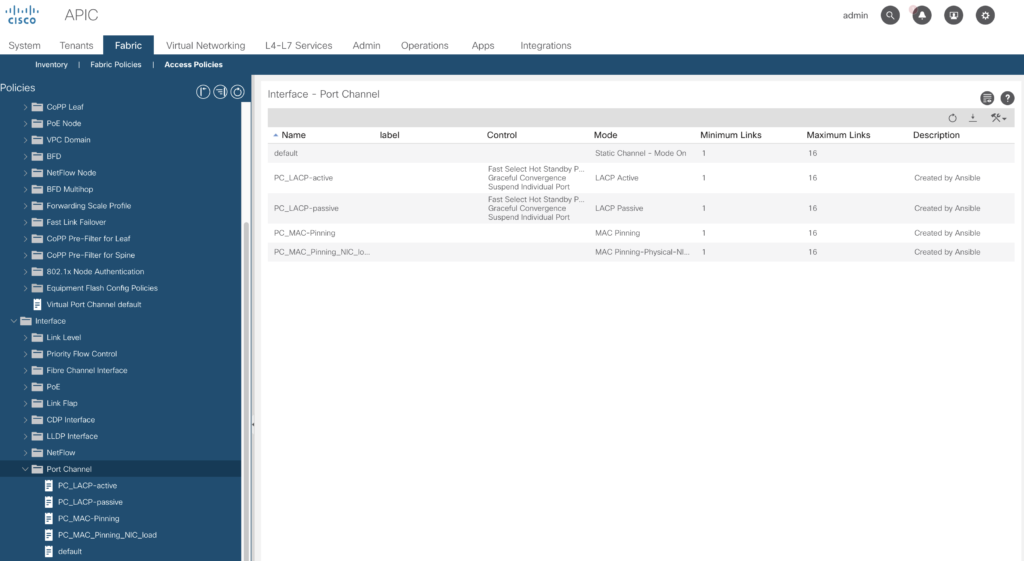
Port Channel Policies

With those you are able to distinguish if using LACP (active or passive) or MAC-Pinning.

Input by another CSV file:

port_channel|description|min_links|max_links|mode
PC_LACP-active|Created by Ansible|1|16|active
PC_LACP-passive|Created by Ansible|1|16|passive
PC_MAC-Pinning|Created by Ansible|1|16|mac-pin
PC_MAC_Pinning_NIC_load|Created by Ansible|1|16|mac-pin-nicload

and the required playbook to read in:

---
- name: ACI Port Channel profiles
  hosts: APIC
  connection: local
  gather_facts: no
  vars:
      whattodo: present
  tasks:
  - name: Read CSV PC profiles
    read_csv:
      path: ./data/data-portchannel.csv
      delimiter: '|'
    register: portchannel
  
# Get Input from list portchannel
  - name: Configure portchannel switch profile from CSV Inputfile
    aci_interface_policy_port_channel:
      host: '{{ inventory_hostname }}'
      user: ansible
      private_key: /root/.pki/ansible.key
      validate_certs: false
      name: "{{ item.port_channel }}"
      description: "{{ item.description }}"
      min_links: "{{ item.min_links }}"
      max_links: "{{ item.max_links }}"
      mode: "{{ item.mode }}"
      state: '{{ whattodo }}'
    with_items: "{{ portchannel.list }}"
ACI and Ansible

Potentially you are already used to Ansible, if so, just skip the introduction in this article.

Installing Ansible

Ansible is a huge and powerful tool set to automate activities – there a so many options. Ansible follows an approach they call „batteries included“ – means – all the modules and tools are always part of the distribution. And this includes as well the Cisco ACI automation capabilities.

If you look around – tutorials are available – from both the ansible team as well from other contributors.

This tutorial gives a nice start into your ansible journey. https://linuxhint.com/ansible-tutorial-beginners/

Installation on a linux box is quite simple (a „no-brainer“ as it has been called from a colleague many years ago). For CentOS/RedHat it is just a

# yum install ansible
# ansible --version
ansible 2.9.10
  config file = /etc/ansible/ansible.cfg
  configured module search path = [u'/root/.ansible/plugins/modules', u'/usr/share/ansible/plugins/modules']
  ansible python module location = /usr/lib/python2.7/site-packages/ansible
  executable location = /usr/bin/ansible
  python version = 2.7.5 (default, Apr  2 2020, 13:16:51) [GCC 4.8.5 20150623 (Red Hat 4.8.5-39)]

As you can see, config file location (for CentOS) is /etc/ansible.cfg.

Please install as well two tools:

  • yamllint
  • ansible-lint

as the yaml syntax is quite picky especially regarding indentitation.

Ansible hosts

Another important file is stored in /etc/ansible as well, the hosts file.

Let us create a simple entry there:

# This is the default ansible 'hosts' file.
#
# It should live in /etc/ansible/hosts
#
#   - Comments begin with the '#' character
#   - Blank lines are ignored
#   - Groups of hosts are delimited by [header] elements
#   - You can enter hostnames or ip addresses
#   - A hostname/ip can be a member of multiple groups

# APIC host

[APIC]
192.168.140.40 ansible_user=ansible ansible_connection=local

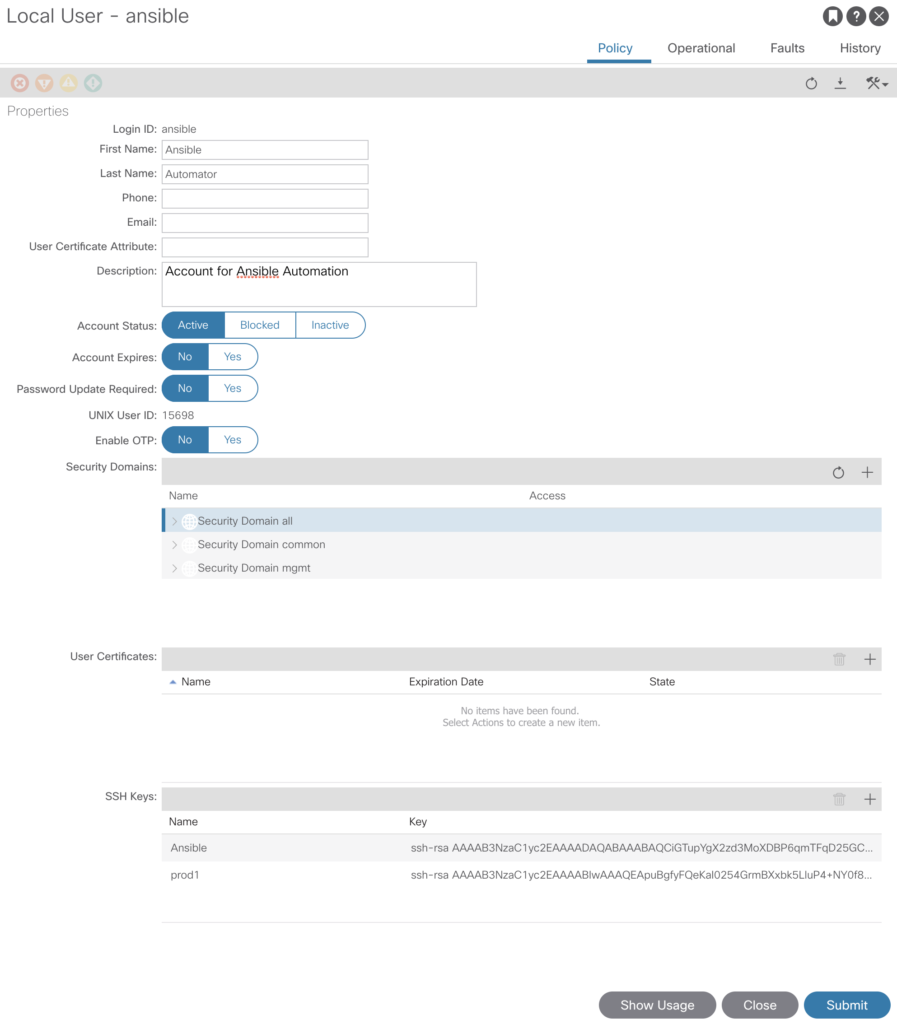
Next step is to create a user ansible within the fabric.

Create Ansible User

As we’ve already done – go to -> Admin -> AAA -> Users and create a new local user. Add your public key from the box you are running ansible from and store it in the SSH Keys section.

Quick check, if we are now able to connect to the box.

# ansible APIC -m ping
192.168.140.40 | SUCCESS => {
    "ansible_facts": {
        "discovered_interpreter_python": "/usr/bin/python"
    }, 
    "changed": false, 
    "ping": "pong"
}

This shows – access via ssh is possible for ansible.

Ansible .yml File

But we want to use the API – and this is really simple.

Just create a file named tenant.yml with this content:

---
- name: ACI Tenant Management
  hosts: APIC
  connection: local
  gather_facts: no
  tasks:
  - name: CONFIGURE TENANT
    aci_tenant:
      host: '{{ inventory_hostname }}'
      user: ansible
      password: SecretSecretOhSoSecret
      validate_certs: false
      tenant: "Beaker"
      description: "Beaker created Using Ansible"
      state: present
...

and run this via the command line:

# ansible-playbook tenant.yml

PLAY [ACI Tenant Management] *********************************************************************************************************************************************************************************************

TASK [CONFIGURE TENANT] **************************************************************************************************************************************************************************************************
changed: [192.168.140.40]

PLAY RECAP ***************************************************************************************************************************************************************************************************************
192.168.140.40             : ok=1    changed=1    unreachable=0    failed=0    skipped=0    rescued=0    ignored=0   

Have a look on your APIC console:


Using private keys

One last step – I’m not a big fan of storing plain passwords – starting with Ansible 2.5 it is possible to use private keys to authenticate. This requires some additional steps.

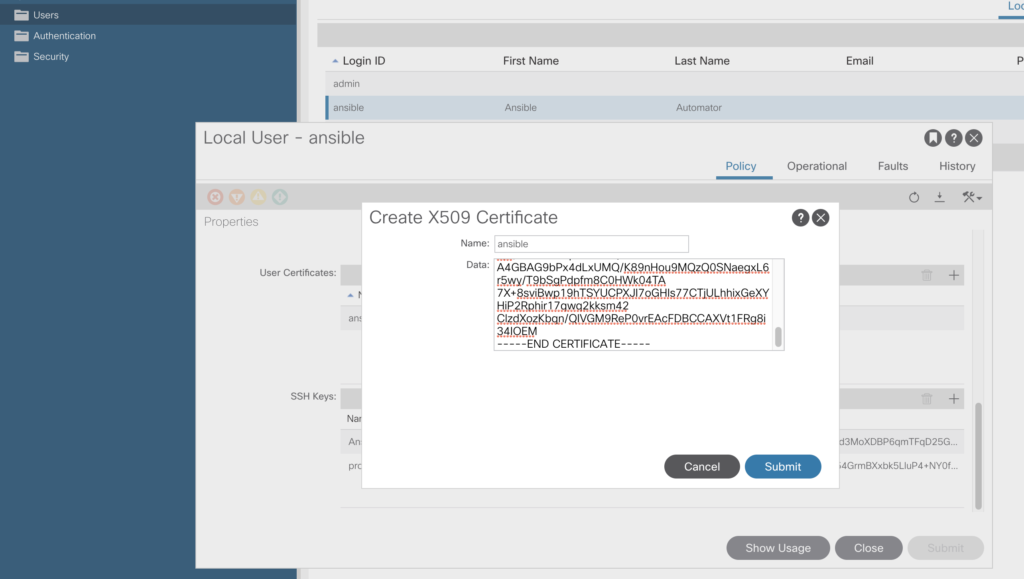
First you have to create a private key and a .crt file (to be used on APIC AAA).

# openssl req -new -newkey rsa:1024 -days 36500 -nodes -x509 -keyout ansible.key -out ansible.crt -subj '/CN=ansible/O=proGIS/C=DE'
Generating a 1024 bit RSA private key
...................................................................++++++
....++++++
writing new private key to 'ansible.key'

After running this command you’ll find two new files in the directory where you’ve executed the command.

  1. ansible.key (your private key)
  2. ansible.crt (the file required in APIC)

Go now to –> Admin -> AAA -> Users

and add the .crt file content in the user certificates section.


Just replace now the password entry with private_key details, the file looks like this:

---
- name: ACI Tenant Management
  hosts: APIC
  connection: local
  gather_facts: no
  tasks:
  - name: CONFIGURE TENANT
    aci_tenant:
      host: '{{ inventory_hostname }}'
      user: ansible
      private_key: /root/.pki/ansible.key
      validate_certs: false
      tenant: "Beaker"
      description: "Beaker created Using Ansible"
      state: present
...

This works! If you want to see more details about the activities behind the scene – please add -vvvv to you playbook command line.

# ansible-playbook tenant.yml -vvvv
ansible-playbook 2.9.10
  config file = /etc/ansible/ansible.cfg
  configured module search path = [u'/root/.ansible/plugins/modules', u'/usr/share/ansible/plugins/modules']
  ansible python module location = /usr/lib/python2.7/site-packages/ansible
  executable location = /usr/bin/ansible-playbook
  python version = 2.7.5 (default, Apr  2 2020, 13:16:51) [GCC 4.8.5 20150623 (Red Hat 4.8.5-39)]
Using /etc/ansible/ansible.cfg as config file
setting up inventory plugins
host_list declined parsing /etc/ansible/hosts as it did not pass its verify_file() method
script declined parsing /etc/ansible/hosts as it did not pass its verify_file() method
auto declined parsing /etc/ansible/hosts as it did not pass its verify_file() method
Parsed /etc/ansible/hosts inventory source with ini plugin
Loading callback plugin default of type stdout, v2.0 from /usr/lib/python2.7/site-packages/ansible/plugins/callback/default.pyc

PLAYBOOK: tenant.yml *****************************************************************************************************************************************************************************************************
Positional arguments: tenant.yml
become_method: sudo
inventory: (u'/etc/ansible/hosts',)
forks: 5
tags: (u'all',)
verbosity: 4
connection: smart
timeout: 10
1 plays in tenant.yml

PLAY [ACI Tenant Management] *********************************************************************************************************************************************************************************************
META: ran handlers

TASK [CONFIGURE TENANT] **************************************************************************************************************************************************************************************************
task path: /root/nxos/tenant.yml:7
<192.168.140.40> ESTABLISH LOCAL CONNECTION FOR USER: root
<192.168.140.40> EXEC /bin/sh -c 'echo ~root && sleep 0'
<192.168.140.40> EXEC /bin/sh -c '( umask 77 && mkdir -p "` echo /root/.ansible/tmp `"&& mkdir /root/.ansible/tmp/ansible-tmp-1594034388.72-15831-57970545921562 && echo ansible-tmp-1594034388.72-15831-57970545921562="` echo /root/.ansible/tmp/ansible-tmp-1594034388.72-15831-57970545921562 `" ) && sleep 0'
<192.168.140.40> Attempting python interpreter discovery
<192.168.140.40> EXEC /bin/sh -c 'echo PLATFORM; uname; echo FOUND; command -v '"'"'/usr/bin/python'"'"'; command -v '"'"'python3.7'"'"'; command -v '"'"'python3.6'"'"'; command -v '"'"'python3.5'"'"'; command -v '"'"'python2.7'"'"'; command -v '"'"'python2.6'"'"'; command -v '"'"'/usr/libexec/platform-python'"'"'; command -v '"'"'/usr/bin/python3'"'"'; command -v '"'"'python'"'"'; echo ENDFOUND && sleep 0'
<192.168.140.40> EXEC /bin/sh -c '/usr/bin/python && sleep 0'
Using module file /usr/lib/python2.7/site-packages/ansible/modules/network/aci/aci_tenant.py
<192.168.140.40> PUT /root/.ansible/tmp/ansible-local-15822LIJPe1/tmpfW12QD TO /root/.ansible/tmp/ansible-tmp-1594034388.72-15831-57970545921562/AnsiballZ_aci_tenant.py
<192.168.140.40> EXEC /bin/sh -c 'chmod u+x /root/.ansible/tmp/ansible-tmp-1594034388.72-15831-57970545921562/ /root/.ansible/tmp/ansible-tmp-1594034388.72-15831-57970545921562/AnsiballZ_aci_tenant.py && sleep 0'
<192.168.140.40> EXEC /bin/sh -c '/usr/bin/python /root/.ansible/tmp/ansible-tmp-1594034388.72-15831-57970545921562/AnsiballZ_aci_tenant.py && sleep 0'
<192.168.140.40> EXEC /bin/sh -c 'rm -f -r /root/.ansible/tmp/ansible-tmp-1594034388.72-15831-57970545921562/ > /dev/null 2>&1 && sleep 0'
changed: [192.168.140.40] => {
    "ansible_facts": {
        "discovered_interpreter_python": "/usr/bin/python"
    }, 
    "changed": true, 
    "current": [
        {
            "fvTenant": {
                "attributes": {
                    "annotation": "", 
                    "descr": "Beaker created Using Ansible", 
                    "dn": "uni/tn-Beaker", 
                    "name": "Beaker", 
                    "nameAlias": "", 
                    "ownerKey": "", 
                    "ownerTag": "", 
                    "userdom": ":all:mgmt:common:"
                }
            }
        }
    ], 
    "invocation": {
        "module_args": {
            "certificate_name": "ansible", 
            "description": "Beaker created Using Ansible", 
            "host": "192.168.140.40", 
            "output_level": "normal", 
            "password": null, 
            "port": null, 
            "private_key": "VALUE_SPECIFIED_IN_NO_LOG_PARAMETER", 
            "protocol": "https", 
            "state": "present", 
            "tenant": "Beaker", 
            "timeout": 30, 
            "use_proxy": true, 
            "use_ssl": true, 
            "user": "ansible", 
            "username": "ansible", 
            "validate_certs": false
        }
    }
}
META: ran handlers
META: ran handlers

PLAY RECAP ***************************************************************************************************************************************************************************************************************
192.168.140.40             : ok=1    changed=1    unreachable=0    failed=0    skipped=0    rescued=0    ignored=0   

Starting with rel. 2.8 ansible offers encryption of the private key as well. Please find more details at the bottom of this article.

https://docs.ansible.com/ansible/latest/scenario_guides/guide_aci.html#aci-guide

A one hour webinar offered by RedHat – please watch it as well:

https://www.ansible.com/resources/webinars-training/cisco-aci-with-red-hat-ansible-collections-webinar

Query the fabric

Quite simple to query the fabric.

---
- name: ACI Get Bridge Domains
  hosts: APIC
  connection: local
  gather_facts: no
  tasks:
  - name: Get Bridge Domains
    aci_rest:
      host: '{{ inventory_hostname }}'
      username: ansible
      private_key: /root/.pki/ansible.key
      validate_certs: false
      path: /api/node/class/fvBD.json
      method: get

...

Will give you

# ansible-playbook getbridge.yml -vvvv | grep dn
                    "dn": "uni/tn-common/BD-default", 
                    "dn": "uni/tn-infra/BD-ave-ctrl", 
                    "dn": "uni/tn-infra/BD-default", 
                    "dn": "uni/tn-mgmt/BD-inb", 

We’ve got now full control in both directions (read and write).

ACI access via external scripts

After we’ve mastered our access to an ACI fabric via Postman – how about the same thing from a script?

Why a script? Firstly – this will give you a deeper understanding how this is working. And secondly – using a script gives you more control, especially if you are planning to automate things.

Just a simple example – you want to create in an automated way changes into the fabric – in the end unattended and in the background. There a so many tools to support you.

Workflow could be:

  • create your demand as a database entry and trigger the build process
  • details are being pushed out to a config file
  • your delivery environment (e.g. GoCD ) detects this config file and
  • launches your script (python, ansible, shell, whatever you prefer)
  • changes will be implemented failsafe (in theory 🙂 as we all know – life can be guileful)

The procedure is always the same – send a post request to the API, and check have a look into the results.

Using Curl in a shell script

We’ll start with a simple curl command line – to login into the box.

The POST url we’ve to use is

https://192.168.140.40/api/aaaLogin.json

The payload is

{ "aaaUser" : { "attributes": {"name":"admin","pwd":"totalsecretpassword" } } }

We’ll put this together in a curl command line (–insecure is needed, as we don’t have a valid cert when accessing per IP):

curl -i --insecure -H "content-type:application/json" -XPOST https://192.168.140.40/api/aaaLogin.json -d '{ "aaaUser" : { "attributes": {"name":"admin","pwd":"totalsecretpassword" } } } '

And our APIC answers back (as we’ve seen in the postman article):

HTTP/1.1 200 OK
Server: Cisco APIC
Date: Thu, 02 Jul 2020 14:14:31 GMT
Content-Type: application/json
Content-Length: 1791
Connection: keep-alive
Set-Cookie: APIC-cookie=eyJhbGciOiJSUzI1NiIsImtpZCI6Ijh4MWp4bWN5aTRkamZqYWd2anVxbmxwdjNtZ2EzNDUyIiwidHlwIjoiand0In0.eyJyYmFjIjpbeyJkb21haW4iOiJhbGwiLCJyb2xlc1IiOjAsInJvbGVzVyI6MX1dLCJpc3MiOiJBQ0kgQVBJQyIsInVzZXJuYW1lIjoiYWRtaW4iLCJ1c2VyaWQiOjE1Mzc0LCJ1c2VyZmxhZ3MiOjAsImlhdCI6MTU5MzY5OTI3MSwiZXhwIjoxNTkzNjk5ODcxLCJzZXNzaW9uaWQiOiJsdVdtdUNBTFFWcStaQzJhckdNRFRBPT0ifQ.kWQcxvw-9cIMP1XAZsTvBs4rtkXWevC2ZC1ONcjsJefMpYWbP8PgiYW6DpW-QLgGDdc8TDL1xws1nG0jPqKneppRgklcI9BygTm3IywkyaWvIEYZMOs0uvWyT8GCFKCPyaqQwAE_m725PLECFIPk4RVfG0dyDi4qca08AtjzGaHhvhp3WsX55XrcBtxA_1c9ZgcHDjhK1NNbOm3HASHa5sZNcpMPogd0ya-vpUrePlw5yrP559gHy2gUhLybANcIkFBCptCUj8X7PETTJi9DEpcPm5mUZTSUw3bcQtHc_rKRA3lTGJWbrOuZTQRCreb7ygaES7SKXYp-3hWAem5FjQ; path=/; HttpOnly; HttpOnly; Secure
Access-Control-Allow-Headers: Origin, X-Requested-With, Content-Type, Accept, DevCookie, APIC-challenge, Request-Tag
Access-Control-Allow-Methods: POST,GET,OPTIONS,DELETE
X-Frame-Options: SAMEORIGIN
Strict-Transport-Security: max-age=31536000; includeSubdomains
Cache-Control: no-cache="Set-Cookie, Set-Cookie2"
Client-Cert-Enabled: false
Access-Control-Allow-Origin: http://127.0.0.1:8000
Access-Control-Allow-Credentials: false

{"totalCount":"1","imdata":[{"aaaLogin":{"attributes":{"token":"eyJhbGciOiJSUzI1NiIsImtpZCI6Ijh4MWp4bWN5aTRkamZqYWd2anVxbmxwdjNtZ2EzNDUyIiwidHlwIjoiand0In0.eyJyYmFjIjpbeyJkb21haW4iOiJhbGwiLCJyb2xlc1IiOjAsInJvbGVzVyI6MX1dLCJpc3MiOiJBQ0kgQVBJQyIsInVzZXJuYW1lIjoiYWRtaW4iLCJ1c2VyaWQiOjE1Mzc0LCJ1c2VyZmxhZ3MiOjAsImlhdCI6MTU5MzY5OTI3MSwiZXhwIjoxNTkzNjk5ODcxLCJzZXNzaW9uaWQiOiJsdVdtdUNBTFFWcStaQzJhckdNRFRBPT0ifQ.kWQcxvw-9cIMP1XAZsTvBs4rtkXWevC2ZC1ONcjsJefMpYWbP8PgiYW6DpW-QLgGDdc8TDL1xws1nG0jPqKneppRgklcI9BygTm3IywkyaWvIEYZMOs0uvWyT8GCFKCPyaqQwAE_m725PLECFIPk4RVfG0dyDi4qca08AtjzGaHhvhp3WsX55XrcBtxA_1c9ZgcHDjhK1NNbOm3HASHa5sZNcpMPogd0ya-vpUrePlw5yrP559gHy2gUhLybANcIkFBCptCUj8X7PETTJi9DEpcPm5mUZTSUw3bcQtHc_rKRA3lTGJWbrOuZTQRCreb7ygaES7SKXYp-3hWAem5FjQ","siteFingerprint":"8x1jxmcyi4djfjagvjuqnlpv3mga3452","refreshTimeoutSeconds":"600","maximumLifetimeSeconds":"86400","guiIdleTimeoutSeconds":"1200","restTimeoutSeconds":"90","creationTime":"1593699271","firstLoginTime":"1593699271","userName":"admin","remoteUser":"false","unixUserId":"15374","sessionId":"luWmuCALQVq+ZC2arGMDTA==","lastName":"","firstName":"","changePassword":"no","version":"5.0(1k)","buildTime":"Wed May 13 23:24:01 PDT 2020","node":"topology/pod-1/node-1"},"children":[{"aaaUserDomain":{"attributes":{"name":"all","rolesR":"admin","rolesW":"admin"},"children":[{"aaaReadRoles":{"attributes":{}}},{"aaaWriteRoles":{"attributes":{},"children":[{"role":{"attributes":{"name":"admin"}}}]}}]}},{"DnDomainMapEntry":{"attributes":{"dn":"uni/tn-common","readPrivileges":"admin","writePrivileges":"admin"}}},{"DnDomainMapEntry":{"attributes":{"dn":"uni/tn-mgmt","readPrivileges":"admin","writePrivileges":"admin"}}},{"DnDomainMapEntry":{"attributes":{"dn":"uni/tn-infra","readPrivileges":"admin","writePrivileges":"admin"}}}]}}]}

As this works – we’ll put this into a bash script.

#!/bin/bash
#
# Script to login to APIC via curl
# 

# Credentials
user=admin
pwd=donttell
# Curl Post
curl -i --insecure -H "content-type:application/json" -XPOST https://192.168.140.40/api/aaaLogin.json -d '{ "aaaUser" : { "attributes": {"name":"'$user'","pwd":"'$pwd'" } } } '

printf "\n\n Done\n\n"

# End of script

Works as designed – nice.

In the end – we’ll follow the same approach as we did with Postman.

The only difference – we’ve to store the session cookie we’ll get after the login (named APIC-cookie) and hand it over to the curl command to create the test tenant.

#!/bin/bash
#
# Script to create a tenant via curl
# 

# Credentials
user=admin
pwd=sosecretsosecret
# Curl Post to get logged in
# Cookie is being stored in file named "Cookie"
curl -i --insecure -H "content-type:application/json" -XPOST https://192.168.140.40/api/aaaLogin.json -d '{ "aaaUser" : { "attributes": {"name":"'$user'","pwd":"'$pwd'" } } } ' -c Cookie
printf "\n\n Logged in\n\n"

printf "\n\n Create tenant\n\n"
# Curl Post to create the tenant
# Cookie being read in 
curl -i --insecure -H "content-type:application/json" -XPOST https://192.168.140.40/api/node/mo/uni/tn-Beaker.json -d '{"fvTenant":{"attributes":{"dn":"uni/tn-Beaker","name":"Beaker","nameAlias":"TheLabGuy","descr":"A simple test tenant with the magic bash script","rn":"tn-Beaker","status":"created"},"children":[]}}' -b Cookie


printf "\n\n Done\n\n"

# End of script

Run the script and have a look on your APIC console.

The most obvious advantage of using a script instead of Postman – you don’t need to install a huge software package (OSX version has a 350 MB size), much leaner.

On the other hand – you’ve got much more options at hand by using Postman, so as always – you’ve to decide which approach fits best. In most cases – both – depends on your use case.

JSON PP (Pretty Printer)

If you modify the curl call a little bit, you are able to use tools like json_pp (man json_pp).

curl  --insecure -H "content-type:application/json" -XPOST https://192.168.140.40/api/aaaLogin.json -d '{ "aaaUser" : { "attributes": {"name":"'$user'","pwd":"'$pwd'" } } } ' | json_pp

This will pipe the output into json_pp and the answer is much easier to read.

{
   "totalCount" : "1",
   "imdata" : [
      {
         "aaaLogin" : {
            "children" : [
               {
                  "aaaUserDomain" : {
                     "children" : [
                        {
                           "aaaReadRoles" : {
                              "attributes" : {}
                           }
                        },
                        {
                           "aaaWriteRoles" : {
                              "children" : [
                                 {
                                    "role" : {
                                       "attributes" : {
                                          "name" : "admin"
                                       }
                                    }
                                 }
                              ],
                              "attributes" : {}
                           }
                        }
                     ],
                     "attributes" : {
                        "rolesW" : "admin",
                        "name" : "all",
                        "rolesR" : "admin"
                     }
                  }
               },
               {
                  "DnDomainMapEntry" : {
                     "attributes" : {
                        "writePrivileges" : "admin",
                        "readPrivileges" : "admin",
                        "dn" : "uni/tn-common"
                     }
                  }
               },
               {
                  "DnDomainMapEntry" : {
                     "attributes" : {
                        "writePrivileges" : "admin",
                        "readPrivileges" : "admin",
                        "dn" : "uni/tn-mgmt"
                     }
                  }
               },
               {
                  "DnDomainMapEntry" : {
                     "attributes" : {
                        "writePrivileges" : "admin",
                        "readPrivileges" : "admin",
                        "dn" : "uni/tn-infra"
                     }
                  }
               }
            ],
            "attributes" : {
               "node" : "topology/pod-1/node-1",
               "remoteUser" : "false",
               "sessionId" : "TL+Yj5bNS1+5TI8rJBGkEQ==",
               "siteFingerprint" : "8x1jxmcyi4djfjagvjuqnlpv3mga3452",
               "lastName" : "",
               "userName" : "admin",
               "token" : "eyJhbGciOiJSUzI1NiIsImtpZCI6Ijh4MWp4bWN5aTRkamZqYWd2anVxbmxwdjNtZ2EzNDUyIiwidHlwIjoiand0In0.eyJyYmFjIjpbeyJkb21haW4iOiJhbGwiLCJyb2xlc1IiOjAsInJvbGVzVyI6MX1dLCJpc3MiOiJBQ0kgQVBJQyIsInVzZXJuYW1lIjoiYWRtaW4iLCJ1c2VyaWQiOjE1Mzc0LCJ1c2VyZmxhZ3MiOjAsImlhdCI6MTU5MzcwNTE0OSwiZXhwIjoxNTkzNzA1NzQ5LCJzZXNzaW9uaWQiOiJUTCtZajViTlMxKzVUSThySkJHa0VRPT0ifQ.Fj4o4jwj2VT2KDmfdSQyrn2EkSSW8MRtjvdEUoHt4-_Bv4RKB_uVRsjaJuBo_e-TQm_dfAc07Hm46iUcqNLon7rbhyb9EqidXY855ZxbL9wJBUvLjKf4hclg3kkw_ctcGcgG6OpZNRX1oKd5NKwlDlffkqHmDB5dFWmjdTxbznyyqHwnuSzxvnRSzYeKU9Q8jVYMPfOnApcyCwyOfdwCLUktGkU0Yv1kpYWrm58gbIKiNt8O5IAHtFNTh58SA538soaHr2y-LFqaDeKrW0KubRyjPp670ocTk-Vc2L7Zh1Qz-jCcAsAyfpnaJvYza5y1FEOR_aiK1ub9AY9-Qrd4qg",
               "firstLoginTime" : "1593705149",
               "firstName" : "",
               "restTimeoutSeconds" : "90",
               "version" : "5.0(1k)",
               "creationTime" : "1593705149",
               "buildTime" : "Wed May 13 23:24:01 PDT 2020",
               "changePassword" : "no",
               "refreshTimeoutSeconds" : "600",
               "maximumLifetimeSeconds" : "86400",
               "unixUserId" : "15374",
               "guiIdleTimeoutSeconds" : "1200"
            }
         }
      }
   ]
}

Accessing ACI via a python script

As all roads lead to Rome – it is possible to use this approach with any tool you prefer. As a brief example – how to do this in python.

Python will manage this by using the json module, which has to be imported.

#!/usr/bin/env python
#
# Python-Example Script to configure ACI
#
# A. Fassl - 07/2020

# Load required modules
import json
import requests
import os

# Prepare 
print requests.certs.where()


# The API URL of the apic - via letsencrypt-delivered https
base_url = 'https://acisim.progis.net:8022/api/'

# Access Credentials
name_and_pwd = {'aaaUser': {'attributes': {'name': 'admin', 'pwd': 'PwD2020xpx'}}}

json_credentials = json.dumps(name_and_pwd)

# login via the API

login_url = base_url + 'aaaLogin.json'
post_response = requests.post(login_url, data=json_credentials, verify=False)

# get token from login response structure
auth = json.loads(post_response.text)
print auth

login_attributes = auth['imdata'][0]['aaaLogin']['attributes']
auth_token = login_attributes['token']

# create cookie array from token
cookies = {}
cookies['APIC-Cookie'] = auth_token

print cookies

And the output delivers the expected results (I haven’t taken care of the SSL cert verification – so please ignore the warning):

# ./login.py
/etc/pki/tls/certs/ca-bundle.crt
/usr/lib/python2.7/site-packages/urllib3/connectionpool.py:769: InsecureRequestWarning: Unverified HTTPS request is being made. Adding certificate verification is strongly advised. See: https://urllib3.readthedocs.org/en/latest/security.html
  InsecureRequestWarning)
{u'imdata': [{u'aaaLogin': {u'attributes': {u'userName': u'admin', u'maximumLifetimeSeconds': u'86400', u'refreshTimeoutSeconds': u'600', u'firstName': u'', u'remoteUser': u'false', u'buildTime': u'Wed May 13 23:24:01 PDT 2020', u'creationTime': u'1594019696', u'sessionId': u'hhoET4O5S0er+ANqeI6FGw==', u'node': u'topology/pod-1/node-1', u'siteFingerprint': u'8x1jxmcyi4djfjagvjuqnlpv3mga3452', u'token': u'eyJhbGciOiJSUzI1NiIsImtpZCI6Ijh4MWp4bWN5aTRkamZqYWd2anVxbmxwdjNtZ2EzNDUyIiwidHlwIjoiand0In0.eyJyYmFjIjpbeyJkb21haW4iOiJhbGwiLCJyb2xlc1IiOjAsInJvbGVzVyI6MX1dLCJpc3MiOiJBQ0kgQVBJQyIsInVzZXJuYW1lIjoiYWRtaW4iLCJ1c2VyaWQiOjE1Mzc0LCJ1c2VyZmxhZ3MiOjAsImlhdCI6MTU5NDAxOTY5NiwiZXhwIjoxNTk0MDIwMjk2LCJzZXNzaW9uaWQiOiJoaG9FVDRPNVMwZXIrQU5xZUk2Rkd3PT0ifQ.irQ52pJMojphV8RrFQ231mwxsBx1_myQmb0kF3G7nIIGgDsU38uiUDydXa_N7dzLKVZb3eOwgZT6mhBDiyMS_iDjBmdimJMU6kRQ191eGeor4WSFX1UdcvHwH_X-BJMebGjWDM2c5tDampke7Ggf5Cr17bvM6NEtWfO_F82QvTq0Whe-FJlkxUXP8wdx1dSBgVVZXGX7c-u3WsaI6SaqhztlaW5mm0DfDYPd2u98xvHM4twJwLhgcyG8vbbu_y88d4O_9RcI-IV1mmXfWHamHzgMfU2vqetzgBWtlF8OUsy-Y-Sk9b2pa7hU23dMSvyXcNiuMDO7dZZwV3CXyMzKJQ', u'version': u'5.0(1k)', u'restTimeoutSeconds': u'90', u'changePassword': u'no', u'lastName': u'', u'firstLoginTime': u'1594019696', u'unixUserId': u'15374', u'guiIdleTimeoutSeconds': u'1200'}, u'children': [{u'aaaUserDomain': {u'attributes': {u'rolesW': u'admin', u'name': u'all', u'rolesR': u'admin'}, u'children': [{u'aaaReadRoles': {u'attributes': {}}}, {u'aaaWriteRoles': {u'attributes': {}, u'children': [{u'role': {u'attributes': {u'name': u'admin'}}}]}}]}}, {u'DnDomainMapEntry': {u'attributes': {u'dn': u'uni/tn-common', u'readPrivileges': u'admin', u'writePrivileges': u'admin'}}}, {u'DnDomainMapEntry': {u'attributes': {u'dn': u'uni/tn-mgmt', u'readPrivileges': u'admin', u'writePrivileges': u'admin'}}}, {u'DnDomainMapEntry': {u'attributes': {u'dn': u'uni/tn-infra', u'readPrivileges': u'admin', u'writePrivileges': u'admin'}}}]}}], u'totalCount': u'1'}
{'APIC-Cookie': u'eyJhbGciOiJSUzI1NiIsImtpZCI6Ijh4MWp4bWN5aTRkamZqYWd2anVxbmxwdjNtZ2EzNDUyIiwidHlwIjoiand0In0.eyJyYmFjIjpbeyJkb21haW4iOiJhbGwiLCJyb2xlc1IiOjAsInJvbGVzVyI6MX1dLCJpc3MiOiJBQ0kgQVBJQyIsInVzZXJuYW1lIjoiYWRtaW4iLCJ1c2VyaWQiOjE1Mzc0LCJ1c2VyZmxhZ3MiOjAsImlhdCI6MTU5NDAxOTY5NiwiZXhwIjoxNTk0MDIwMjk2LCJzZXNzaW9uaWQiOiJoaG9FVDRPNVMwZXIrQU5xZUk2Rkd3PT0ifQ.irQ52pJMojphV8RrFQ231mwxsBx1_myQmb0kF3G7nIIGgDsU38uiUDydXa_N7dzLKVZb3eOwgZT6mhBDiyMS_iDjBmdimJMU6kRQ191eGeor4WSFX1UdcvHwH_X-BJMebGjWDM2c5tDampke7Ggf5Cr17bvM6NEtWfO_F82QvTq0Whe-FJlkxUXP8wdx1dSBgVVZXGX7c-u3WsaI6SaqhztlaW5mm0DfDYPd2u98xvHM4twJwLhgcyG8vbbu_y88d4O_9RcI-IV1mmXfWHamHzgMfU2vqetzgBWtlF8OUsy-Y-Sk9b2pa7hU23dMSvyXcNiuMDO7dZZwV3CXyMzKJQ'}

ACI and Postman

ACI can be configured via the CLI console command and the web based interface. But there is another option – which enables automation by scripted configuration.

Lets have first a view on the internals.

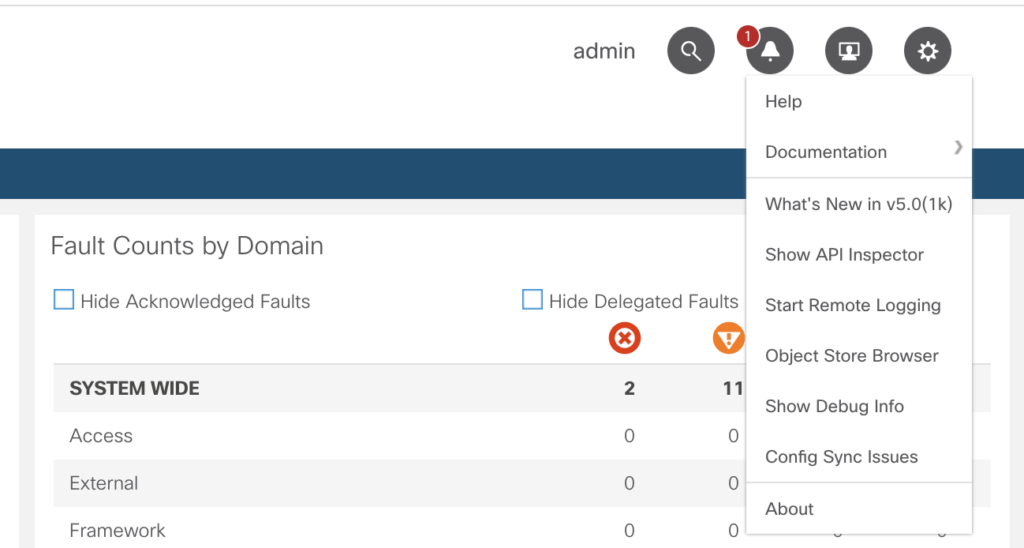
If you click on the gear symbol on the upper right side of the web based interface you’ll notice an option „Show API inspector“.


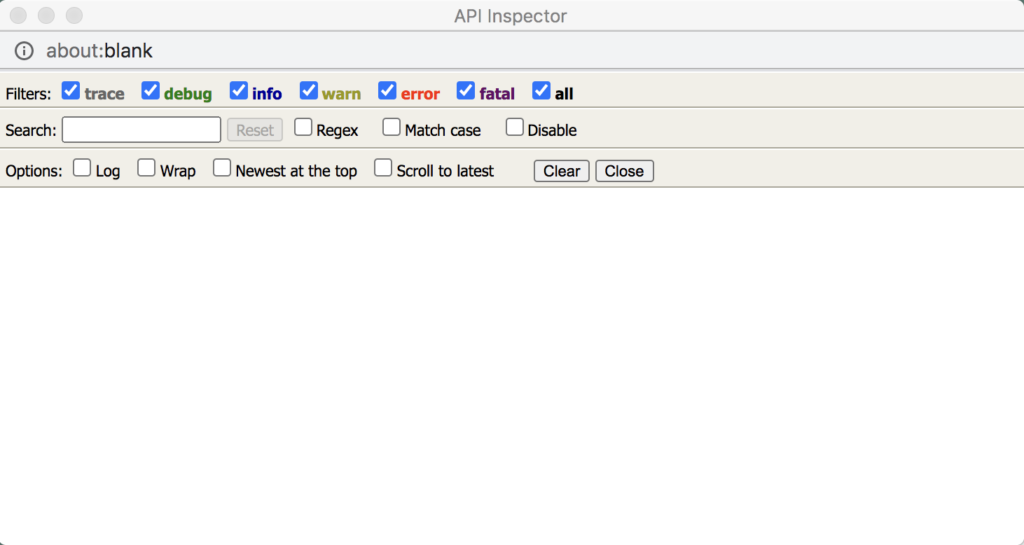
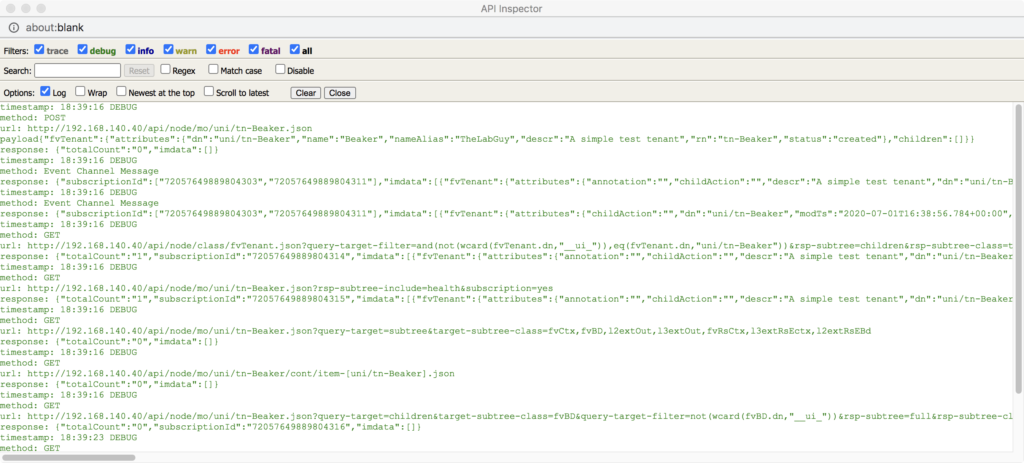
Now you’ll get an additional window – the API inspector.


and if you choose the various pages within the APIC web console, you’ll see the corresponding communication within the API inspector.

There are filters available, and it is possible to search in the output for certain keywords.

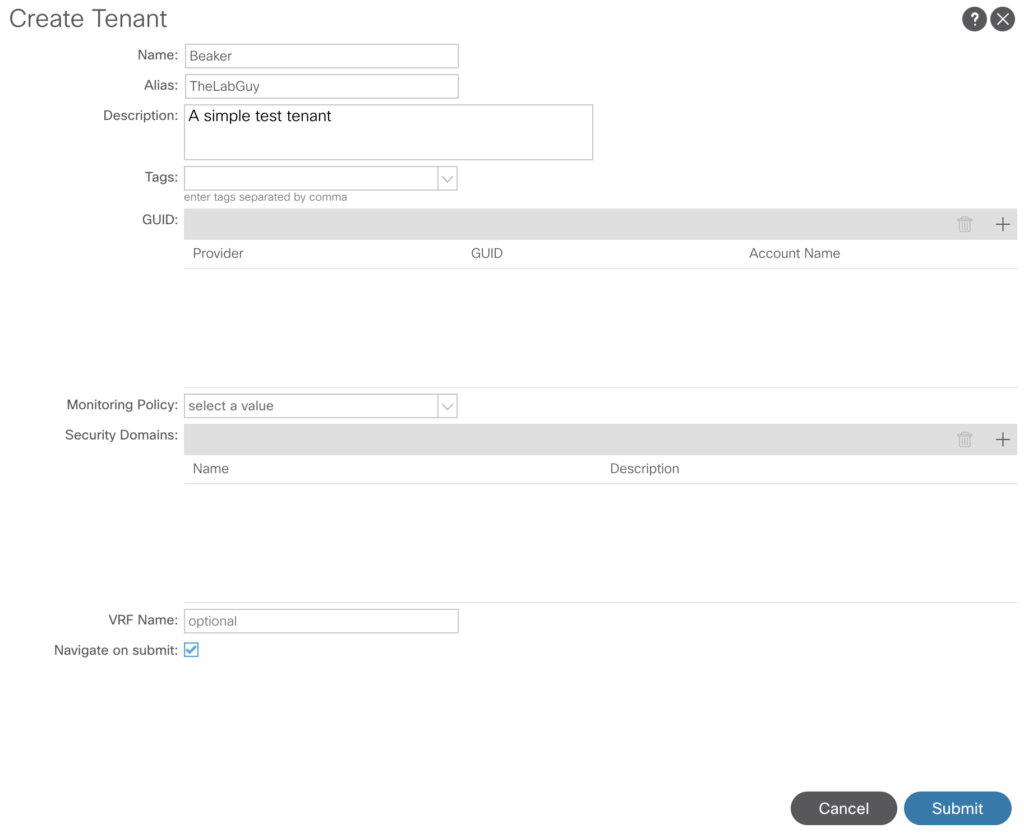
As an example – we just add a Tenant.

-> Tenants -> Add Tenant

To keep it simple, I’ve just filled in three fields.


After pressing „Submit“ the API inspector is being updated.


if you now search for „POST“ – here we go.

method: POST
url: http://192.168.140.40/api/node/mo/uni/tn-Beaker.json
payload{"fvTenant":{"attributes":{"dn":"uni/tn-Beaker","name":"Beaker","nameAlias":"TheLabGuy","descr":"A simple test tenant","rn":"tn-Beaker","status":"created"},"children":[]}}
response: {"totalCount":"0","imdata":[]}
timestamp: 18:39:16 DEBUG 

That is the payload JSON code triggering the creation of a tenant.

But how to do this from an external tool or even better by a script?

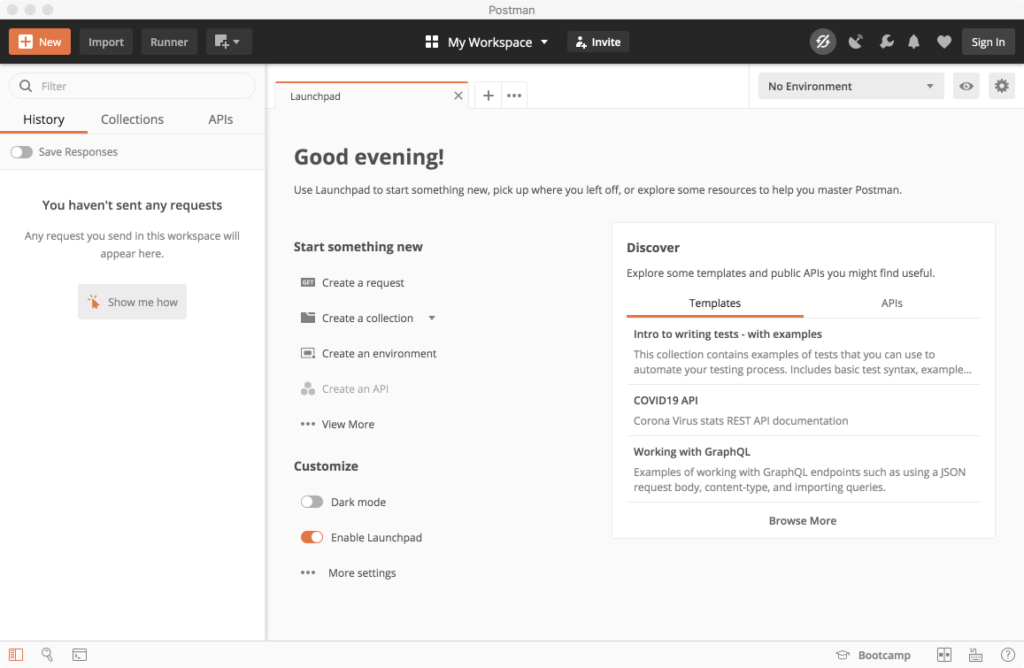
To achieve this, we’ll start with Postman, a collaboration platform with huge capabilities – to go into detail is far beyond of our scope here. We’ll install the application and have a look how this works in principle.

Software download is at : https://www.postman.com/downloads/

After download and stepping over the initial questions (I’ve skipped the login part to keep it simple) you ‚ll see the postman interface like this.


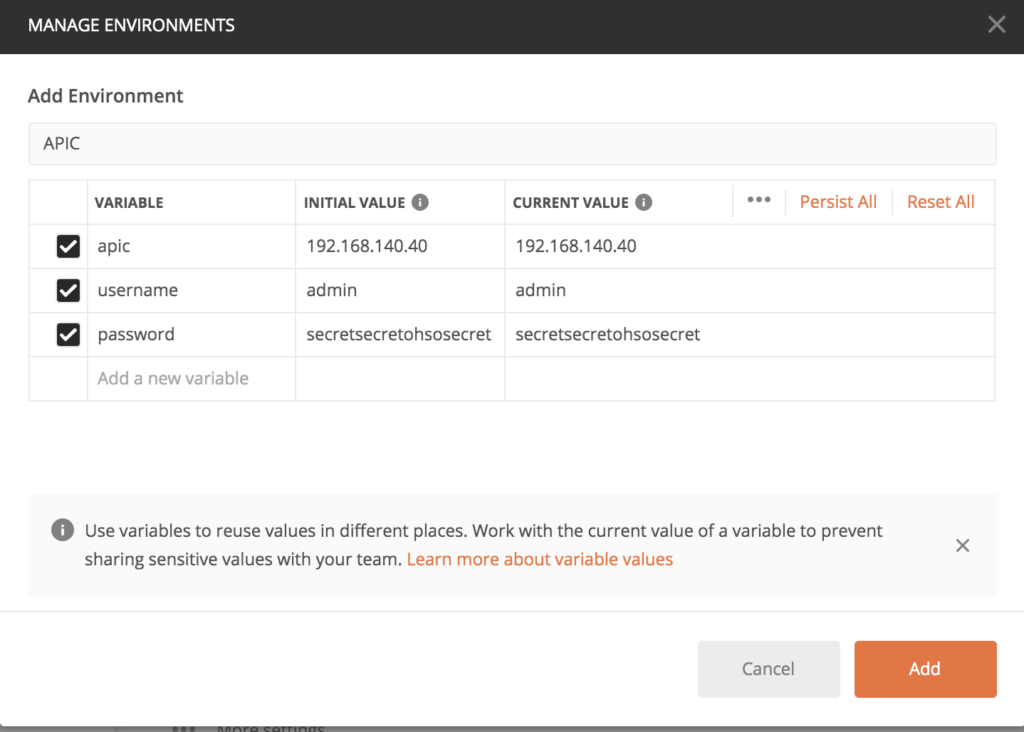
To access your APIC you need to create an environment. Click on „Create an enviroment“ in the middle of the window (beneath „Starting something new“).


Those are the basic details you need to access the APIC, IP-address, username and password. Close the window by „Add“.

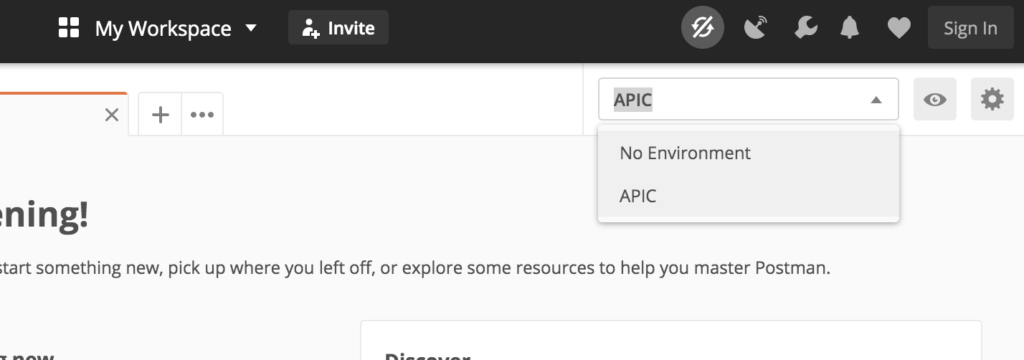
in the right corner now the selection „APIC“ (or whatever name you’ve chosen) is available.


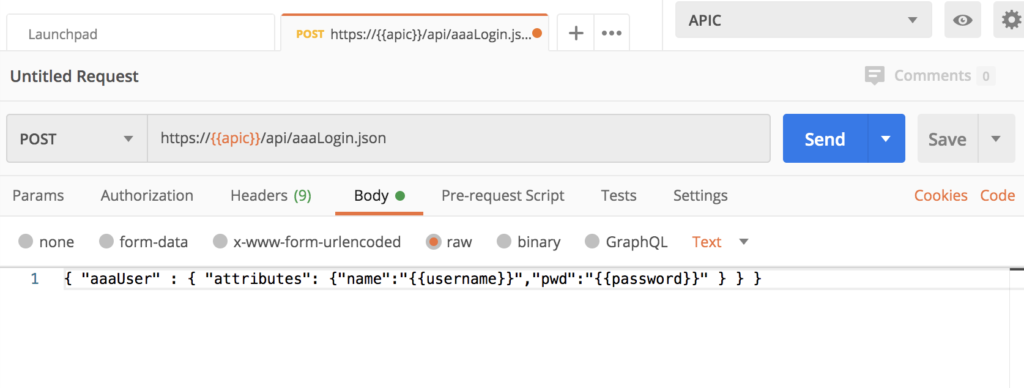
To check, if your access is now in place, just create a new request (in the launchpad tab).


The POST field has to be filled with

https://{{apic}}/api/aaaLogin.json

and the body field (please select „raw“) with

{ "aaaUser" : { "attributes": {"name":"{{username}}","pwd":"{{password}}" } } } 
apic, username and password are the variables we’ve defined for the environment.

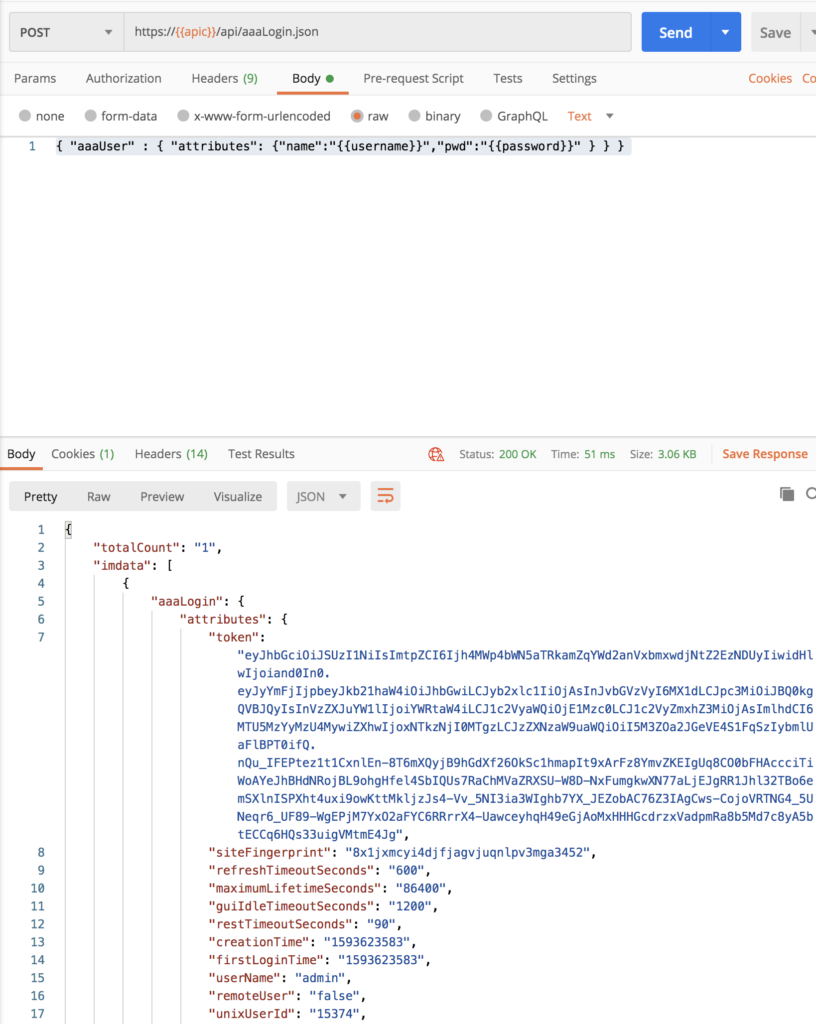
After pressing „Send“ – you’ll get an answer from the system.

Another achievement – we are now able to communicate via Postman.

Next step – we’d like to create a new tenant. If we go up – we’ll see all the information required to launch this via our tool.

CAVEAT: The API inspector captured call ist http – but it has to be https. http is only being used internally in the APIC.

The POST-URL will be:

https://{{apic}}/api/node/mo/uni/tn-Beaker.json

and the payload (the information for the body section) will be.

{"fvTenant":{"attributes":{"dn":"uni/tn-Beaker","name":"Beaker","nameAlias":"TheLabGuy","descr":"A simple test tenant with Postman","rn":"tn-Beaker","status":"created"},"children":[]}}

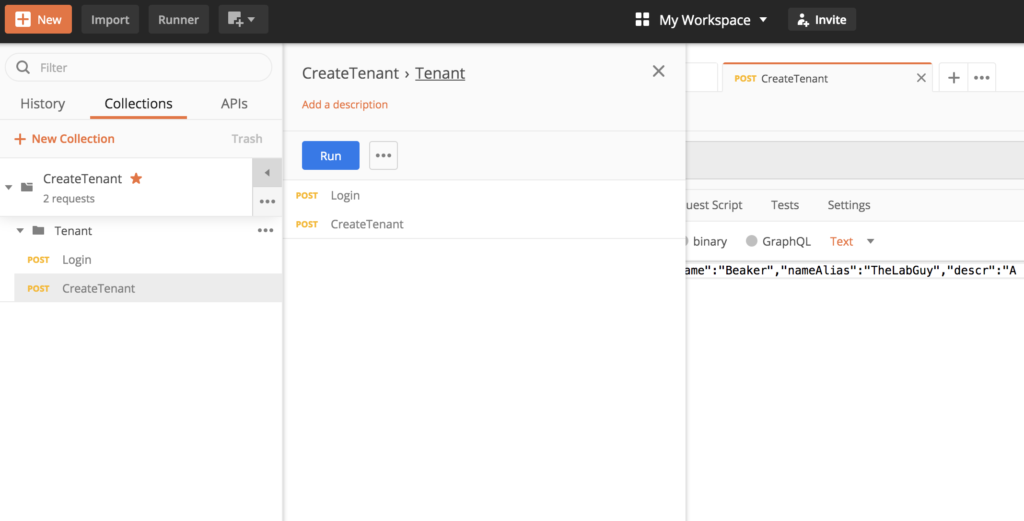
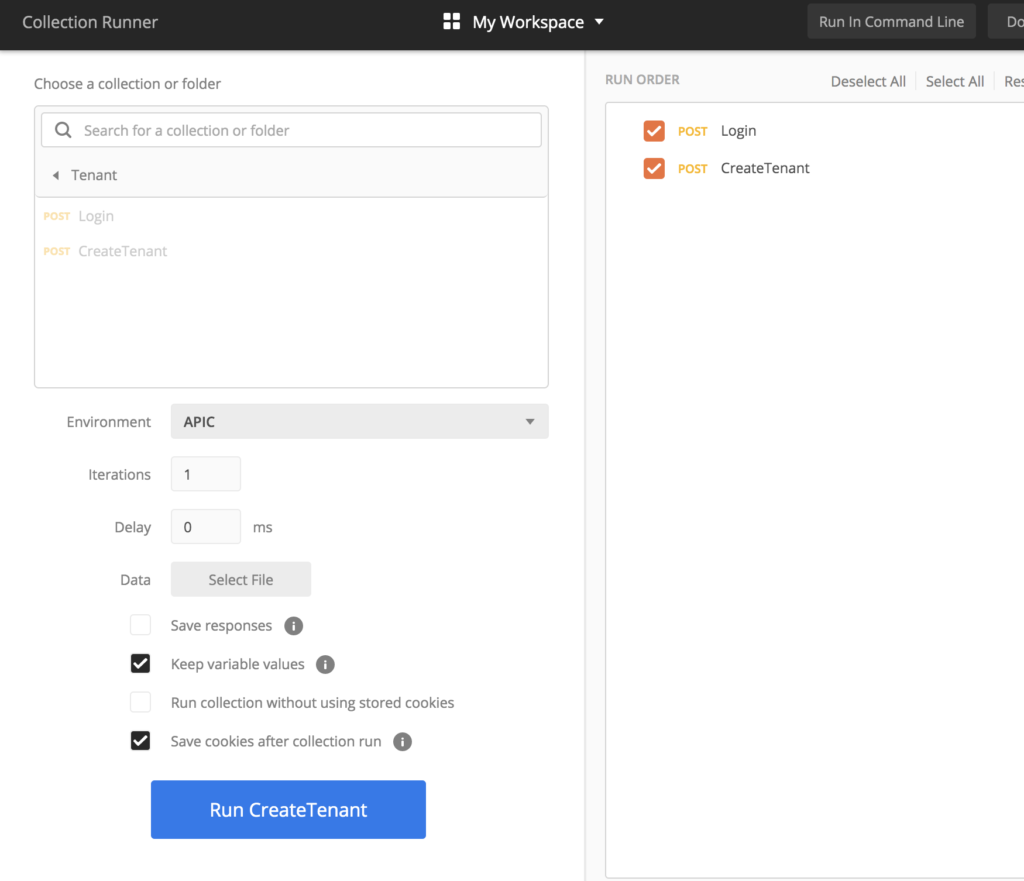
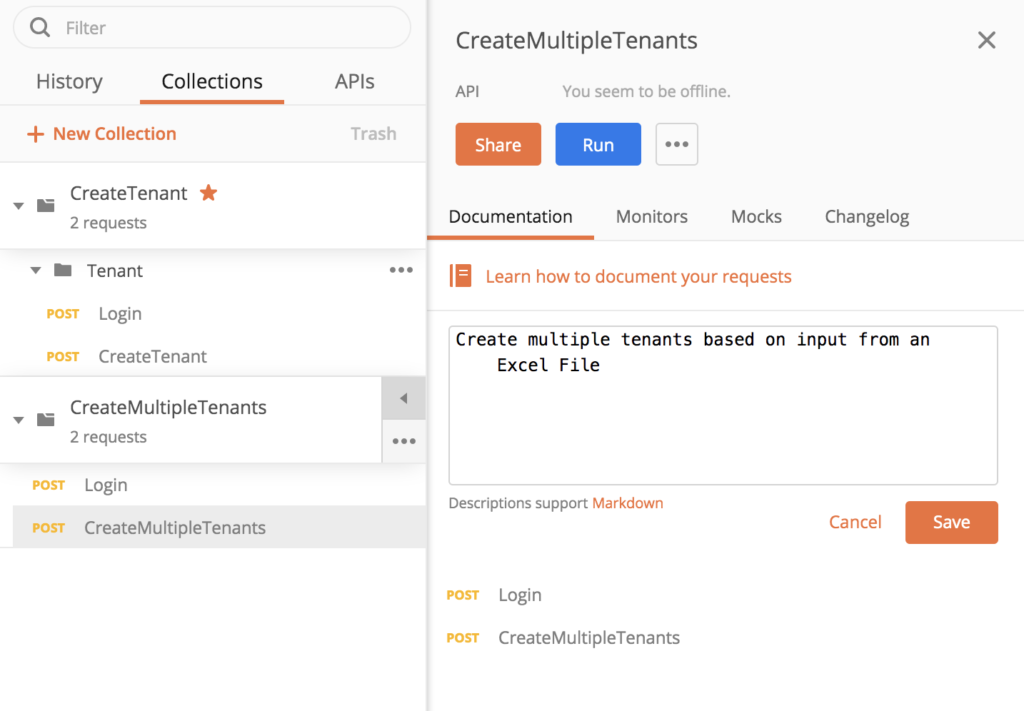
you’ve to add those two request into one collection.


Pressing „Run“ will open a new window.


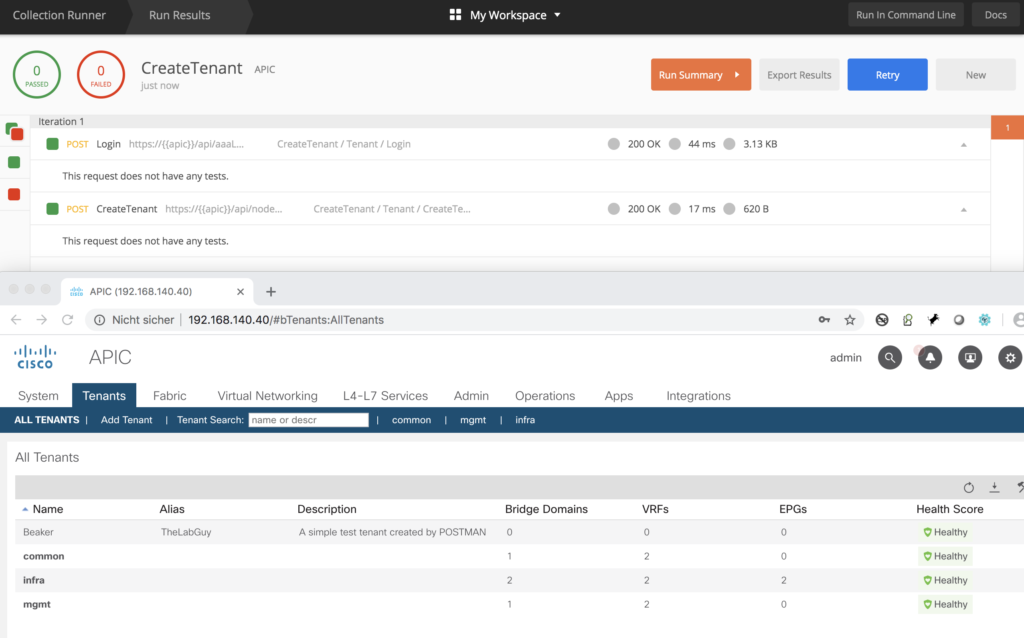
Pressing „Run CreateTenant“ triggers the collection to be executed.


The lower half of the image shows in the APIC console our new tenant.

Postman and Excel Input

To stay with our example above – how to create multiple tenants with one go based on the input of an excel table. This is quite straight forward.

We do need:

  • Collection to control the build
  • within the collection the commands to login to the APIC (we’ll just copy the one we’ve already created)
  • and a control table (in this case an excel file)

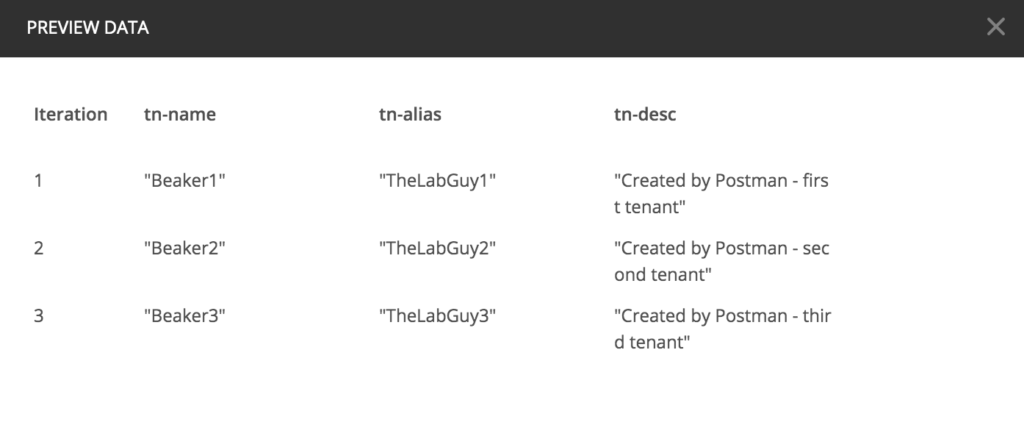
The input we do need for this simple example is the name of the tenant, an alias and a description.

Save this list as a comma-separated CSV file (important!).

We’re going now to create a new collection with the modified payload to use the input list, we just copy the existing two examples (right to the request name there are three dots, which will give you a context menu).


Next step – modify the payload and replace the static values with variable names (use those header names from the excel list).

Static version:

{"fvTenant":{"attributes":{"dn":"uni/tn-Beaker","name":"Beaker","nameAlias":"TheLabGuy","descr":"A simple test tenant created by POSTMAN","rn":"tn-Beaker","status":"created"},"children":[]}}

Updated version:

{"fvTenant":{"attributes":{"dn":"uni/tn-{{tn-name}}","name":"{{tn-name}}","nameAlias":"{{tn-alias}}","descr":"{{tn-desc}}","rn":"tn-{{tn-name}}","status":"created"},"children":[]}}

And you’ve to change as well the Post Request to:

https://{{apic}}/api/node/mo/uni/tn-{{tn-name}}.json

Save your work – and press run as in the example above.


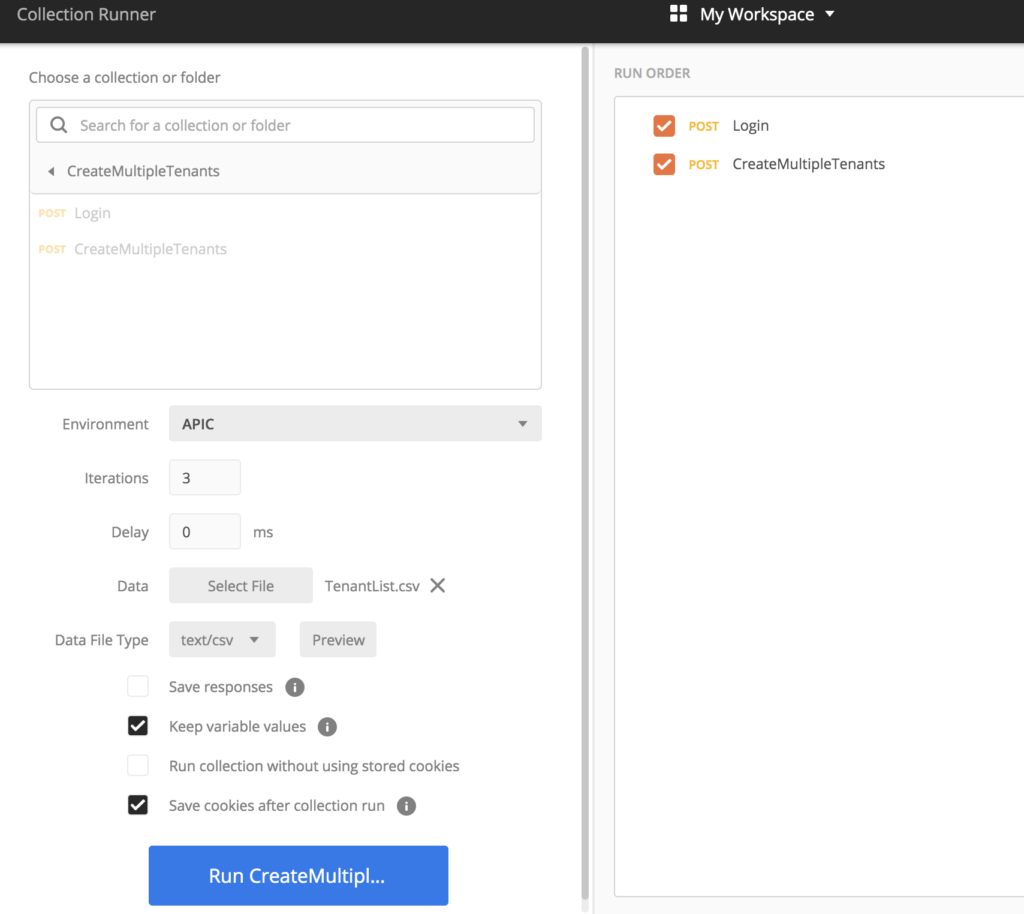
After pressing „Run“ the control window will open.


Select your environment and (by pressing on „Select File“ next to Data ) your control file.

After loading you can do a last sanity check by selecting „Preview“.

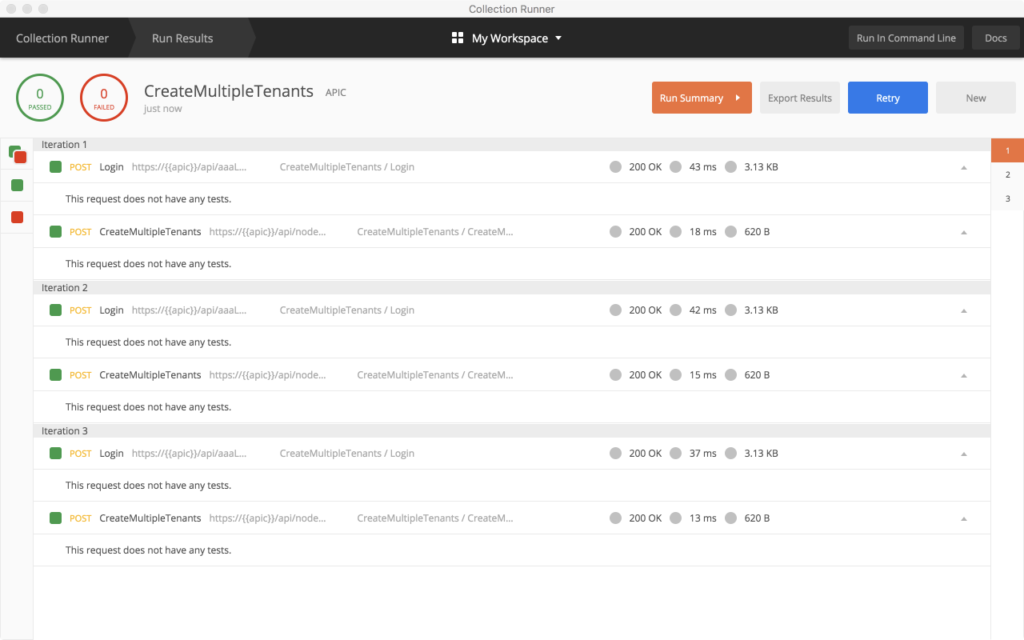
And now – another drum roll please – click on „Run CreateMultipleTenants“

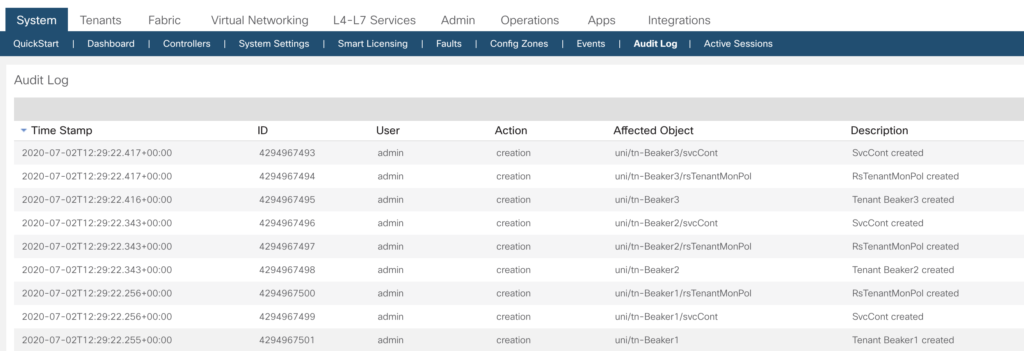
In your APIC console the result of your run is immediately visible.


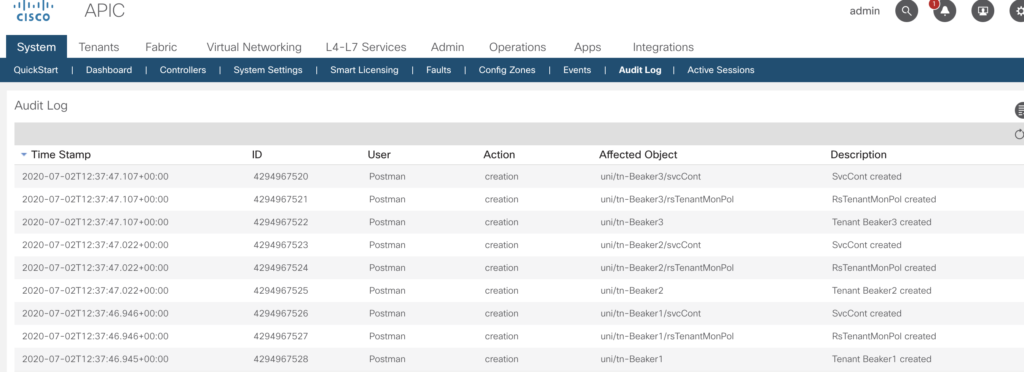
and as well – it is being tracked in the audit log.


At this point – think about user management – rather simple to create a dedicated account for your postman activities, that way it is much easier to track changes.


ACI – Backup – Restore

As we all know – a working backup is a must in every IT configuration. And even more important – the backup ought to be usable for a restore.

As the ACI simulator will always be an untouched configuration after boot we’ll have a look how to apply a backup to restore the configuration.

This approach can be chosen as well to restore a production configuration to a clone – but – please be aware – certain configuration details have to be the same. (e.g. TEP pool, mgmt VLAN, etc.) and can’t be changed.

Creating a snapshot

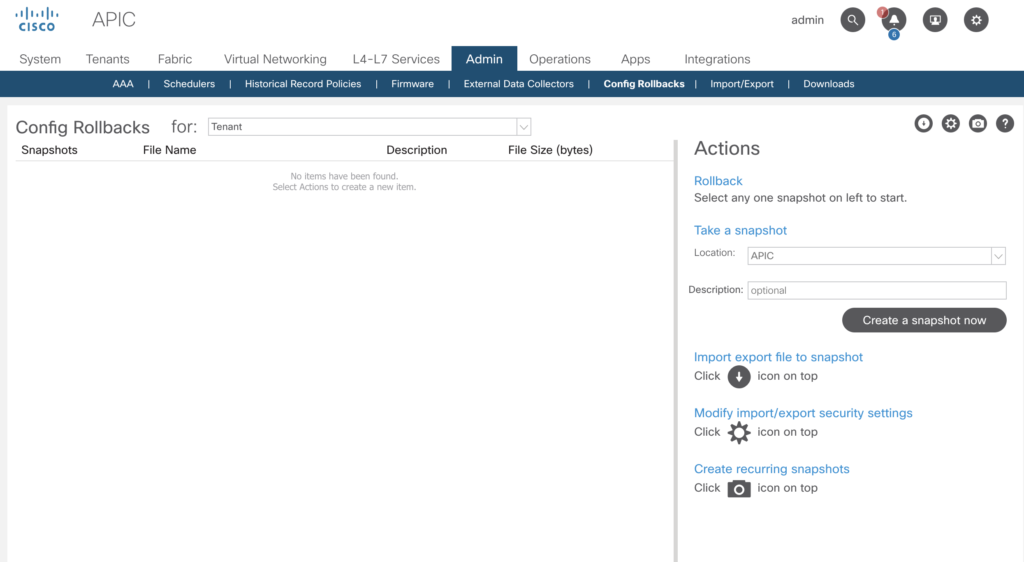
After you’ve done your configuration, it is time to create your backup.

Please move to

–> Admin –> Config Rollbacks


This snapshot is being stored on the apic in directory /data2/snapshots, you can give it name as well.

apic1# pwd
/data2/snapshots
apic1# ls -l
insgesamt 40
-rw-r--r-- 1 ifc admin 40611 29. Jun 20:50 ce2_defaultOneTime-2020-06-29T20-50-49.tar.gz

Now you are able to copy this snapshot file via scp (ftp and sftp is possible as well) to our jump server, it is gzipped tar ball with all the configuration steps you’ve done before.

[root@prod1 apic_backup]# scp admin@192.168.140.160:/data2/snapshots/* .
Application Policy Infrastructure Controller
admin@192.168.140.160's password: 
ce2_defaultOneTime-2020-06-29T20-50-49.tar.gz                                                                                                                     100%   40KB   5.7MB/s   00:00    
[root@prod1 apic_backup]# ls -l
insgesamt 40
-rw-r--r-- 1 root root 40611 29. Jun 22:53 ce2_defaultOneTime-2020-06-29T20-50-49.tar.gz
[root@prod1 apic_backup]# tar tvf ce2_defaultOneTime-2020-06-29T20-50-49.tar.gz 
-rw-r--r-- ifc/admin    525178 2020-06-29 22:50 ce2_defaultOneTime-2020-06-29T20-50-49_1.json
drwxr-xr-x ifc/admin         0 2020-06-29 22:50 idconfig/
-rw-r--r-- ifc/admin       498 2020-06-29 22:50 idconfig/ce2_defaultOneTime-2020-06-29T20-50-49_2_idfile.json
-rw-r--r-- ifc/admin       499 2020-06-29 22:50 idconfig/ce2_defaultOneTime-2020-06-29T20-50-49_31_idfile.json
-rw-r--r-- ifc/admin       499 2020-06-29 22:50 idconfig/ce2_defaultOneTime-2020-06-29T20-50-49_30_idfile.json
-rw-r--r-- ifc/admin       499 2020-06-29 22:50 idconfig/ce2_defaultOneTime-2020-06-29T20-50-49_29_idfile.json
-rw-r--r-- ifc/admin       499 2020-06-29 22:50 idconfig/ce2_defaultOneTime-2020-06-29T20-50-49_28_idfile.json
-rw-r--r-- ifc/admin       499 2020-06-29 22:50 idconfig/ce2_defaultOneTime-2020-06-29T20-50-49_27_idfile.json
-rw-r--r-- ifc/admin     11121 2020-06-29 22:50 idconfig/ce2_defaultOneTime-2020-06-29T20-50-49_26_idfile.json
-rw-r--r-- ifc/admin      5479 2020-06-29 22:50 idconfig/ce2_defaultOneTime-2020-06-29T20-50-49_25_idfile.json
-rw-r--r-- ifc/admin       499 2020-06-29 22:50 idconfig/ce2_defaultOneTime-2020-06-29T20-50-49_24_idfile.json
-rw-r--r-- ifc/admin      1238 2020-06-29 22:50 idconfig/ce2_defaultOneTime-2020-06-29T20-50-49_23_idfile.json
-rw-r--r-- ifc/admin       499 2020-06-29 22:50 idconfig/ce2_defaultOneTime-2020-06-29T20-50-49_22_idfile.json
-rw-r--r-- ifc/admin       499 2020-06-29 22:50 idconfig/ce2_defaultOneTime-2020-06-29T20-50-49_21_idfile.json
-rw-r--r-- ifc/admin       498 2020-06-29 22:50 idconfig/ce2_defaultOneTime-2020-06-29T20-50-49_1_idfile.json
-rw-r--r-- ifc/admin       499 2020-06-29 22:50 idconfig/ce2_defaultOneTime-2020-06-29T20-50-49_19_idfile.json
-rw-r--r-- ifc/admin       499 2020-06-29 22:50 idconfig/ce2_defaultOneTime-2020-06-29T20-50-49_18_idfile.json
-rw-r--r-- ifc/admin      3625 2020-06-29 22:50 idconfig/ce2_defaultOneTime-2020-06-29T20-50-49_17_idfile.json
-rw-r--r-- ifc/admin       499 2020-06-29 22:50 idconfig/ce2_defaultOneTime-2020-06-29T20-50-49_16_idfile.json
-rw-r--r-- ifc/admin       499 2020-06-29 22:50 idconfig/ce2_defaultOneTime-2020-06-29T20-50-49_15_idfile.json
-rw-r--r-- ifc/admin       499 2020-06-29 22:50 idconfig/ce2_defaultOneTime-2020-06-29T20-50-49_14_idfile.json
-rw-r--r-- ifc/admin       499 2020-06-29 22:50 idconfig/ce2_defaultOneTime-2020-06-29T20-50-49_13_idfile.json
-rw-r--r-- ifc/admin       499 2020-06-29 22:50 idconfig/ce2_defaultOneTime-2020-06-29T20-50-49_12_idfile.json
-rw-r--r-- ifc/admin       499 2020-06-29 22:50 idconfig/ce2_defaultOneTime-2020-06-29T20-50-49_11_idfile.json
-rw-r--r-- ifc/admin     12899 2020-06-29 22:50 idconfig/ce2_defaultOneTime-2020-06-29T20-50-49_10_idfile.json
-rw-r--r-- ifc/admin       498 2020-06-29 22:50 idconfig/ce2_defaultOneTime-2020-06-29T20-50-49_9_idfile.json
-rw-r--r-- ifc/admin       498 2020-06-29 22:50 idconfig/ce2_defaultOneTime-2020-06-29T20-50-49_8_idfile.json
-rw-r--r-- ifc/admin       498 2020-06-29 22:50 idconfig/ce2_defaultOneTime-2020-06-29T20-50-49_7_idfile.json
-rw-r--r-- ifc/admin       498 2020-06-29 22:50 idconfig/ce2_defaultOneTime-2020-06-29T20-50-49_6_idfile.json
-rw-r--r-- ifc/admin       498 2020-06-29 22:50 idconfig/ce2_defaultOneTime-2020-06-29T20-50-49_5_idfile.json
-rw-r--r-- ifc/admin       498 2020-06-29 22:50 idconfig/ce2_defaultOneTime-2020-06-29T20-50-49_4_idfile.json
-rw-r--r-- ifc/admin     23082 2020-06-29 22:50 idconfig/ce2_defaultOneTime-2020-06-29T20-50-49_3_idfile.json
-rw-r--r-- ifc/admin      2399 2020-06-29 22:50 idconfig/ce2_defaultOneTime-2020-06-29T20-50-49_32_idfile.json
-rw-r--r-- ifc/admin    143424 2020-06-29 22:50 idconfig/ce2_defaultOneTime-2020-06-29T20-50-49_20_idfile.json
drwxr-xr-x ifc/admin         0 2020-06-29 22:50 dhcpconfig/
-rw-r--r-- ifc/admin      6469 2020-06-29 22:50 dhcpconfig/ce2_defaultOneTime-2020-06-29T20-50-49_255_idfile.json
drwxrwxr-x ifc/admin         0 2020-06-29 22:33 packages/
drwxr-xr-x root/root         0 2020-06-29 22:34 vmmconfigfile/

ok – so far – so good.

Let us now try to restore the snapshot.

We restart the simulator.

While waiting for the initial start, I’ve created a backup user on the jump server, and moved the snapshot to /home/backup.

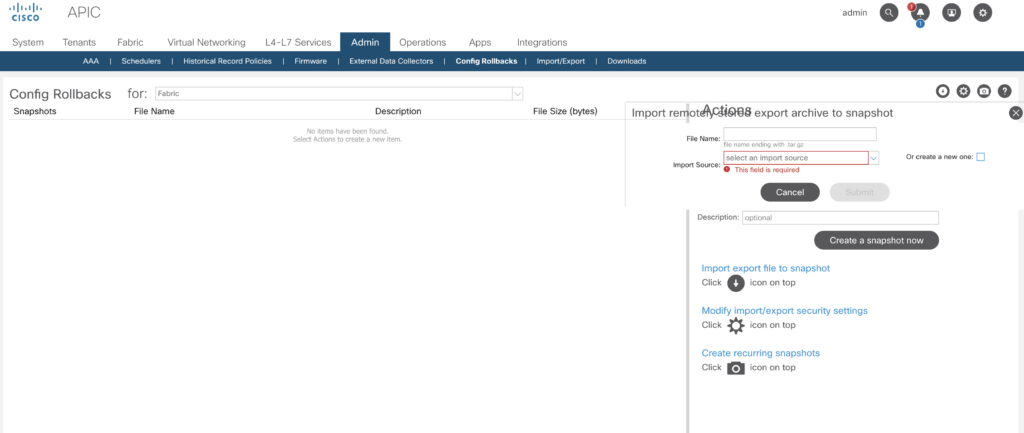
We now move to the very same location (-> Admin -> Config Rollbacks) , but this time we do select the up arrow in the right upper left.


and fill in the details to advise the system to pull the backup file.


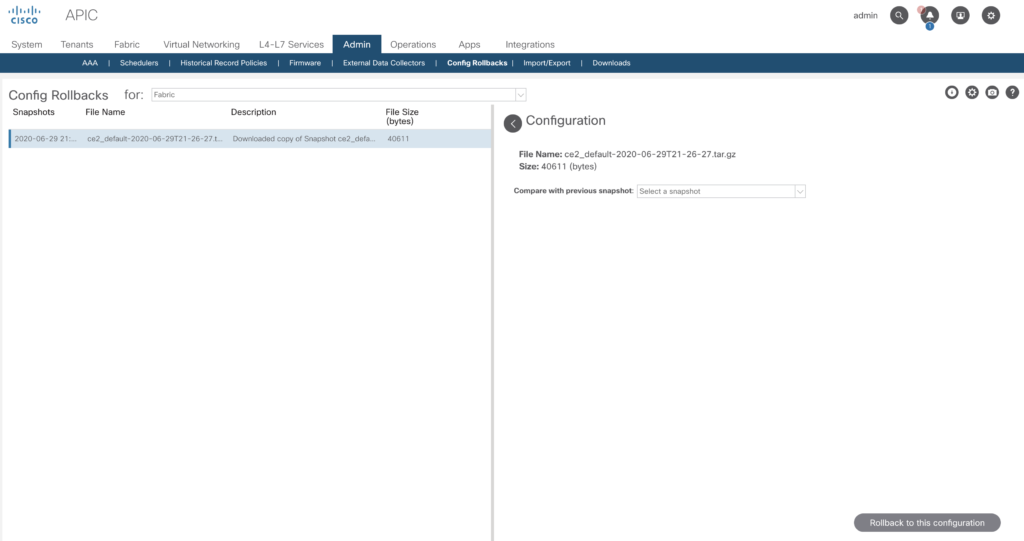
The upload happens pretty fast and you’ll be able to see the snapshot file.


And – the big moment – press Rollback in the lower left corner.

One last question:


and more or less immediately you’re going to see a green checkmark – nice.


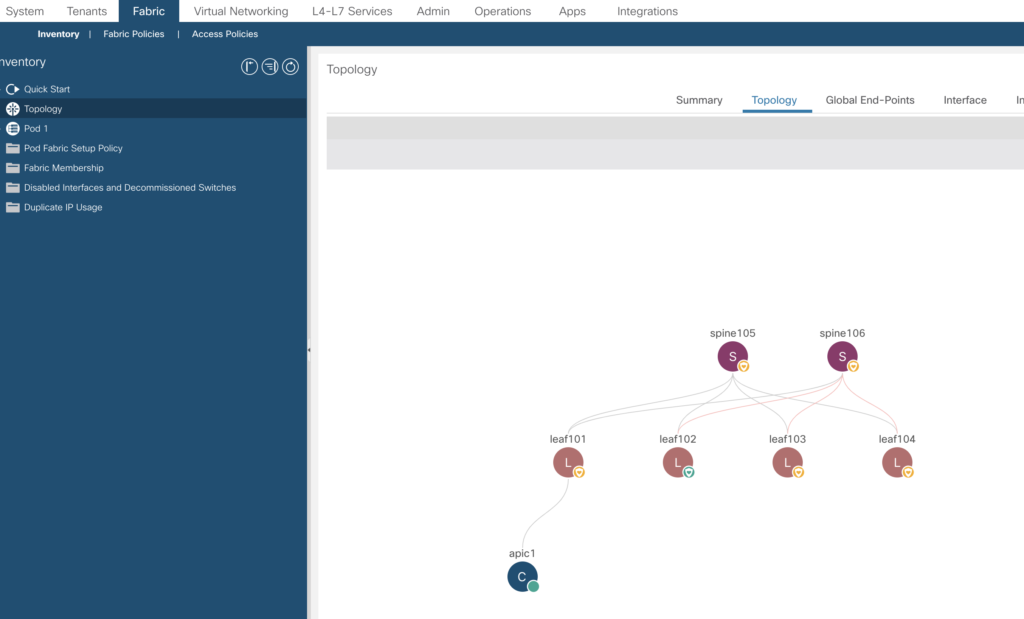
Give the fabric a while to apply all the changes this will cause a lot of activity – but you’ll see the setup as you’ve made the snapshot prior shutting down the simulator.

ACI Simulator SSL with Letsencrypt

When connecting to the APIC you are enforced to use SSL. And in this case, you are either expected to use a valid SSL cert or a self-signed one. In the latter case and if this is not configured properly, you’ll get bothered by those browser warnings.

One option is to request certs from a commercial provider (being one or two year valid) or – and this is becoming more and more standard – using a letsencrypt.org validated cert.

https://letsencrypt.org/

Disadvantage of those certs – they have to be renewed every three months.

If you are building up a SSL based communication, you need on your SSL accepting end.

  1. the private key of the server (that must not be visible publically)
  2. the chain PEM
  3. the certificate itself.

The Certs are managed within APIC at

Admin -> AAA -> Security (menu left) -> Public Key Management.


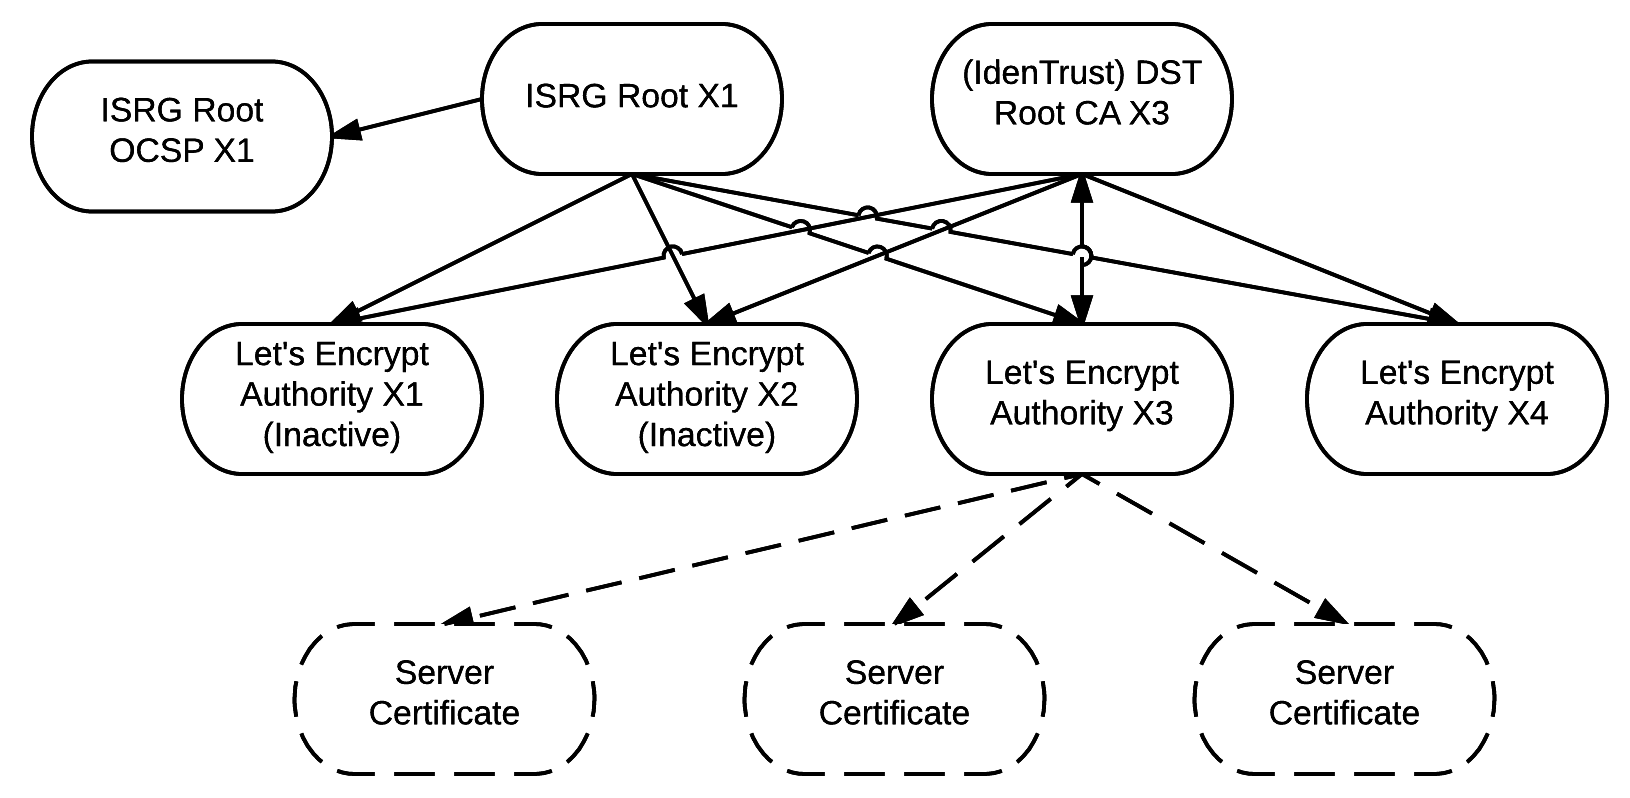
We’ll start with the Certificate Authorities. The diagram (nicked from letsencrypt) shows the relationships.

ISRG Key relationship diagram

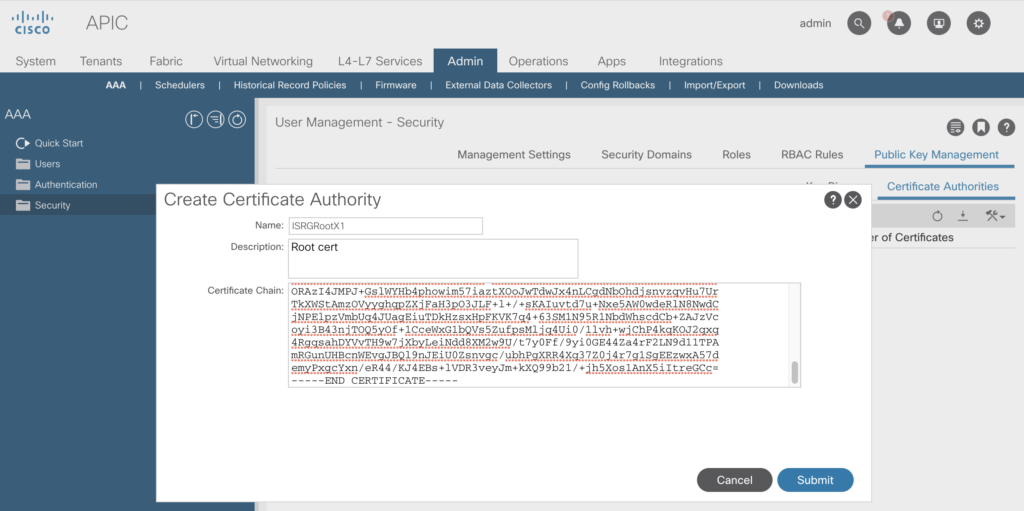
So we ingest first the ISRG Root X1 certificate

https://letsencrypt.org/certs/isrgrootx1.pem.txt

just copy the text and paste it into the box opening up when selecting „Create Certificate Authority“


After some seconds (including a to be ignored message about web sockets to be restarted) the cert is visible.

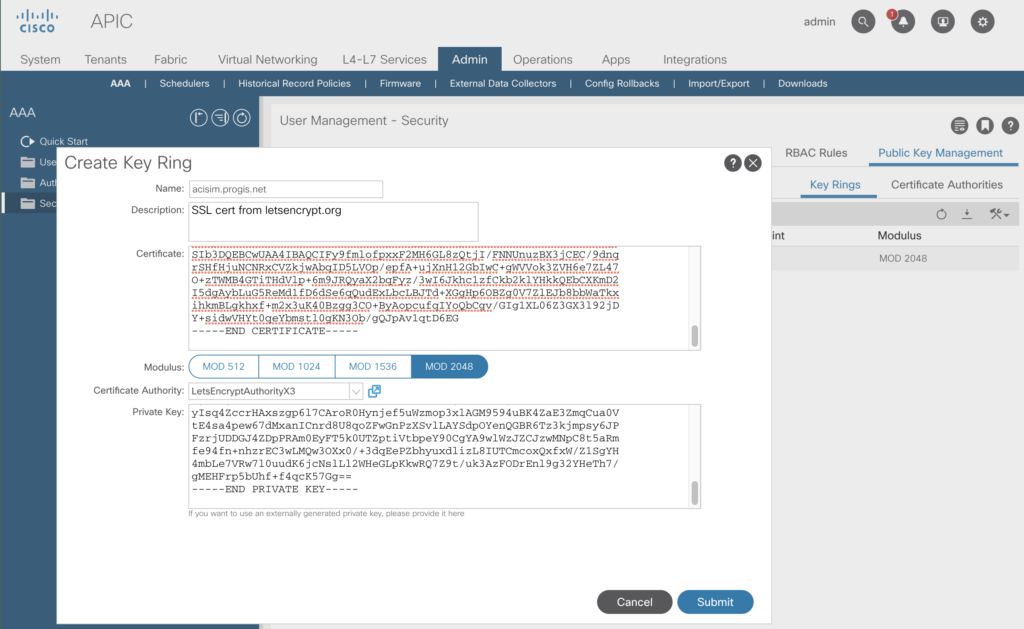
As we’ve got now a Certificate Authority, we are able to import the certificate and the private key in the key ring section.


As now the key has been successfully imported – the final step is to enable his per policy.

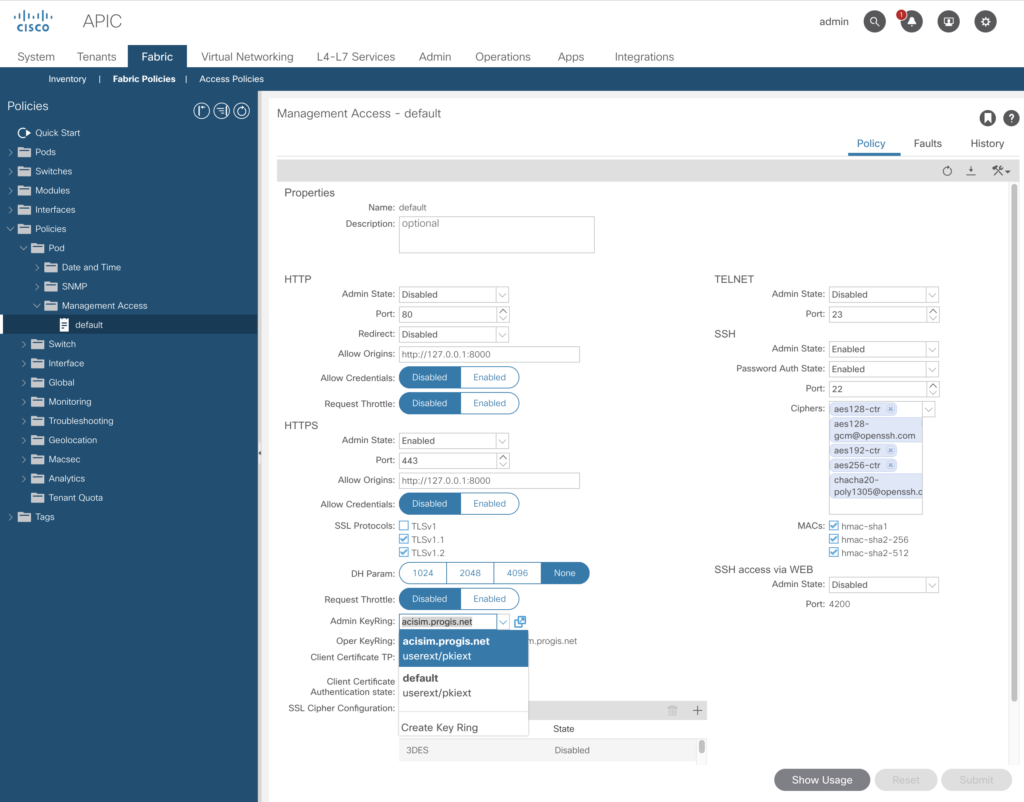
To achieve this change, you to go to:

-> Fabric -> Fabric Policies -> Policies (left menu) -> Pod -> Management Access -> default

Choose there the Admin KeyRing you’ve just created.


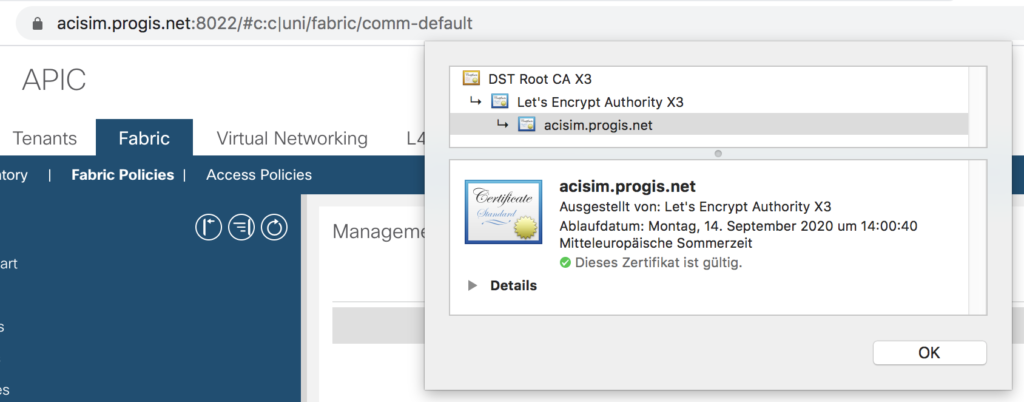
A quick check via a webbrowser – all set.


By the way – in this configuration tab you are able to enable plain http as well – e.g. to use a NGINX reverse proxy in front of.

NGINX Setup

To use Nginx as a reverse proxy it is required to handle the websocket connections properly.

If take away the SSL offloading from the APIC and move it to the Nginx, things are much easier to handle. Requires to turn on http internally, and to create this configuration.

server {
    listen       443 ssl http2;
    server_name  acisim.progis.net;
        ssl_certificate /etc/letsencrypt/live/acisim.progis.net/fullchain.pem;
        ssl_certificate_key /etc/letsencrypt/live/acisim.progis.net/privkey.pem;

    ssl_session_timeout  5m;
ssl_protocols TLSv1.2;
#    ssl_protocols  SSLv2 SSLv3 TLSv1;
    ssl_ciphers  ALL:!ADH:!EXPORT56:RC4+RSA:+HIGH:+MEDIUM:+LOW:+EXP;
    ssl_prefer_server_ciphers   on;

    location / {
    	    proxy_pass http://192.168.140.40:80;
            proxy_set_header X-Real-IP  $remote_addr;
            proxy_set_header X-Forwarded-For $proxy_add_x_forwarded_for;
	    proxy_set_header Upgrade $http_upgrade; # websocket handling
    	    proxy_set_header Connection "Upgrade"; # websocket handling
            proxy_set_header Host $host;
client_max_body_size 128m;
    }
}

The two lines tagged with # websocket handling will do the trick.

APIC – The Application Policy Infrastructure Controller

The APIC is the core component for ACI. All configuration will be issued and maintained from this system.

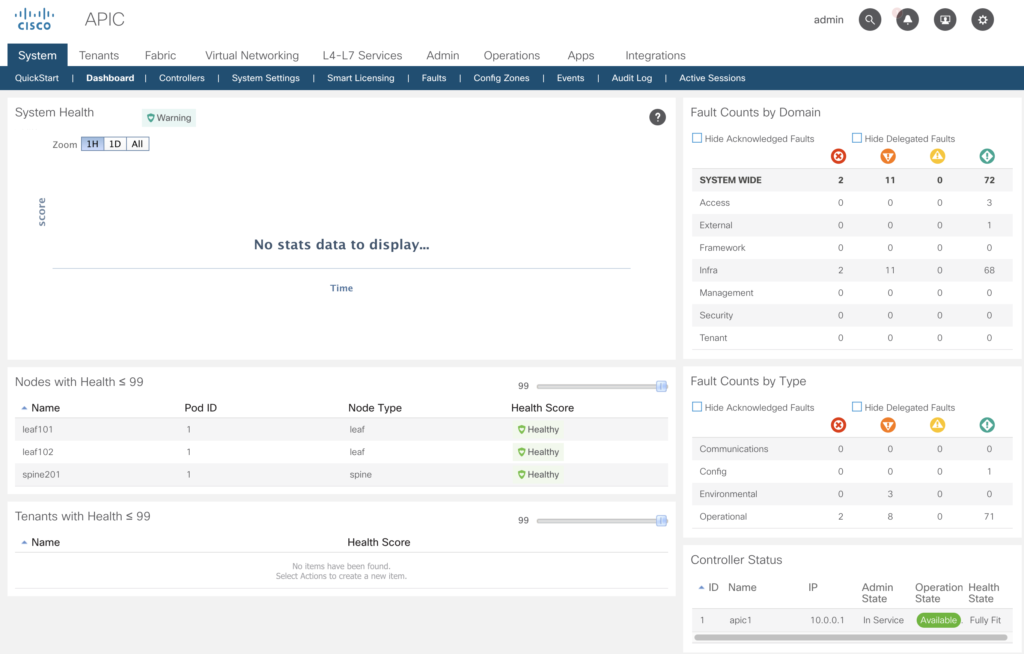
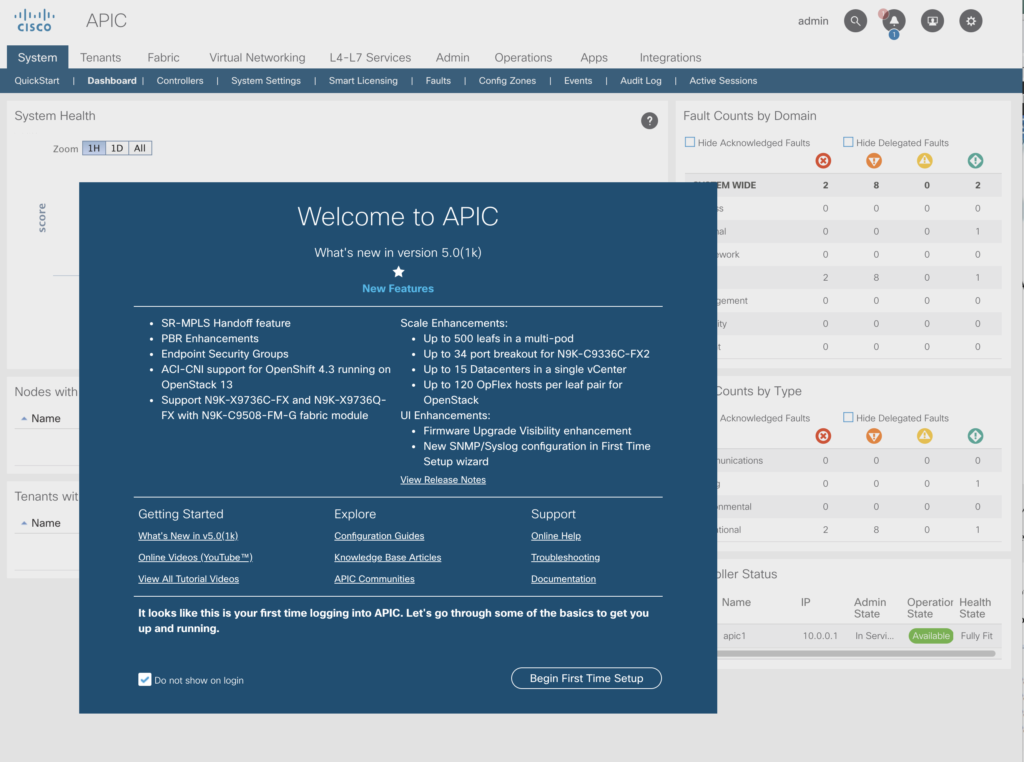
After the login the dashboard is being presented – will give you an overview on system health and some statistics.


In our simulator we’ve got only one APIC, in production setups there have to be at least three nodes. That’s why you will see constantly in your simulator a warning in your notification field.

Three nodes to avoid the risk of cluster fragmentation (sometimes called „split brain“).

Briefly explained – if there are only two nodes acting as APIC, and they will lose connectivity – there is no way to decide for the now isolated APIC, if the other node is down or just not reachable. Worst case scenario for this failure – both nodes are guessing, the other one is down, and that way the configuration will differ.

To avoid this situation the solution is to provide a n+1 requirement. Means – only if a node is part of a majority, than this node will continue to run. So – if e.g. apic1 and apic2 are having connectivity, but apic3 hasn’t, apic3 will cease operation.

After login you’ll find many tabs and sub-tabs. We’ll just go briefly through them.

At the top right there are four icons, the second from the right expands to:


Nice – Change My SSH Keys – here you are able to store the public key from your jump server (if you are using one).

After deploying – the passwordless ssh-key based access is working. Automatically on all nodes.

iMac:~ andreasfassl$ ssh -l admin 192.168.140.40
Application Policy Infrastructure Controller
Last login: 2020-06-18T14:08:12.000+00:00 UTC
apic1# 
Connection to 192.168.140.40 closed.
iMac:~ andreasfassl$ ssh -l admin 192.168.140.41

admin@leaf1:~> 

NX-OS CLI

While exploring the new environment you’ll find out – the NX-OS is modified CentOS-System. When logging in, you’ll be able to use both – the „traditional“ linux commands and as well the NX-OS commands.

Reference document for all NX-OS commands is available here:

https://www.cisco.com/c/en/us/td/docs/switches/datacenter/aci/apic/sw/1-x/cli/nx/cfg/b_APIC_NXOS_CLI_User_Guide.html

I’ve found as well a nice „cheat sheet“ on the community portal (maybe outdated).

https://community.cisco.com/t5/data-center-documents/cisco-aci-cli-commands-quot-cheat-sheet-quot/ta-p/3145799

When accessing the ACI components via the CLI – you ought to be really, really careful! When accessing the APIC via the GUI, there is quite a lot of logic active behind the scene to avoid evil things to happen.

In the beginning (APIC release 1.0 – 1.2) the default CLI was the bash shell, this has changed to the NX-OS style CLI.

Being used to CISCO IOS, you’ll find out the command completion is the same – by using the „TAB“ key will help you. As well as using a „?“ to get the next command option.

apic1# show running-config ?
 <CR>
 aaa                      Show Authentication, Authorization, and Accounting configuration
 all                      Show running-config with defaults
 analytics                Show external analytics reachability information
 bd-enf-exp-ip            Enable Enforced BD Flag
 bgp-fabric               Border Gateway Protocol (BGP)
 callhome                 Show Callhome policy
 clock                    Show Clock
 comm-policy              Show communication policy
 controller               Show Controller Node
 coop-fabric              Council Of Oracles Protocol (COOP)
 crypto                   Show crypto settings
...

To get the entire system setup –

apic1# show running-config all
# Command: show running-config all 
# Time: Thu Jun 18 11:44:32 2020
  power redundancy-policy default
    redundancy-mode combined
    exit
  aaa banner 'Application Policy Infrastructure Controller'
  aaa user default-role no-login
  aaa authentication login console
    realm local
    exit
  aaa authentication login default
    realm local
    exit
  aaa authentication login domain fallback
    realm local

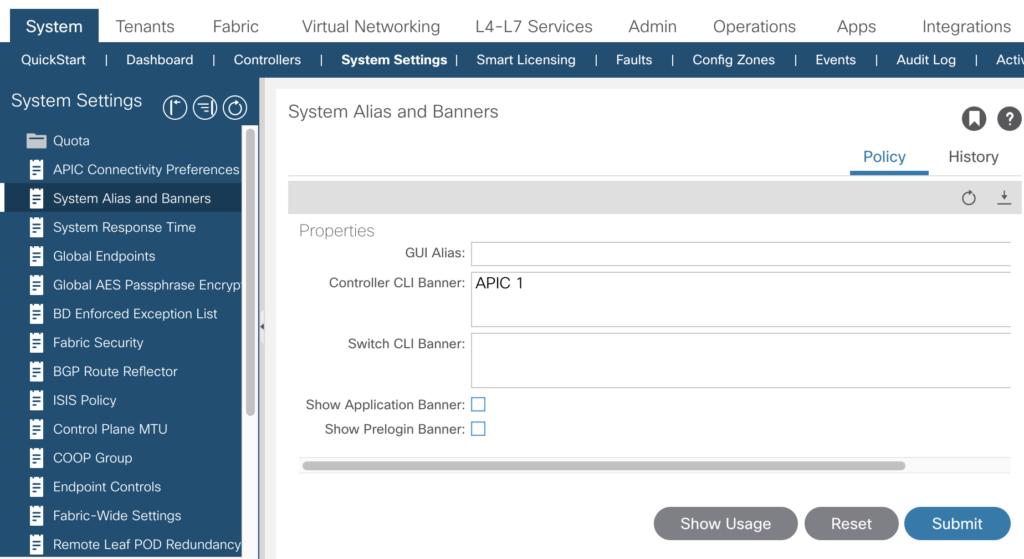
Just as a quick example – the Controller CLI Banner can be changed by either the CLI or the GUI.

After pressing „Submit“ the change is visible as well via the CLI

apic1(config)# show running-config aaa 
# Command: show running-config aaa
# Time: Thu Jun 18 11:54:32 2020
  aaa banner 'APIC 1'
  aaa authentication login console
    exit
  aaa authentication login default
    exit
  aaa authentication login domain fallback
    exit

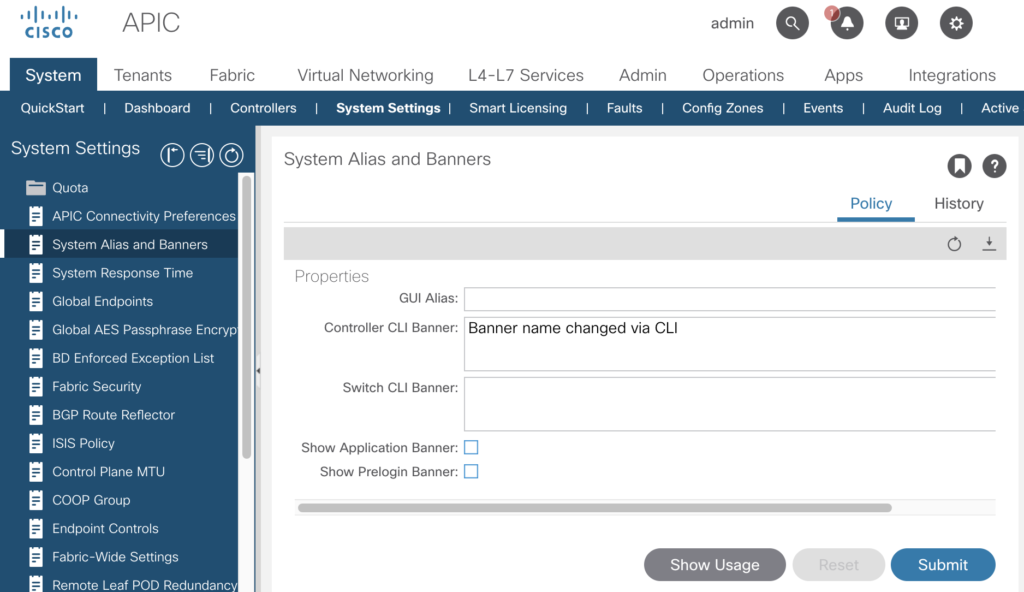
And after changing it via the CLI:

apic1(config)# aaa banner "Banner name changed via CLI"
apic1(config)# 

you’ll see the change (after pressing the refresh button right over the properties box) immediately.


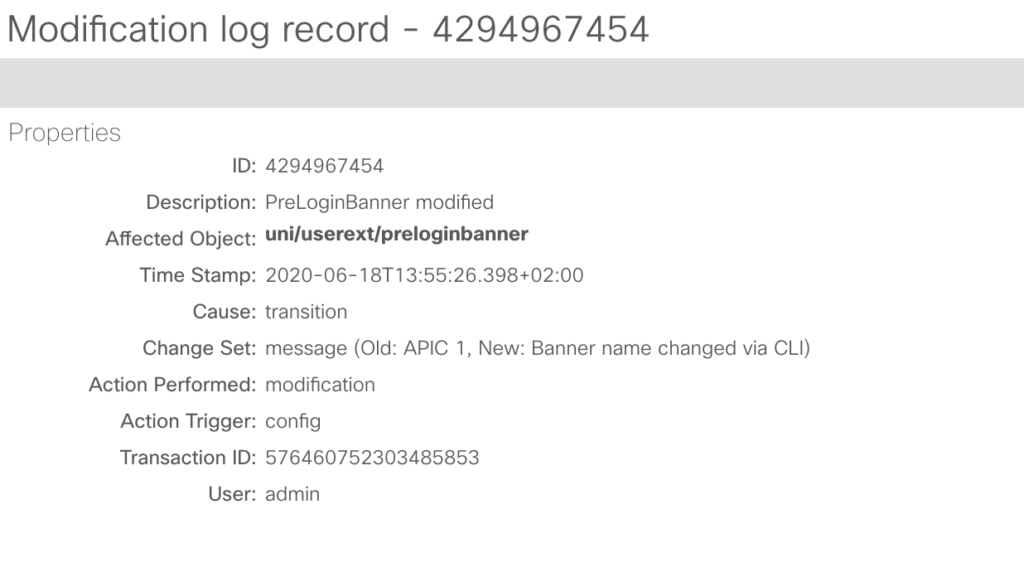
And the changes will be logged by auditing as well.


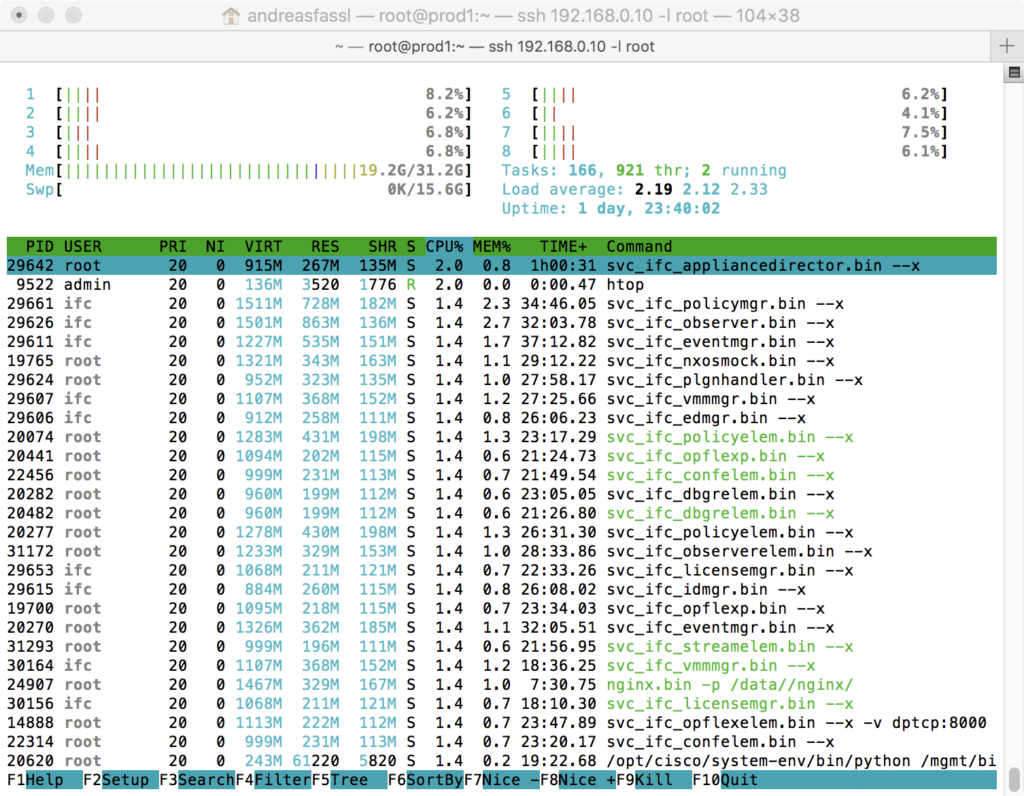
From a linux perspective – many of the standard commands are available. But – and this is to protect the environment and in the end yourself – the capabilities are restricted, you won’t be able to root level access.

quite nice – included is my favorite „htop“ command.

If you are used to linux – you should spend some time to explore the box – but don’t waste too much time.

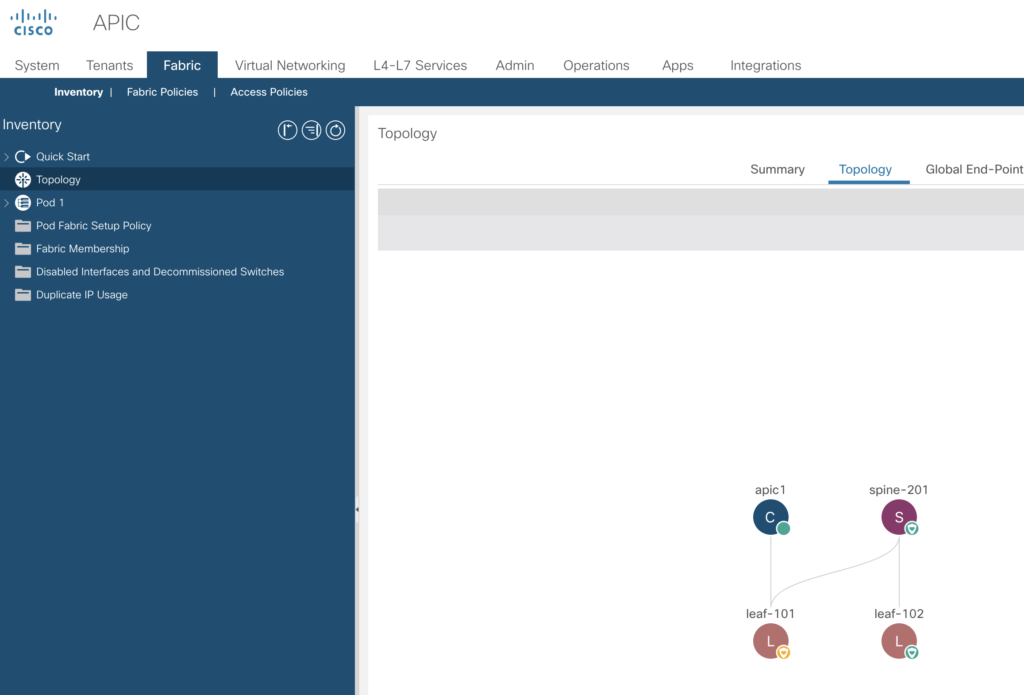
And you’ll see as well, that the simulated components (spine, leaf) are detached processes running on that VM.

apic1# ps -ef | grep leaf
root     18791     1  0 Jun16 ?        00:00:00 SCREEN -dmS leaf1
root     19573     1  0 Jun16 ?        00:00:00 SCREEN -dmS leaf2
apic1# ps -ef | grep spine
root     20919     1  0 Jun16 ?        00:00:00 SCREEN -dmS spine1

The ACI Simulator

Learning by doing is in most of the time the best practice approach in IT. Even the best training slides won’t deliver the same experience when using an environment you are interested to get used to.

But – for ACI – this will require quite a lot of stuff – and a basic environment is quite expensive just for learning. That’s why Cisco is offering for certain parties a simulator environment.

Cisco is offering quite a lot of sandbox environments, too.

https://developer.cisco.com/docs/sandbox/#%21data-center/overview

Part of this is the ACI (Ver. 4.0) available via this link.

sandboxapicdc.cisco.com

username: admin
password: ciscopsdt

There is a download available to build up your own lab system.

This consists of a spine, two leafs and an APIC, all in a single VM (identical setup to that one from sandboxapicde).

Software (you do need an account with the proper provisioning) can be downloaded at

https://www.cisco.com/c/en/us/products/cloud-systems-management/application-centric-infrastructure-simulator/index.html

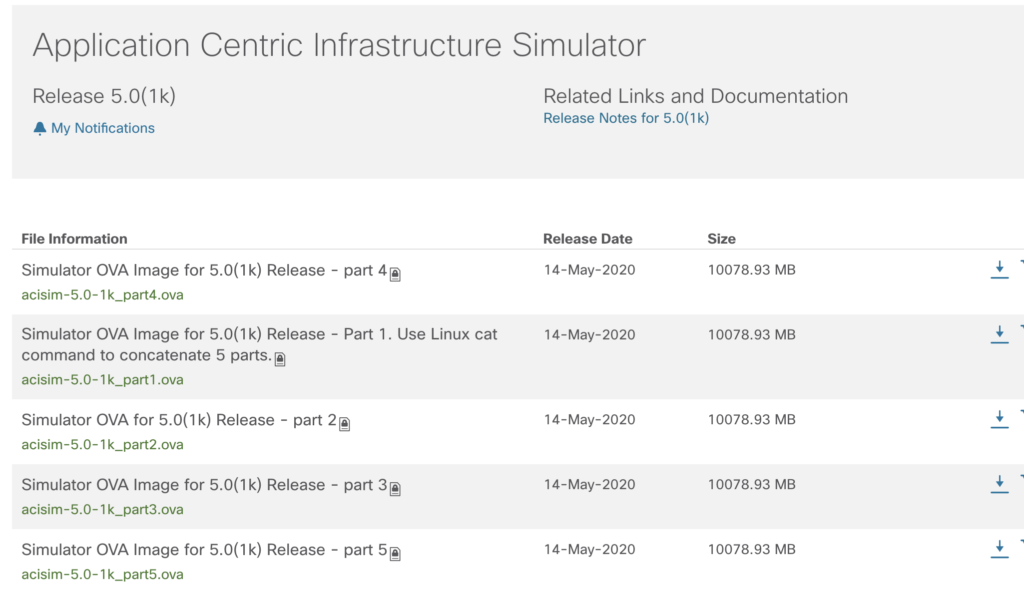
At the time of this writing the latest version is 5.0 – consisting of five parts, each part is about 10 GB.

Please check as well the release notes for further details:

https://www.cisco.com/c/en/us/td/docs/switches/datacenter/aci/apic/sw/5-x/release-notes/cisco-aci-simulator-release-notes-501.html

and as well

https://www.cisco.com/c/en/us/support/cloud-systems-management/application-centric-infrastructure-simulator/series.html

First step after downloading – put the five parts together into one file.

On the linux/unix console it is:

cat part1 part2 part3 part4 part5 > aci.ova

and similar in Windows within the command window.

type part1 part2 part3 part4 part5 > aci.ova

Just replace part1 etc. with the names of the downloaded ova parts. The order has to be kept.

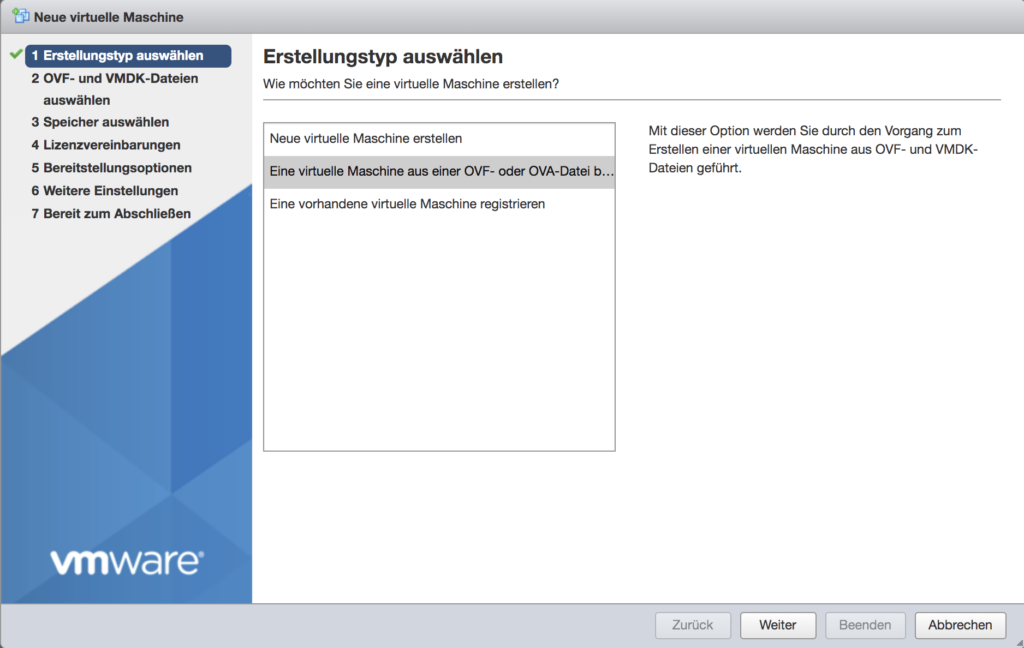
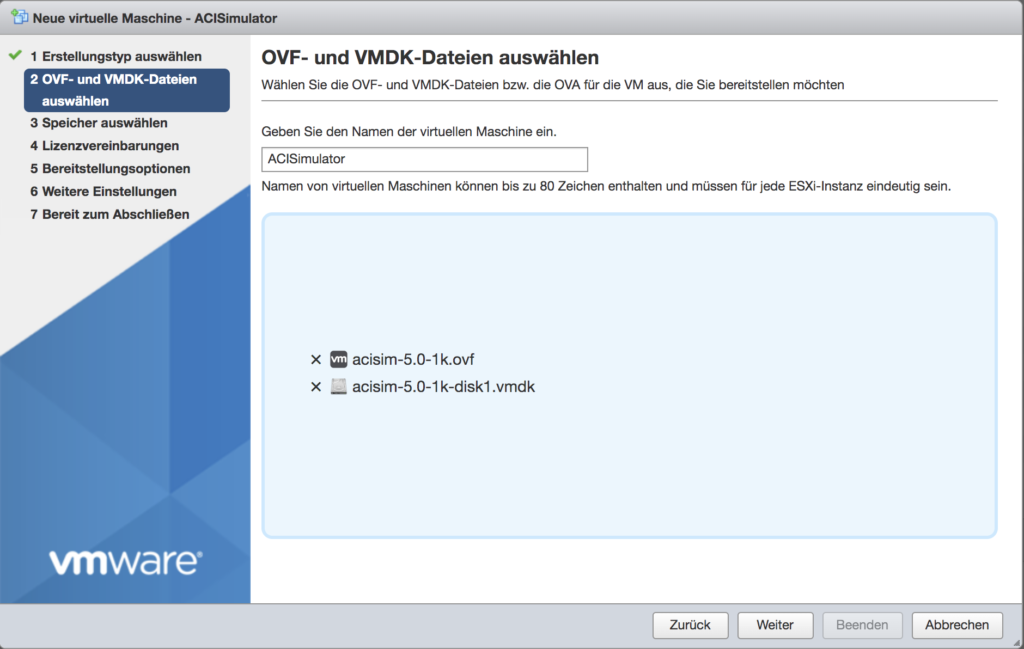
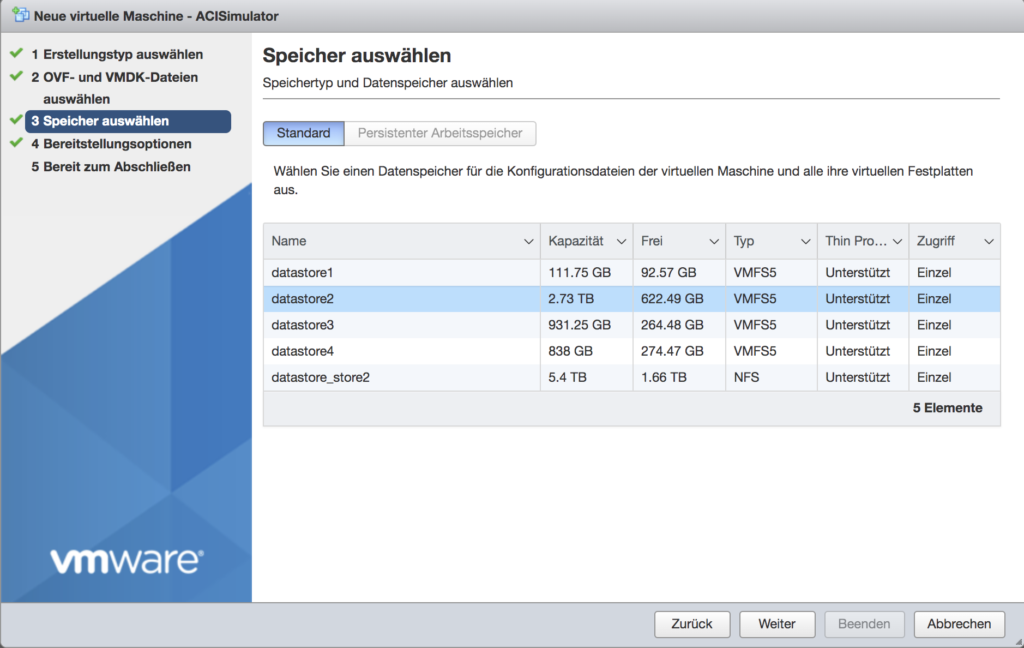
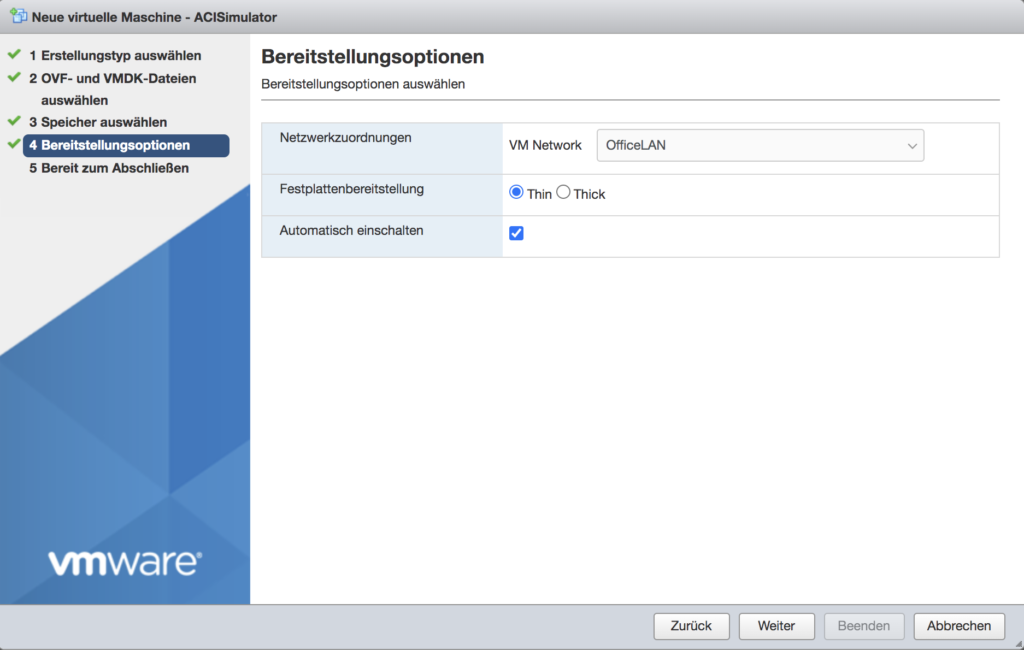
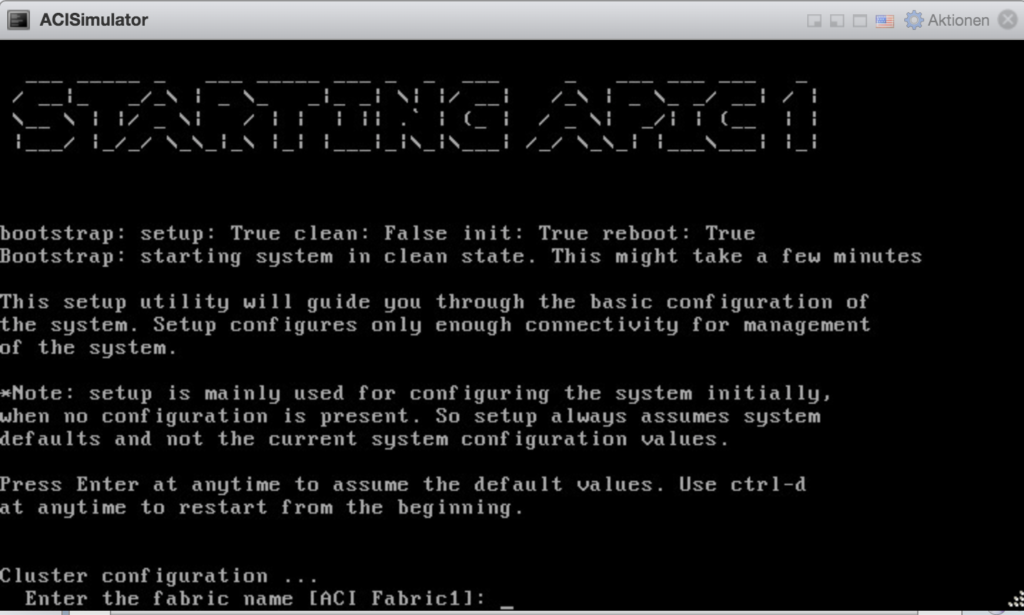
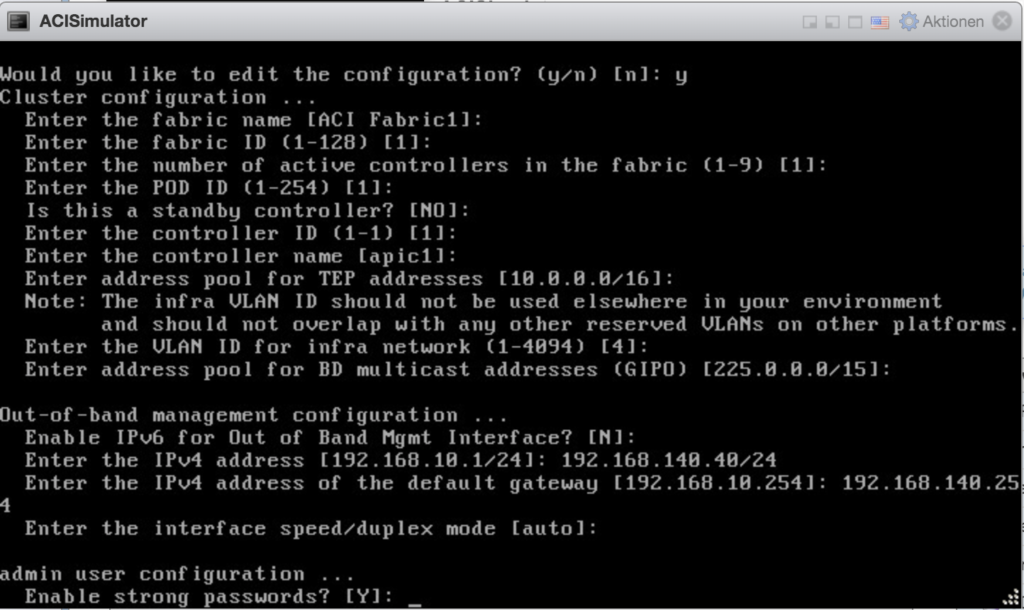
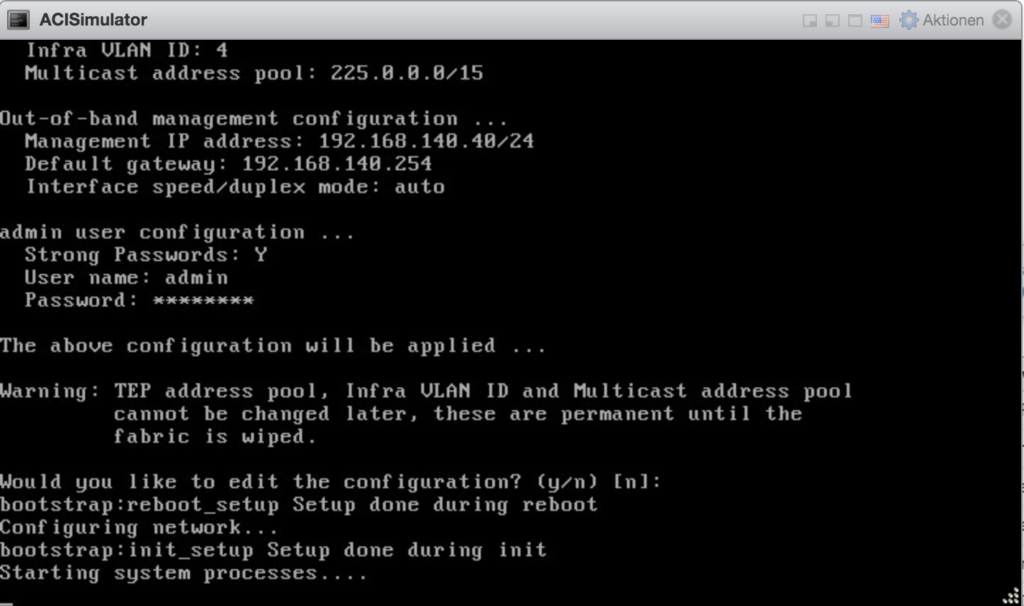
To run this ova file, it is possible to use all hypervisors being able to use OVA file format like VMware Workstation or VMware ESXi.

This tutorial is about deploying the simulator on ESXi. This will require some extra steps, as the traditional approach (uploading of the ova file via the webinterface) won’t work due to the size of the ova file (50 GB).

But – this is not a problem. A closer look shows the nature of an .ova file. It is just a tar archive with the ending .ova.

# tar tvf aci.ova

-rw-r--r-- someone/64     5600 2020-05-15 03:03 acisim-5.0-1k.ovf

-rw-r--r-- someone/64      211 2020-05-15 03:03 acisim-5.0-1k.mf

-rw-r--r-- someone/64 4019572736 2020-05-15 03:03 acisim-5.0-1k-file1.bin

-rw-r--r-- someone/64 48823041536 2020-05-15 03:51 acisim-5.0-1k-disk1.vmdk

This technote describes how to deploy an .ova file on ESXi.

https://docs.vmware.com/en/VMware-vSphere/6.7/com.vmware.vsphere.html.hostclient.doc/GUID-8ABDB2E1-DDBF-40E3-8ED6-DC857783E3E3.html

Sizing of the VM is crucial – please calculate at least 16 GB or better 24 GB RAM.

As said – it is possible to use VMware Workstation on a PC as well, but RAM requirements are the same.

In your Vsphere webclient right-click on your host inventory and select „Create/register VM“ (my screenshots are in german, but quite easy to find the same in your local language).


Now choose a name – and – as already mentioned – for smaller OVA files you’d be able to drag-and-drop, but this is limited to 1 GB.


Now select a datastore where the upload will be placed


and a network.


That’s it. Now a little more patience is required – the upload of the disk container will take some time.


After the successful upload you’ll be able to boot the VM.

IMPORTANT : The simulator has to be reconfigured after each boot – the configuration isn’t persistent.

Ok – we’ll just use the default values except for the local network details (in this case 192.168.140.40/24).


Using the account „admin“ and the password you’ve provided you’ll be able to login.


To get access from the outside world you’ve to set


for the virtual switches promiscuous-mode to accept, as well as for mac address changes and forged transits.

After those changes you’ll be able to logon from the „outside“ world.


Lets begin now with the base configuration.

The simulator delivers four entities in one „pod“:

Lets go now through the basics of a fully working APIC setup.

Fabric Membership

Login to your web-based console and click on „Fabric“ -> Inventory -> Fabric-Membership (within the left-pane)

You’ll see there the first leaf – With serial number TEP-1-101. Right click on this one, and select register.

Chose a name and just wait a while.

After some time the spine node will be discovered.


It will be added as well that way.


After adding all three nodes, the status should be active.

If you go now to

Fabric -> Inventory -> Topology -> Pane „Topology“ you’ll see your lab setup.

And it will explain the discovery path.

  1. APIC sees leaf-101 – and adds to inventory
  2. Now APIC will discover spine-201 – add to inventory
  3. If spine-201 is active – leaf-102 will be discovered

The Fabric -> Inventory -> Pod 1 -> leaf101 -> Sub Tab Interface will display the „physical“ connections to this leaf switch (port 41 and 49 in green).

Same for leaf-102 (port 49)


and the spine201 (port 01 and 02).

Maybe best to go through the quick start guide first.


Next step

BGP

Out Of Band Management

This takes care of the connectivity to the outside world. The GUI auto-assigns IP-addresses you’ve entered in the field „IPv4 Starting Address“ to the nodes of your simulator setup.


After setting those IP-addresses – you’ll be able to login from your remote system to the components.

DNS

NTP-Servers


If you want to change it later – you’ll find the configuration via:

-> Fabric -> Fabric Policies -> Policies -> Pod -> Date and Time -> Policy Default

And as a last step

Additional configuration

based on Cisco best practices.


After this you’ll see in the overview:


SNMP Configuration

We’ll just choose a very simple setup, with the well-known public community string, and do ignore those more strict v3 login features.